HYT TC-580 Owner's Manual
Hide thumbs
Also See for TC-580:
- Service manual (71 pages) ,
- Owner's manual (48 pages) ,
- Service manual (13 pages)
Table of Contents
Advertisement
Preface
Thank you for purchasing HYT TC-580 portable radio. It incorporates ergonomic design, and practical
features such as front panel programming and DTMF Encode & Decode. You can conveniently customize
radio settings and make calls.
To derive optimum performance from your radio, please read the Safety Information Booklet and Owner's
Manual carefully before use.
Advertisement
Table of Contents

Related Manuals for HYT TC-580


Summary of Contents for HYT TC-580
- Page 1 Preface Thank you for purchasing HYT TC-580 portable radio. It incorporates ergonomic design, and practical features such as front panel programming and DTMF Encode & Decode. You can conveniently customize radio settings and make calls. To derive optimum performance from your radio, please read the Safety Information Booklet and Owner’s...
- Page 2 Icon Information The following icons are available through this manual: Caution: indicates situations that could cause damage to your radio. Note: indicates tips that can help you make better use of your radio. Term Explanation The following terms will appear through this manual: Key Operation Short press: to press a key and release it quickly.
- Page 3 The HYT product described in this manual may include HYT computer programs stored in memory or other media. Laws in the PRC and/or other countries or areas preserve for HYT exclusive rights for HYT computer programs. The purchase of this product shall not be deemed to grant, either directly or by implication, any rights to the purchaser with respect to HYT computer programs.
- Page 4 RF Energy Exposure Compliance ● Your radio is designed and tested to comply with a number of national and international standards and guidelines (listed below) regarding human exposure to radio frequency electromagnetic energy. This radio complies with the IEEE and ICNIRP exposure limits for occupational/controlled RF exposure environment at operating duty factors of up to 50% transmitting and is authorized by the FCC for occupational use only.
- Page 5 EU Regulatory Conformance The equipment is in compliance with the essential requirements and other relevant provisions of the Directive 1999/5/EC. Note: The above information is applicable to EU countries only. FCC Licensing Information Part 15 Compliance This equipment has been tested and found to comply with the limits for a Class B digital device, pursuant to part 15 of the FCC Rules.
-
Page 6: Table Of Contents
Contents Checking Items in the Package .................... 7 Radio Overview ........................8 Radio Controls..........................8 Programmable Keys ........................9 Before Use.......................... 10 Charging the Battery........................10 Assembly and Disassembly......................11 Status Indications ....................... 13 LCD Icons............................13 LED Indicator..........................13 Basic Operations ........................ 15 Turning the Radio On/Off.......................15 Entering Power-on Password ......................15 Adjusting the Volume ........................15 Selecting a Zone..........................15... - Page 7 Reverse Display ..........................28 Signaling Introduction ......................29 CTCSS/CDCSS ..........................29 Dual Tone Multiple Frequency (DTMF) ..................29 Manual Program ......................... 31 CH Set ............................31 Zone Set ............................34 Troubleshooting ........................36 Care and Cleaning......................37 Optional Accessories ......................38 Appendix: Input Method...................... 40...
-
Page 8: Checking Items In The Package
Checking Items in the Package Please unpack carefully and check that all items listed below are received. If any item is missing or damaged, please contact your dealer. 批注 [x1]: 排版时请注意与后 面充电图中的适配器保持一 致。 Battery Rapid-rate Charger (for Li-Ion battery) Power Adapter (different P/N for different countries and areas) Antenna Belt Clip... -
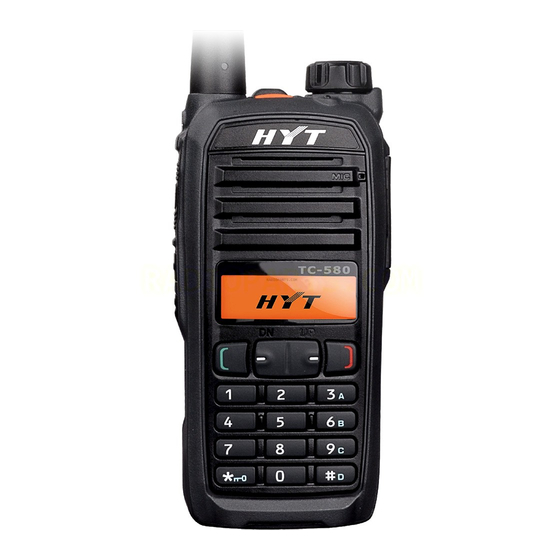
Page 9: Radio Overview
Radio Overview Radio Controls Part Name Part Name ○ ○ Strap Hole Microphone ○ ○ Antenna Speaker ○ ○ PTT Key Accessory Jack Cover ○ ○ SK1 (programmable) Numeric Keypad ○ ○ SK2 (programmable) Battery Latch ○ ○ LCD Display Accessory Jack ○... -
Page 10: Programmable Keys
Radio On-Off/Volume ○ Control Knob Programmable Keys For enhanced convenience, you may request your dealer to program the keys SK1, SK2, and TK as shortcuts to the functions listed below: Shortcut Keys Description To adjust power level through one button Adjust Power Level press. -
Page 11: Before Use
Before Use Charging the Battery Use only the charger and battery specified by HYT. Charger LED can indicate the charging process. Charge Diagram 批注 [x2]: 排版时请注意与前 面充电图中的适配器保持一 致。 Procedures Connect the power adapter to AC source. See arrow 1. Plug the power adapter into the rear socket of the charger. See arrow 2. -
Page 12: Assembly And Disassembly
Note: Be sure to read the Safety Information Booklet, to get necessary safety information. Assembly and Disassembly Attaching the Antenna Turn the antenna clockwise to fasten it. To remove the antenna, rotate it counter-clockwise. Attaching the Battery 1. Press the belt clip and slide the battery into the radio’s slot. 2. - Page 13 2. Align the screw holes on the belt clip with those on the radio’s body, and then tighten the screws. To remove the belt clip, loosen the screws. Attaching Accessories 1. Open the accessory jack cover. 2. Plug an accessory into the accessory jack, and then tighten the screw. To remove accessories, loosen the screw first.
-
Page 14: Status Indications
Status Indications LCD Icons Icon Name Icon Description There is no signal; RSSI There is signal for receiving; Transmit Icon Transmission is in progress; Scanning is in progress; Scan Icons Scanning pauses on a non-priority channel; Scanning pauses on Priority Channel 1; Transmit Power The current channel is operating at low power;... - Page 15 Orange LED glows. A call is transmitted (within the Auto Reset Time) Orange LED flashes slowly. A call is received (within the Auto Reset Time) Orange LED flashes rapidly. A call is missed...
-
Page 16: Basic Operations
Basic Operations Turning the Radio On/Off Rotate the Radio On-Off/Volume Control knob clockwise/counter-clockwise until a click is heard to turn the radio on/off. Entering Power-on Password You may go to the menu “Settings->PowerOn PSW” to set the password on or off. See PowerOn PSW on page 19 for more details. -
Page 17: Selecting A Channel
Note: You may include channels in a zone in Manual Program mode, or ask your dealer to include them in a zone. Selecting a Channel The radio supports up to 256 channels. You may select a channel through any of the following methods: Press to select your desired channel;... -
Page 18: Adjusting Power Level
This function may not be available in certain countries or regions. Please contact your local 批注 [x4]: 增加说明:在某些 dealer for more information. 国家或地区, 此功能的使用可 能会受到限制, 具体请咨询当 Adjusting the Power Level 地经销商。 Generally, we recommend you to adopt low power for battery saving. However, if you cannot communicate with radios located at a distant place with low power, please select high power. -
Page 19: Menu Navigation
Menu Navigation Radio Set Menu Call Keypad Zone Settings Scan List Mode On the home screen, press to access the main menu. Then press to select a menu option from Call List, Zone, Settings, Scan, and Keypad Mode. Call List MENU 1/5 ◄Call List ►... - Page 20 This menu includes the following sub-menus: VOX Gain To select a VOX gain level. Available options Off / Level 1 / Level 2 / Level 3 / Level 4 / Level 5 Note: Higher gain level represents higher sensitivity. If this option is set to Off, the VOX feature will not work even if it is enabled.
-
Page 21: Scan
To set the volume level for key press alert such as front panel key press alert, error alert, TX inhibit alert and cycle alert. Available options: Off / Level 1 / Level 2 / Level 3 / Level 4 / Level 5 Note: Higher level represents higher volume. - Page 22 Channel: You can input channel number through the keypad. DTMF: You can input DTMF code through the keypad. Frequency: You can input frequency through the keypad. Note: This function may not be available in certain countries or regions. Please contact your local 批注...
-
Page 23: Functions And Operations
Functions and Operations Time-out Timer (TOT) The purpose of TOT is to prevent any user from occupying a channel for an extended period. When the preset time expires, the radio will automatically terminate transmission and keep beeping. To stop beeping, please release the PTT key. You must wait for a certain time period (preset by your dealer) to initiate another transmission. -
Page 24: Emergency
批注 [x6]: 这段原来是在备注 information, please contact your dealer. 第 3 点,现在提前到此处。 To exit the scanning process, press the Scan key again; or select “Off?” from the menu “Scan”, and press to confirm. When exiting from Scan mode, the radio will also sound an alert tone (programmed by your dealer) and the icon disappears. -
Page 25: Quick Call
complete process includes four stages: 1) Transmit the ID; 2) Transmit the alarm; 3) Transmit the background tone; and 4) Forcibly receive. The cycles and duration of each stage can be programmed by your dealer. Please ask your dealer to program one of the following Emergency modes: No alarm tone sounds;... -
Page 26: Keypad Mode Switch
Press the programmed Display Mode Switch key to switch the mode; or Select your desired display mode through “CH Display” under the menu “Settings”, and press to confirm. Keypad Mode Switch This feature allows you to choose one of these keypad input modes: Disabled, Frequency, Channel and DTMF. -
Page 27: Squelch Off
twice). Note: In Auto Reset mode, press the programmed Monitor or Monitor Momentary key to cancel a call. Squelch Off This feature allows you to unmute the speaker to receive all audio signals on current channel. Operation: Press the programmed Squelch Off key to activate this function ( appears and an alert tone sounds);... -
Page 28: Scrambler
Scrambler This feature can encrypt your audio signals to prevent eavesdropping. Thus privacy of your voice communication is guaranteed. Operation: Press the programmed Scrambler key to activate this function ( appears and an alert tone sounds); press the key again to deactivate it (the icon disappears and the alert tone sounds twice). -
Page 29: Whisper
PTT, or turning the radio off and back on. You can select an appropriate VOX sensitivity according to the environment. If there are heavy noises, you’d better select a lower VOX sensitivity. Whisper With this feature, even if you speak with a very low voice, it can still be heard clearly by the receiving party. -
Page 30: Signaling Introduction
Signaling Introduction CTCSS/CDCSS and DTMF signalings are available with TC-580. For detailed information, please contact your dealer. CTCSS/CDCSS CDCSS/CTCSS can be used to prevent unwanted conversations at the same frequency. If CTCSS/CDCSS is set on a certain channel, you can only receive voice calls from radios with matching CTCSS/CDCSS. - Page 31 When an individual call is received The radio will sound a personalized alert tone when it receives an Individual Call (an Individual Call ID should be programmed at first). When a group call is received The radio will sound a personalized alert tone when it receives a Group Call (a Group Call ID should be programmed at first).
-
Page 32: Manual Program
Manual Program The radio supports convenient programming of zone and channel related parameters from the front panel. However, this function may not be available in certain countries or regions. Please contact your local 批注 [x10]: 增加说明: 在某些 dealer for more information. 国家或地区,... - Page 33 - -” will be displayed for non-existing channels. Available operations: Delete a channel: select an existing channel, and press . Then the LCD will give a prompt “Del CH?”. You may press to delete this channel, or press to cancel. Note: After you delete a channel, You cannot select the deleted channel for use.
- Page 34 2. Press to save it. RX CTC/CDC You can set RX CTCSS/CDCSS signaling to CTC/CDC None, CTC, Normal CDC, or Invert CDC, and you can also customize the signaling. Operations: 1. Select RX CTC/CDC -> press -> press to select the desired signaling type ->...
-
Page 35: Zone Set
Scrambler To enable or disable the Scrambler feature. Available options: Disabled/ Enabled Alias To set the alias for the current channel. Operations: 1. Press and then enter the alias (up to 10 characters). 2. Press to save the alias. Zone Set This menu allows you to add or delete zones and channels. - Page 36 Add CH You may add channels to the current zone. Operations: 1. Press to select a channel to add. 2. Press to add it (LCD will display the next available channel). Note: If the currently selected channel is already included in the zone, the LCD will give you a prompt.
-
Page 37: Troubleshooting
Troubleshooting Phenomena Analysis Solution The battery may be improperly Remove the battery and attach it again. installed. The battery may have run out. Recharge or replace the battery. The radio can not be Clean the battery contacts. If the problem powered on. -
Page 38: Care And Cleaning
Care and Cleaning To guarantee optimal performance as well as a long service life of your radio, please follow the tips below. Radio Care Keep the radio far away from substances that can corrode the circuit. Do not hold the radio by its antenna or earpiece cable directly. Attach the accessory jack cover when the radio is not in use. -
Page 39: Optional Accessories
Optional Accessories The following items are the main optional accessories for the radio, and please consult your local dealer for more accessories. Li-Ion Battery (1100mAh) Six-unit Switching Power BL1102 Vehicle Adapter for Charger PS7002 (The power cable Li-Ion Battery (1300mAh) CHV09 may vary in different countries BL1301... - Page 40 Note: Use only the accessories specified by HYT only. If not, HYT shall not be liable for any losses or damages arising out of use of other unauthorized accessories.
-
Page 41: Appendix: Input Method
Appendix: Input Method You can enter channel number, alias, frequency or DTMF code using the keypad. This radio supports the following input methods: Number (“123”) and English (“ABC”/”abc”). Use the following keys as instructed: Function To move the cursor. To confirm your entry. To delete the characters. - Page 42 When the input method is switched to Number, press appropriate key to enter your desired number. For example, to input the number “130”, you just need to press orderly.