TomTom START User Manual
Hide thumbs
Also See for START:
- User manual (105 pages) ,
- Reference manual (85 pages) ,
- Manual (39 pages)
Table of Contents
Advertisement
Quick Links
Advertisement
Table of Contents

Related Manuals for TomTom START


Summary of Contents for TomTom START
- Page 1 TomTom START...
-
Page 2: Getting Started
Get- ting started 1. Push the EasyPort™ Mount on your TomTom START against the windshield in your car. 2. Adjust the angle of your device. 3. Lock the EasyPort Mount by twisting the base. 4. Insert the Car Charger into your device. -
Page 3: Gps Reception
The Mount comes off of the windshield. GPS reception When you first start your TomTom START navigation device, the device may need a few minu- tes to determine your GPS position and show your current position on the map. In the future, your position will be found much faster, usually within a few seconds. - Page 4 First, check that the battery is properly charged. To charge the battery, connect your device to the car charger. It can take up to 2 hours to fully charge the battery. If this does not solve the problem, you can reset the device. First turn your device off and wait for at least 10 seconds.
-
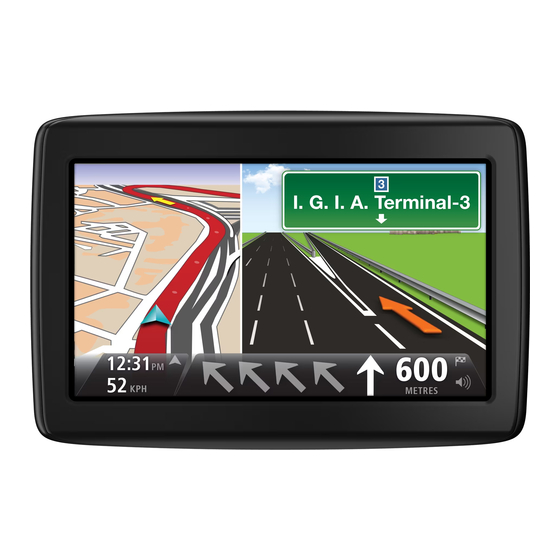
Page 5: Driving View
Driving View Driving View 1. Your current position. 2. The name of the next street or street sign information. 3. Your speed and the speed limit, if known. Tap this area to repeat the last spoken instruction and to change the volume. 4. -
Page 6: Advanced Lane Guidance
Note: Lane guidance is not available for all junctions or in all countries. Your TomTom START helps you prepare for highway exits and junctions by showing the cor- rect driving lane for your planned route. As you approach an exit or junction, the lane you need is shown on the screen. -
Page 7: Main Menu Buttons
Main Menu The Main Menu is the starting point for planning a route, looking at a map or changing Main Menu your device settings. To open the Main Menu from the Driving View, tap the center of the screen. To return to the Driving View from the Main Menu, tap done. Main Menu buttons The following buttons are shown on the Main Menu. - Page 8 Night /Day night Tap this button to set the night color scheme, which reduces the brightness of the screen and shows the map using dark colors. This is useful when driving at night or in dark environments such as long tunnels. Tap this button to set the day color scheme, which increases the brightness of the screen and shows the map using bright colors.
-
Page 9: Browse Map
Browse map To look at the map in the same way as you might look at a traditional paper map, tap Browse Browse map in the Main Menu. You can move the map by touching the screen and sliding your finger across the screen. 1. -
Page 10: Planning A Route With A New Starting Point
You can enter an address in various ways, but we will enter the full address. 3. Tap Address. 4. Start to type the name of the town where your trip will begin and tap on the name when it appears in the list. - Page 11 5. Enter the street name and the house number, then tap Done. Tip: Before you start to enter a street name, City center is shown at the top of the list. This is useful if you do not have an address and only need general directions.
-
Page 12: Finding Alternative Routes
You then have to choose how much of the route ahead you want to avoid. Avoid roadblock Choose from the different options. Your START recalculates your route avoiding the section of the route for the distance you selected. Don’t forget that once a new route is calculated, you may have to turn off the road you are on very soon. - Page 13 So you can select from all the same options, for example: Address, Favorite, Point of Interest and Point on map. Your START calculates a new route to your destination that passes the location you chose. Unlike your final destination, your START does not inform you when you pass by this location.
-
Page 14: Set Clock
Set clock Tap this button to select the time format and to set the time. The easiest way to set the time is by tapping the Sync button. Your START will then take the time from GPS information. Set clock Note: You can only use Sync if you have GPS reception, so you cannot set the clock in this way when you are indoors. -
Page 15: Map Corrections
Tap this button to make a correction to your map. corrections Advanced settings To change the advanced settings on your TomTom START, tap the Advanced button in the Options menu. Set units Tap this button to set the units used for the following measurements: •... -
Page 16: Keyboard Preferences
Tap this button to change the map you are using. Switch map Reset factory settings Tap this button to restore the factory settings to your TomTom START. All your settings, including your Home location and any Favorites, are deleted. Reset factory... -
Page 17: About Favorites
You can then select the location of the Favorite from the list below. You can type your own name for the Favorite when the keyboard is shown. To enter the name, there’s no need to delete the suggested name, just start typing. You can set your Home location as a Favorite. -
Page 18: Using A Favorite
You can add a Point of Interest (POI) as a Favorite. Does it make sense to do this? Point of Interest If you visit a POI you particularly like, for example a restaurant, you can add it as a Favorite. To add a POI as a Favorite, tap this button, then do the following: 1. -
Page 19: Changing The Name Of A Favorite
Changing the name of a Favorite 1. Tap the screen to bring up the main menu. 2. Tap options to open the Options menu. 3. Tap Home and Favorites. 4. Tap Manage Favorites. 5. Tap the Favorite you want to rename. 6. -
Page 20: Points Of Interest
Points of Interest Points of Interest or POIs are useful places on the map. Here are some examples: Points of Inte- rest • Restaurants • Hotels • Museums • Parking garages • Gas stations Note: Tap Map corrections in the Options menu to report missing POIs or edit existing POIs. - Page 21 Tap the arrow to choose from the complete list of categories. Select the category from the list or start to type the name of the category and select it when it appears in the list. 7. Tap Parking garage. 8. From the list of POIs shown, select the POI you want to navigate to.
-
Page 22: Voices And Images
Set day color scheme Tap day in the Main Menu to increase the brightness of the screen and show lighter colors on the map. You can download additional color schemes using TomTom HOME. Set day color scheme Set night color scheme Tap night in the Main Menu to reduce the brightness of the screen and show darker colors on the map. -
Page 23: Change Start-Up Image
Change start-up image Tap this button to select the start-up image which is shown every time you switch on the device. You can download additional start-up images using TomTom HOME. -
Page 24: Tomtom Map Share
TomTom Map Share™ With TomTom Map Share, you can correct errors on your map and share those correc- TomTo m Map Share™ tions with other people in the TomTom Map Share community, as well as receiving cor- rections made by others. -
Page 25: Tomtommap Share Community
To report the change, tap the Report button and your START will save your current location. You can then send the correction to TomTom Map Share when you have finished your trip. -
Page 26: Correction Preferences
• Trusted sources - accept changes made by TomTom and by trusted users who have been verified by TomTom. • Many users - accept changes made by TomTom, by trusted users who have been veri- fied by TomTom and changes made by a high number of Map Share community mem- bers. - Page 27 6. Tap Done. The next time you connect your device to TomTom HOME, your cor- rections are shared with the TomTom Map Share community. Tap this button to correct the traffic direction of a one-way street, where the direction of traffic is different to the direction shown on your map.
- Page 28 Tap this button to change the name of a street on your map. For example, to rename a street near to your current location: Edit street 1. Tap Edit street name. name 2. Tap Near you. 3. Select the street or section of a street you want to correct by tapping it on the map.
- Page 29 Tap this button to report other types of corrections. These corrections are not immediately applied to your map. Your TomTom START sends a special report to TomTomMap Share. Report other error You can report missing streets, errors in freeway entrances and exits and missing rotaries.
- Page 30 Help Help provides an easy way to contact and plan a route to locations that provide emer- Help gency services, such as a hospital or to other specialized services. For example, if you are involved in a car accident, you could use Help to call or find the phone number for the nearest hospital and tell them your exact location.
-
Page 31: Introducing Tomtom Home
• Download updates for your device for free, including Map Share updates and other ser- vices included with your product. • Add new items to your device, like maps, voices and POIs, as well as buy TomTom ser- vices and manage your subscriptions. -
Page 32: Traffic Information Using Rds-Tmc
Your TomTom navigation device can use TMC traffic information to warn you about traffic delays along your route and how you can avoid them. You can attach the TomTom RDS-TMC Traffic Receiver to your TomTom START to view traffic congestion and plan routes that avoid heavy traffic. -
Page 33: Traffic Incidents
2. Tap Minimize delays. Your device looks for the quickest route to your destination. The new route may also include traffic delays, or may even be the same route as before. 3. Tap Done. Traffic incidents Traffic incidents and warnings are shown on the map, in the Driving View and on the Tra- ffic sidebar. - Page 34 Snow Note: The incident avoided symbol is shown for any traffic inci- dent that you avoid using the TomTom Traffic Service. TOMTOM GPS GPS SYSTEMS...
Need help?
Do you have a question about the START and is the answer not in the manual?
Questions and answers
how to update