Panasonic KX-TGA641 Installation Manual
Additional digital cordless handset dect 6.0
Hide thumbs
Also See for KX-TGA641:
- Installation manual (16 pages) ,
- Service manual (95 pages) ,
- Operating instructions manual (48 pages)
Table of Contents
Advertisement
TGA641(e).fm Page 1 Wednesday, November 19, 2008 9:56 AM
Thank you for purchasing a Panasonic product.
This unit is an additional handset compatible with the following
series of Panasonic Digital Cordless Phone:
KX-TG6411/KX-TG6421/KX-TG6431/KX-TG6441/
KX-TG7431
You must register this handset with your base unit before it can
be used. This installation manual describes only the steps
needed to register and begin using the handset. Please read
the base unit's operating instructions for further details.
Charge the batteries for about 7 hours before initial use.
Please read this installation manual before using the unit and
save it for future reference.
For assistance, visit our website:
http://www.panasonic.com/help
for customers in the U.S.A. or
Puerto Rico.
Installation Manual
Additional Digital Cordless Handset
KX-TGA641
Model No.
PNQX1634ZA
DM1108DM0
Advertisement
Table of Contents

Related Manuals for Panasonic KX-TGA641


Summary of Contents for Panasonic KX-TGA641
- Page 1 TGA641(e).fm Page 1 Wednesday, November 19, 2008 9:56 AM Installation Manual Additional Digital Cordless Handset KX-TGA641 Model No. Thank you for purchasing a Panasonic product. This unit is an additional handset compatible with the following series of Panasonic Digital Cordless Phone: KX-TG6411/KX-TG6421/KX-TG6431/KX-TG6441/ KX-TG7431 You must register this handset with your base unit before it can be used.
-
Page 2: Accessory Information
Hooks (120 V AC, 60 Hz) Note: L Use only the supplied Panasonic AC adaptor PQLV219. L The AC adaptor must remain connected at all times. (It is normal for the adaptor to feel warm during use.) For assistance, please visit http://www.panasonic.com/help... -
Page 3: Battery Installation/Battery Charge
Battery installation/Battery charge Important: L Use the supplied rechargeable batteries. For replacement, we recommend using the Panasonic rechargeable batteries noted on page 2. L Wipe the battery ends (S, T) with a dry cloth. L Avoid touching the battery ends (S, T) or the unit contacts. -
Page 4: Registering A Handset To A Base Unit
Press and hold {LOCATOR} for about 4 seconds until the registration tone sounds. L If all registered handsets start ringing, press the same button to stop. Then repeat this step. L The next step must be completed within 90 seconds. For assistance, please visit http://www.panasonic.com/help... -
Page 5: Display Language
Drive the screws (not supplied) into the wall. Mount the charger (A), then slide it down (B) and to the right (C) until it is secure. 25.4 mm (1 inch) Screws (120 V AC, 60 Hz) For assistance, please visit http://www.panasonic.com/help... - Page 6 *2 The unit displays a list of all recorded messages and allows you to select the item to play back. Note: L For some features, the operations are slightly different from the descriptions in the KX-TG7431 series base unit’s operating instructions (page 8). For assistance, please visit http://www.panasonic.com/help...
- Page 7 *1 Pressing down the center of the joystick. *2 Pushing the joystick down or up. *3 Pushing the joystick right or left. *4 To skip messages, push the joystick right. To repeat messages, push the joystick left. For assistance, please visit http://www.panasonic.com/help...
- Page 8 {V}/{^}: “Yes” i {SELECT} i {OFF} Caller list: Editing a caller’s phone number before calling back {MENU} i {#}{2}{1}{3} {V}/{^}: Select the desired entry. Press {EDIT} repeatedly until the phone number is shown in the desired format. For assistance, please visit http://www.panasonic.com/help...
-
Page 9: For Your Safety
L Unplug the product from power outlets if it emits smoke, an abnormal smell, or makes an unusual noise. These conditions can cause fire or electric shock. Confirm that smoke has stopped emitting and contact the Panasonic Call Center at 1-800-211- PANA (1-800-211-7262). -
Page 10: Other Information
L This product can store your private/confidential information. To protect your privacy/confidentiality, we recommend that you erase information such as phonebook or caller list entries from the memory before you dispose of, transfer, or return the product. For assistance, please visit http://www.panasonic.com/help... -
Page 11: Fcc And Other Information
– Increase the separation between the equipment and receiver. – Connect the equipment into an outlet on a circuit different from that to which the receiver is connected. – Consult the dealer or an experienced radio/TV technician for help. For assistance, please visit http://www.panasonic.com/help... - Page 12 à la législation locale. LEste producto está diseñado para usarse en los Estados Unidos de América. La venta o el empleo de este producto en ciertos países puede constituir violación de la legislación local. For assistance, please visit http://www.panasonic.com/help...
- Page 13 This material is copyrighted by Panasonic Communications Co., Ltd., and may be reproduced for internal use only. All other reproduction, in whole or in part, is prohibited without the written consent of Panasonic Communications Co., Ltd. © Panasonic Communications Co., Ltd. 2008...
-
Page 14: Manual De Instalación
Lea este manual de instalación antes de usar la unidad y guárdelo para consultarlo en el futuro. Visite nuestro sitio web para obtener ayuda: http://www.panasonic.com/help para clientes de EE. UU. o Puerto Rico (sólo en inglés). -
Page 15: Información De Los Accesorios
Ganchos (120 V CA, 60 Hz) Nota: L Use sólo el adaptador de corriente Panasonic PQLV219 que se suministra. L El adaptador de corriente debe permanecer conectado todo el tiempo. (Es normal que el adaptador se caliente durante su uso.) - Page 16 Instalación y carga de las baterías Importante: L Utilice las baterías recargables que se suministran. Para reemplazarlas, recomendamos el uso de las baterías recargables Panasonic que se especifican en la página 2. L Limpie los extremos de las baterías (S, T) con un paño seco.
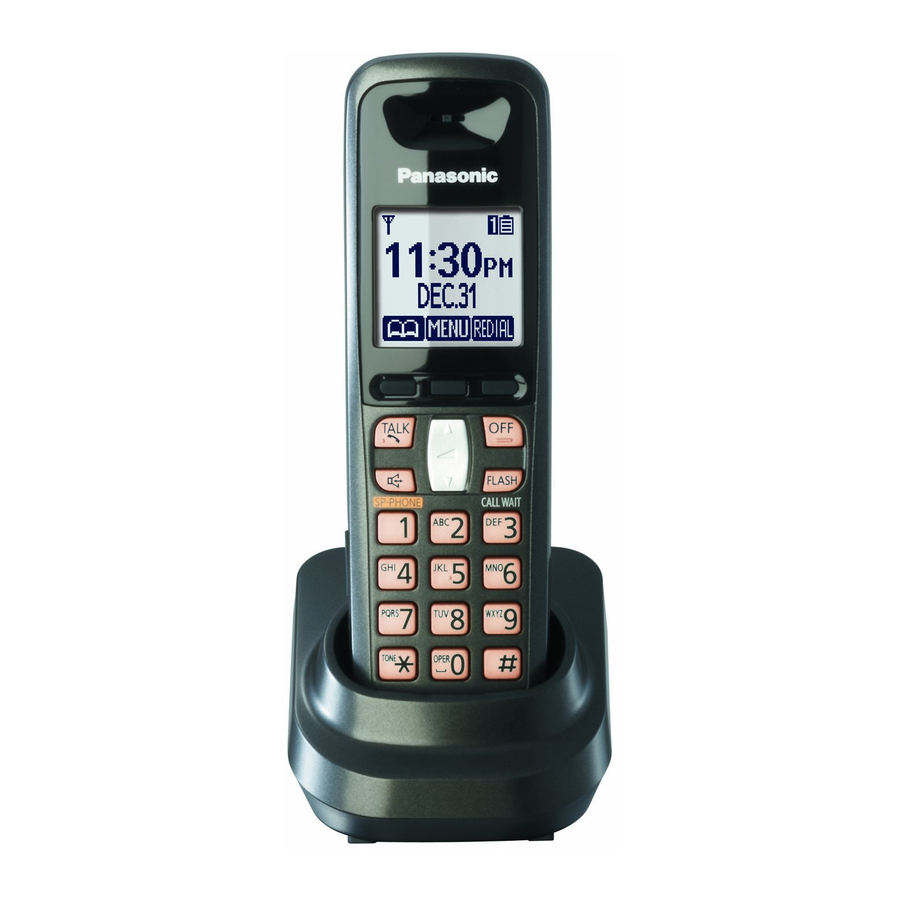
- Page 17 TGA641(sp-sp).fm Page 4 Tuesday, November 18, 2008 6:13 PM Controles A Indicador de carga Indicador de timbre Indicador de mensaje B Altavoz C Teclas de función D {C} (TALK: Hablar) E {s} (SP-PHONE: Altavoz) F Toma para audífono G Teclado de marcación {*} (TONE: Tono) H Receptor I Pantalla...
- Page 18 TGA641(sp-sp).fm Page 5 Tuesday, November 18, 2008 6:13 PM L El siguiente paso debe completarse en un máximo de 90 segundos. Auricular: Oprima {OK} y espere a que se emita un pitido largo. Nota: L Si suena un tono de error, o si _ continúa mostrándose, registre el auricular de acuerdo con las instrucciones de operación de la unidad base.
- Page 19 TGA641(sp-sp).fm Page 6 Tuesday, November 18, 2008 6:13 PM Para los usuarios de la serie KX-TG7431: Resumen de funciones disponibles del auricular Principales diferencias en las funciones Función KX-TGA641 KX-TGA740 Descripción Mismo tipo de auricular que Mismo tipo de auricular se suministra con las series...
- Page 20 TGA641(sp-sp).fm Page 7 Tuesday, November 18, 2008 6:13 PM Tipo de control N KX-TGA641 N KX-TGA740 Tecla navegadora Joystick Teclas de función Teclas de función Función KX-TGA641 KX-TGA740 Uso de las teclas de función Izquierda, del Izquierda, medio, derecha centro del...
Need help?
Do you have a question about the KX-TGA641 and is the answer not in the manual?
Questions and answers