Table of Contents
Advertisement
BriskONE
Temperature Controller
Instruction Manual
Read and understand this material before operating or
servicing these heating tapes. Failure to understand
how to safely operate these heaters could result in an
accident causing serious injury or death. These heaters
should only be operated by qualified personnel.
Advertisement
Table of Contents

Subscribe to Our Youtube Channel
Related Manuals for BriskHeat BriskONE


Summary of Contents for BriskHeat BriskONE
- Page 1 BriskONE Temperature Controller Instruction Manual Read and understand this material before operating or servicing these heating tapes. Failure to understand how to safely operate these heaters could result in an accident causing serious injury or death. These heaters should only be operated by qualified personnel.
-
Page 2: Table Of Contents
BriskONE Temperature Controller Instructions Table of Contents Introduction ..................... 3 Operation ....................4 Controller Key Functions ..............6 Key Combinations ................7 Programming Instructions ..............8 Security ....................9 Temperature Unit ................. 10 Setpoint Range ..................10 Setpoint ....................10 Method of Control ................ -
Page 3: Introduction
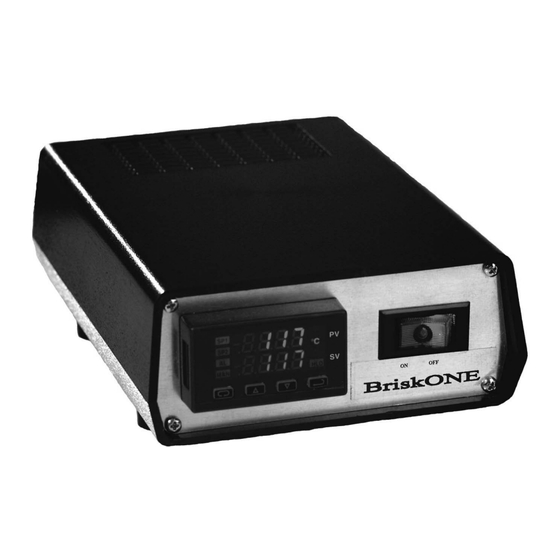
BriskONE Temperature Controller Instructions INTRODUCTION BriskONE is a compact one zone controller which provides excellent temperature control in areas with limited space. Features: Compact size: 7.6” x 5.0” x 2.5” [194mm x 127mm x 64mm] Provides 15A@120V or 10A@240V output power. -
Page 4: Operation
BriskONE Temperature Controller Instructions OPERATION To begin operation of the BriskOne Controller, Follow these steps: Plug the input power cord into the controller (see Figure 2 for input power receptacle location). Then connect the other end of power cord into a properly grounded 120VAC or 240VAC outlet. - Page 5 BriskONE Temperature Controller Instructions Plug thermocouple into the controller. Verify that the temperature displayed on the upper display is the actual temperature of the heating system. If not, check to ensure the thermocouple plug was correctly wired and connected to the controller.
-
Page 6: Controller Key Functions
BriskONE Temperature Controller Instructions Controller Key Functions 4: D IGURE ISPLAY ONTROLLER 1. Setpoint Display: Displays the SV (setpoint value). The SV is the setpoint entered by the operator. 2. Process Display: Displays the PV (process value). The PV is the actual temperature of the system being controlled. -
Page 7: Key Combinations
BriskONE Temperature Controller Instructions This decimal point flashes when SELF-TUNE is operating. ARROW: Decrements a value, changes a menu item, or selects the item to OFF. The minimum value obtainable is -1999 regardless of the decimal point placement. 10. UP ARROW: Increments a value, changes a menu item, or selects the item to ON. -
Page 8: Programming Instructions
BriskONE Temperature Controller Instructions Programming Instructions The controller’s Programming is divided up into three menus: Primary Menu Secondary Menu Secure Menu Within each menu are menu items. Each of the menu items pertains to a parameter of the controller. To enter and move from menu item to menu item within the Primary Menu: ... -
Page 9: Security
BriskONE Temperature Controller Instructions Security The security code is located in the Secure Menu. The Code locks out programming access to specific menus. To access the locked out menus the security level must be changed. To change the security level, the correct password must be entered into the SECr menu item. -
Page 10: Temperature Unit
BriskONE Temperature Controller Instructions Temperature Unit Hold the UP ARROW and ENTER simultaneously for five seconds to enter the secure menu. Press the INDEX key until Unit is shown on the lower display. Change the unit of measurement, by using the UP ARROW and DOWN ARROW keys to select C (Celsius) or F (Fahrenheit). -
Page 11: Method Of Control
BriskONE Temperature Controller Instructions Method of Control Press the UP ARROW and ENTER keys simultaneously. Press the INDEX key until Out1 is shown on the lower display. Menu item Out1 designates the control method to be used by the controller. - Page 12 12. Press the INDEX key until ALLP appears on the display. ALLP is the alarm lamp. BriskONE’s design requires ALLP be set to OFF. If ALLP is set to On, the press UP ARROW and DOWN ARROW keys until the value shown is OFF.
- Page 13 BriskONE Temperature Controller Instructions 13. Press the INDEX key until ALLb appears on the display. ALLb is the alarm loop break menu item. The controller will alarm if no change has been detect by the sensor under full output conditions for a period of time.
-
Page 14: Sensor Break Alarm Action
BriskONE Temperature Controller Instructions Sensor Break Alarm Action Hold the UP ARROW and ENTER simultaneously for five seconds to enter the secure menu. Press the INDEX key until InPt appears on the display. InPt is the input fault timer. When the input is out of range, shorted, or open, the timer will start. -
Page 15: Tuning
BriskONE Temperature Controller Instructions Tuning Press the UP ARROW and ENTER keys to enter the Secondary Menu. Press the INDEX key until tun appears on the display. tun is where the type of tuning choice is selected. There are five options to choose from. -
Page 16: Input Calibration
BriskONE Temperature Controller Instructions Input Calibration Press the UP ARROW and ENTER keys to enter the Secondary Menu. Press the INDEX key until InPC appears on the display. InPC allows the input value to be changed to agree with an external reference or to compensate for sensor error. - Page 17 BriskONE Temperature Controller Instructions Press the INDEX key until StAt appears on the display. StAt controls how the Primary Menu will display the Ramp/Soak parameters. OFF allows the Primary Menu to operate normally. On alters the Primary Menu to display the following items.
- Page 18 BriskONE Temperature Controller Instructions 20. Press the INDEX key until 1AL appears on the display. 1AL is the first segment’s alarm event. On activates the alarm during segment 1’s time. OFF deactivates the alarm during segment 1’s time.
-
Page 19: Setting Fuzzy Logic Parameters
BriskONE Temperature Controller Instructions Setting Fuzzy Logic Parameters Press the UP ARROW and ENTER keys to enter the Secondary Menu. Press the INDEX key until Fint appears on the display. Fint determines the amount of impact fuzzy logic will have on the output, and can be 0 to 100%. -
Page 20: Installation
BriskONE Temperature Controller Instructions Installation The following procedure should be used when installing the BriskONE temperature controller. Choose an appropriate location with the following: Proximity to a suitable power supply. Appropriate clearances (for example: clearance to allow easy installation of connectors). - Page 21 BriskONE Temperature Controller Instructions Figure 5: Mounting Bracket Figure 6: Controller within Bracket ® BriskHeat Corporation. All rights reserved...
-
Page 22: Connecting The Heater's Wire To The Pins
BriskONE Temperature Controller Instructions Connecting the Heater’s Wire to the Pins: 20-14 AWG Wire Body of Pin Wire Barrel Insulation Support Barrel Figure 7: Diagram of Pin and Stripped Wire For heater’s power leads use the bronze pins. If the heater has a ground wire, then use the silver pin for the ground wire. -
Page 23: Inserting The Pins Into The Plug
BriskONE Temperature Controller Instructions Inserting the Pins into the Plug: Figure 8: Diagram of Pin Insertion into Plug Insert the wired pins into the back of the plug. Push the pins in until they cannot be pushed in any further. The grounding pin must be inserted into the center position of the plug. -
Page 24: Troubleshooting
Troubleshooting Before calling for assistance, please review this troubleshooting guide. If, after consulting the guide, you are still unable to identify the problem or if you need ® additional assistance then Please contact BriskHeat Problem Solution CONTROLLER Plug is disconnected from outlet. Push plug firmly DOES NOT TURN into outlet. -
Page 25: Parts List
BriskONE Temperature Controller Instructions Parts List ® Whenever possible, please order all parts by the BriskHeat part number, not ® by the description. Contact BriskHeat for current pricing and availability. Table 2: List of Parts Description BriskHeat Part # Quantity... -
Page 26: Programming: Quick Reference Table
BriskONE Temperature Controller Instructions Programming: Quick Reference Table Table 3: List of Menu Items Located in the Secure Menu Secure Menu Display Description Default Value SECr Security level Unit Temperature Units Decimal point positioning InPt Input fault timer InPb Input alarm action... - Page 27 BriskONE Temperature Controller Instructions Table 4: List Of Menu Items Located In The Secondary Menu Secondary Menu Display Description Default Value ALLo Value for low alarm (Only if AL is set for F or 0 Lo or HiLo.) ALHi Value for high alarm (Only if AL is set...
- Page 28 BriskONE Temperature Controller Instructions 1055 Gibbard Ave, Columbus, OH 43201 Toll Free: 800-848-7673 Phone: 614-294-3376 Fax: 614-294-3807 Email: bhtsales1@briskheat.com ® BriskHeat Corporation. All rights reserved PN: 40890-03 Rev B...
Need help?
Do you have a question about the BriskONE and is the answer not in the manual?
Questions and answers