GME TX670 Instruction Manual
2 watt handheld uhf cb radio
Hide thumbs
Also See for TX670:
- Instruction manual (20 pages) ,
- Use and care manual (2 pages) ,
- Instruction manual (32 pages)
Table of Contents
Advertisement
Advertisement
Table of Contents

Related Manuals for GME TX670


Summary of Contents for GME TX670
- Page 1 2 watt handheld UHF CB radio I N S T R U C T I O N M A N U A L...
-
Page 2: Table Of Contents
• 2 40 V AC adapter Class Licence and in New Zealand by the Ministry of Economic • L eather case Development New Zealand (MED). A General User Radio Licence • Instruction manual for Citizens Band radio and operation is subject to conditions contained in those licences. WARNING - SAFETY INFORMATION T he class licence for users and equipment operating in the CB/PRS 477 MHz band has been amended. This radio meets the new 80 the tX670 is a radio transmitting device. channel standard. • W hen transmitting, keep the antenna more than 25 mm from I n simple terms the same amount of spectrum is available; however, any part of the head or body. radio transceivers can now operate in a narrower bandwidth and • D o not transmit near electrical blasting equipment or in hence use less spectrum. These radios are generally referred to as explosive atmospheres. narrowband or 12.5 kHz radios. By using 12.5 kHz channel spacing • D o not allow children to operate a radio transmitter unsupervised. -
Page 3: Possible Issues
TElEMETRY CHANNElS expanded to 80 channels thereby doubling the channel capacity and relieving congestion in the UHF CB/PRS band. ACMA regulations have allocated channels 22 and 23 for telemetry only applications and have prohibited the transmission of speech O riginal 40 channel wideband Radios will continue to operate on the on these channels. Consequently the TX670 has a transmit-inhibit original 40 channels, however they will not be able to converse on the applied to channels 22 and 23. newer channels 41 – 80. The newer narrowband radios will be able In the event that additional telemetry/telecommand channels are to converse with all older 40 channel wideband radios on all channels approved by the ACMA, these channels shall be added to those 1 to 40 as well as the newer channels allocated from 41 to 80. currently listed where voice transmission is inhibited. Currently T he mixing of narrowband and wideband radios in the same transmissions on channels 61, 62 and 63 are also inhibited and spectrum can cause some possible operating issues of interference these channels are reserved for future allocation. and varying levels of received volume. FEATURES PossiBle issUes • Microprocessor Controlled Frequency Synthesiser: Allows user programmable control of scanning, channel memories and When a new narrowband radio receives a transmission from an older selected feature options. wideband radio the speech may sound loud and distorted – simply adjust your radio volume for best performance. • Programmable Scan Function: Scans up to 80 UHF CB channels. -
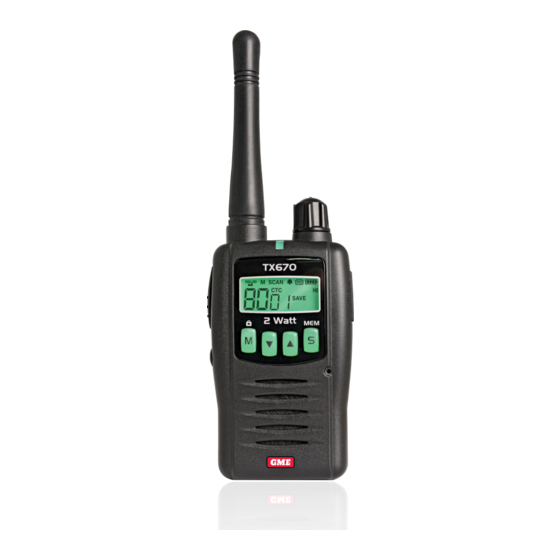
Page 4: Radio Controls
lCD DisPlAY RADIO CONTROlS Antenna Volume On/Off Mode/ 1 9 Appears R eceiver Busy Icon: H igh Power Icon: Lock Key Appears when receiving. when High transmitter External power is selected. Speaker Appears Transmit Icon: Duplex/ when transmitting. 10 D uplex Icon: indicates that monitor Scan/ Duplex communication has Memory Icon: Appears memory been enabled. -
Page 5: Powering The Radio
Charging the Batteries POWERING THE RADIO Your TX670 is supplied with an AC adapter which will recharge Your TX670 is powered by a Ni-MH rechargeable battery pack. a fully discharged battery pack to full capacity in around 15-16 If left unused, the batteries will discharge within a few months. hours. If you have not used your TX670 for some time, you will need to recharge your battery pack before use. 1. P lug the charger into a standard 240 volt AC outlet. Installing the Batteries 2. C onnect the charger to mic/charge socket on the radio. Battery installation is more convenient when the belt clip is Battery Low Alert removed. To do this, release the spring clip and slide the belt When the battery icon blinks on the display, the battery level clip downward and away from the radio body. is low and the batteries should be recharged or replaced. If the 1. Press the centre-top area of the battery cover and batteries are not charged, an audio tone will then sound to warn slide downwards. the user that the batteries are almost discharged. 2. I nstall the rechargeable battery pack in the direction Battery Usage indicated on the pack until it ‘clicks’ into place. -
Page 6: General Operation
Scanning If the incoming signal is encoded with a CTCSS tone that matches the one set in your radio, the LED indicator will light orange and The TX670 draws more power from the batteries when scanning you will be able to hear the signal in the speaker. than when monitoring a single channel. This is because it must ‘wake up’ more often to monitor each channel for activity. If the LED indicator lights green and the icon appears but You can lengthen the battery life by avoiding any unnecessary you cannot hear the signal, it is likely that your radio has CTCSS scanning. In addition, scanning increases the chance of finding a enabled and the incoming signal is not using your selected CTCSS signal thereby keeping the receiver ‘awake’ and the Squelch open tone (see ‘Mode Settings’ for more details on CTCSS settings). more often. If no further signals are received, the unit will return to Low Transmit Power Settings Standby mode. The transmitter has both high and low power settings. If you TrAnsmiTTing are only operating over short distances, are in a reasonably To transmit, press and hold the Push-To-Talk (PTT) switch. The high location or are close to a local repeater, try using the other radio you are talking to must be set to the same channel low transmitter power setting. This reduces the transmitter (and CTCSS code if applicable). Hold the TX670 approximately 5 power from 2 watts to 1 watt effectively doubling the talk time to 8 cms from your face with the antenna vertical and speak into available. the built-in microphone. GENERAl OPERATION While the PTT switch is pressed, the LED indicator on the upper edge of the radio will light red and the icon will appear on Power on/oFF the LCD. -
Page 7: Scan/Memory Key
Duplex operation allows the TX670 to transmit on a different particularly if you have CTCSS enabled. When the Squelch is open, the LED indicator on the upper edge of the radio will light frequency to that which it receives. This allows operation green, the icon appears on the display and you will hear through repeater stations in your area. Repeaters automatically static or hiss if the channel is clear. Do not transmit if you hear re-transmit your signal over a much wider area, providing greatly any conversations. Press and hold the MON key again to close increased range. The Duplex mode only works on channels the Squelch. 1 – 8 and 41 – 48. With Duplex selected, your TX670 actually transmits 30 channels higher than it receives. CTCSS To activate or deactivate CTCSS, the current channel must have a Receive Transmit Channel Channel Channel CTCSS code selected via the MODE key, (see MODE key settings Selected for more details). sCAn/memorY KeY the SCAN key is a dual function key that controls both Scan and Memory Functions. Scanning Function Channel Scanning allows you to monitor channels that have been included in the active scan list. The active scan list includes all channels which display the icon ‘m’ on the LCD. To enable channel scanning, briefly press the SCAN key. ‘SCAN’ will be displayed and the radio will show rapidly changing channel numbers as it scans through the channels. While scanning, briefly press the keys to select the scan direction. -
Page 8: Mode/Key-Lock Function
1. CTCss CoDe seleCTion include the channel. When the channel is deleted from the scanning list, the channel will be skipped upon scanning. All The Continuous Tone Coded Squelch System (CTCSS) is a Squelch channels are saved to Memory during manufacture. To disable quieting system that allows groups of users to share the same the Memory, press and hold the SCAN/MEM key. channel without disturbing each other. It uses 1 of 38 low frequency tones to open and close the Squelch on the radio. The CTCSS codes moDe/KeY-loCK KeY do not prevent others from hearing your transmission. They simply Mode Function provide you with a quieter channel by preventing you from hearing the MODE key is used to set the various feature settings of the transmissions that are not using the same code as you and are TX670. The following chart shows the order of these selections: therefore not directed at you. Standby Mode: NOTE: To communicate with other UHF radios using CTCSS, all 1. CTCSS Code Selection radios you wish to communicate with must be switched to the same channel and have the same CTCSS code selected. If you wish to 2. Transmitter Power receive signals from UHF radios that are not using CTCSS you will need to either disable CTCSS on that channel or set the CTCSS code 3. VOX Settings to ‘ ‘ as described in the following ‘note’. 4. Dual Watch Channel To select a CTCSS Code 5. Squelch Settings... -
Page 9: Transmitter Power
2. Press the keys to select the Dual Watch channel 2. Press the keys to select the required power setting. number (1 – 40). To disable the Dual Watch Mode altogether Select ‘HI’ for high power or ‘LO’ for low power. select ‘oF‘. 3. Press the MODE or PTT key momentarily to confirm and store 3. Press the MODE or PTT key momentarily to confirm and store your selection. your Dual Watch channel selection ‘DW’ will be displayed at The TX670 should now display the selected channel number the top of the LCD and the display will now alternate between along with ‘HI’ if you have selected high power. If you have the currently selected channel and the Dual Watch channel. selected low power, this setting will not be indicated. To EXIT the Dual Watch mode, momentarily press the SCAN key. 3. Vox seTTings This is equivalent to setting the Dual Watch mode to ‘oF‘. The VOX feature lets you have hands-free conversations. When Dual Watch Operation you speak, the microphone automatically detects your voice (or • I f a signal is received on the Dual Watch channel, the radio... -
Page 10: Squelch Settings
3. Press the MODE or PTT key momentarily to confirm and store response to key activation. your Squelch mode selection. 8. CAll AlArm seleCTion 6. roger BeeP Tone seleCTion The TX670 provides 5 user selectable call alarm melodies to alert The Roger Beep is a tone which is automatically transmitted other users to your incoming call. When enabled, the melody whenever the PTT switch is released. This tone alerts the can be transmitted to another user where it will be heard in the receiving party that your transmission has ended. speaker of the receiving radio. To enable or disable the Roger Beep Tone To select your favourite Call Alarm Melody From the ‘Standby’ mode:... -
Page 11: Uhf Cb Operating Frequencies
UHF CB OPERATING FREQUENCIES Channel Frequency (MHz) Channel Frequency (MHz) Channel Frequency (MHz) Channel Frequency (MHz) 476.425~ 476.925 476.4375~ 476.9375 61• 476.450~ 476.950 476.4625~ 476.9625 62• 476.475~ 476.975 476.4875~ 63• 476.9875 476.500~ 477.000 476.5125~ 477.0125 476.525~ 477.025 476.5375~ 477.0375 476.550~ 477.050 476.5625~ 477.0625... -
Page 12: Ctcss Tone Frequencies
SPECIFICATIONS CTCSS TONE FREQUENCIES Frequency Frequency generAl 67.0 131.8 Frequency Range: 476.425 - 477.4125 MHz 71.9 136.5 Channel Spacing: 12.5 kHz 74.4 141.3 No. of Channels: 80 77.0 146.2 (75 Voice, 2 Telemetry-RX only, 3 for future use) 79.7 151.4 CTCSS Codes: 38 82.5 156.7 Dimensions (W x H x D): 6 2 mm x 98 mm x 30 mm 85.4 162.2 (without antenna) - Page 13 (b) i n the case of services we supply, to any one of the STANDARD COMMUNICATIONS following as we decide – WARRANTY AGAINST DEFECTS (i) t he supplying of the services again; This warranty against defects is given by Standard Communications Pty (ii) the cost of having the services supplied again. Ltd ACN 000 346 814 (We, us, our or GME). Our contact details are set 2.4 F or repairs outside the warranty period, we warrant our repairs out in clause 2.7. to be free from defects in materials and workmanship for three 1. Consumer guarantees months from the date of the original repair. We agree to re-repair 1.1 O ur goods come with guarantees that cannot be excluded under or replace (at our option) any materials or workmanship which the Australian Consumer Law. You are entitled to a replacement we are satisfied are defective. or refund for a major failure and for compensation for any other 2 .5 W e warrant that we will perform services with reasonable care reasonably foreseeable loss or damage. You are also entitled to...
-
Page 14: Warranty Period
( f) g oods where the serial number has been removed or made illegal. 4. Warranty period 4.1 W e provide the following warranty on GME and Kingray products. No repair or replacement during the warranty period will renew or extend the warranty period past the period from original date of purchase. PRODUCT TYPE WARRANTY PERIOD 477 MH UHF CB portable transceivers 1 year PA G E 2 6 i n s t r u c t i o n m A n u A l... - Page 15 10-12 Harvard Way VIC 3165 SA 5031 Canning Vale T: (03) 9798 0988 T: (08) 8234 2633 WA 6155 F: (03) 9798 0177 F: (08) 8234 5138 T: (08) 9455 5744 F: (08) 9455 3110 For customers outside Australia and New Zealand, please contact your local GME retailer or email: export@gme.net.au www.gme.net.au Part Number: 310414 Drawing Number: 44165-6...
Need help?
Do you have a question about the TX670 and is the answer not in the manual?
Questions and answers