Advertisement
Quick Links
Advertisement

Related Manuals for Jarv Joggerz BT-301


Summary of Contents for Jarv Joggerz BT-301
- Page 1 Jarv Joggerz BT-301 Bluetooth Stereo Headphones Users Guide...
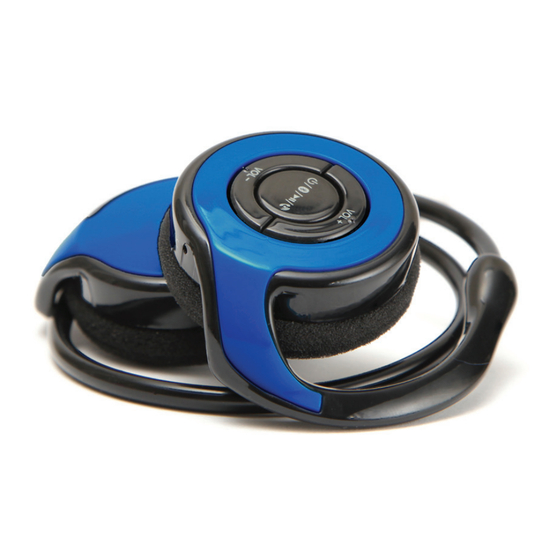
- Page 2 Features: • B luetooth Wireless technology • C ompact design fits in the palm of your hand and weighs less than 2 oz. • Comfortable Behind the Neck design • High Definition Stereo Sound with Noise Reduction • Rechargeable battery with Up to 6 Hours of Talk/Music time • Stream Audio from any Bluetooth Device • C ontrol unit has built in Volume, Play, Pause and Answer functionality • Built-In microphone...
- Page 3 Package Contents: • Jarv Joggerz BT-301 Bluetooth Stereo Headphones • Micro USB Charging Cable • Users Guide...
- Page 4 Control Unit: • Volume +/Previous Track • Power/Pair/Play/Pause/Call • Volume – / Next Track • Microphone • Micro USB Charging port...
- Page 5 LED Indicator Guide Status Indicator Power On Blue Light Power Off Red light comes on and shuts off Charging Red Light Charging complete Red light shuts off Pairing Mode Red And Blue Light flashes alternately. Once paired , Blue LED light will come on Low Power Red Light with prompt tone...
- Page 6 Getting Started To use your Jarv Joggerz BT-301 Bluetooth Stereo Headphones, please follow the steps below: 1. Ensure your Bluetooth headphones are fully charged. 2. P air your Bluetooth headphones with a Bluetooth-enabled device prior to use. (See Pairing your Headphones instructions) Charging Your Headphones Your Joggerz headphones come with a built-in rechargeable battery and a Micro USB charging cable. Your Joggerz headphones can be charged either directly from an AC power supply (not included) or through your PC via the included Micro USB Charging cable. Charge fully before use. The battery indicator will turn red when charging and turn off once charging is complete. Initial charging time is approximately 2-3 hours. Pairing Your Headphones In order to use your Jarv Joggerz BT-301 Bluetooth Stereo Headphones with a Bluetooth-enabled device, you will first need to pair the two. 1. P lace the headphones and the mobile phone where they are easily viewable and no more than 5 ft. apart.
- Page 7 2. Ensure that the headphones are fully charged 3. Ensure that the headphones are turned off (Very important) 4. P ress down the Pairing button for 8-9 seconds until the red and blue light flash alternately which indicates that you are in Pairing Mode. Once paired successfully, the Blue LED light will come on. 5. Activate your mobile phone’s Bluetooth pairing function. 6. S et the mobile phone to search for Bluetooth devices within range and select “BT-301” from the list of devices shown. 7. I f you are prompted for a Passcode enter “0000” and press “ok” to pair the headphones with your mobile phone. (Note: If the Bluetooth version of your phone is 2.1, there is no need to enter the passcode when pairing.) 8. N ow you can use your Bluetooth headphones to listen to music, and make and receive phone calls. Some mobile phones will connect automatically to the Jarv Joggerz Bluetooth Headphones when restarted. Powering On the Headphones Press and hold down the Power button for 3 seconds to turn the unit on and off or until Blue light comes on Wearing Your Headphones Your headphones should be worn with the multi- function button on your right ear.
- Page 8 Using Your Headphones Answering a Call When you receive a call, the ring tone will be heard through the headphones. Press the Power button once to accept the call, or answer the call normally via your mobile phone. Rejecting a Call Press the Power button for 2 seconds to reject the incoming call. Ending a Call Press the Power button once to end the call or hang up on your mobile phone. Redialing a Call Double click the Power button; the headphone will dial the last phone number. Adjusting the Volume Hold down the Volume + to increase volume or Volume – to decrease volume. You will hear a beep when you reach the maximum or minimum volume level. (You can also adjust the volume on your handset or device) Play/Pause Music When the Bluetooth headphones are connected with your mobile...
- Page 9 phone, press the Power button once to play music. Press Pause button quickly to pause music. (Attention: your mobile phone must support A2DP profile.) Previous Track Press the “Volume +” key to select the previous track. Next Track Press the “Volume -” key to select the next track. Connection with the Last Paired Device When powered on, the headphones will automatically connect with the last successfully paired device. If the connection is successful, it enters standby mode. If the devices fail to connect within 5 minutes after the pairing has been initiated, the headphones will turn off automatically. Troubleshooting If you are unable to connect your headphones and mobile phone, please try the following: Ensure that your headphones is fully charged and powered on. Ensure that the headphones are paired with your mobile phone. Ensure that your mobile phone’s Bluetooth feature is activated.
- Page 10 Please refer to your mobile phone user guide for specific instructions. Ensure that the headphones are within a 10 meter (33 ft.) range of your mobile phone and that there are no obstructions, such as walls or other electronic devices, between the two. If the above steps do not solve your problem, please remove your mobile phone battery for a short time and recharge the headphones. Repeat the troubleshooting sequence. Safety Information Check local laws regarding the use of mobile phones and headphones while driving. If you use the headphones while driving, ensure that your attention and focus remains on the road and you drive in a responsible and safe manner. Never allow children to play with the headphones, as the small parts may be a choking hazard. Observe all signs that require an electrical device or RF radio product to be switched off in designated areas. These could include hospitals, blasting areas, and potentially explosive environments. Turn off your headphones prior to boarding an aircraft. Do not use your headphones in an aircraft. Never mount or store your headphones over an air bag deployment area, a serious injury may result when the air bag deploys. Do not open or mutilate the built-in battery. Dispose of batteries according to local regulations. Do not dispose as...
- Page 11 household waste. Care and Maintenance of Your Headphones i. C onsider turning your headphones off before placing it in your pocket or bag. If the Power button is accidentally activated, your mobile phone may place an unintended call. ii. D o not expose the headphones to liquid, moisture or humidity, as it is not waterproof. iii. D o not use abrasive cleaning solvents to clean the headphones. iv. D o not expose the headphones to extreme temperatures. The best storage temperature range is from 40-80 F; otherwise, the life of the headphones will be affected. v. D o not dispose of the headphones in fire as it this may result in an explosion. vi. D o not bring your headphones into contact with sharp objects as this will cause scratches and can damage the headphones. vii. D o not attempt to disassemble the headphones, as it does not contain serviceable components.
- Page 12 Product Specifications Headphone length: 14.5 inches Weight: 1.6oz Charging Interface: Micro USB Battery Specifications: 3.7V/200mAh Charging Input: 5V/500mA DC Battery power: Built-in rechargeable lithium battery Battery life: Up to 6 hours of Talk/Music Time Stand-by Time: Up to 180 hours Wireless Range: 33 feet (10m) Speaker diameter: 30MM Impedance: 32R Built-In Microphone Frequency Response: 200HZ-3KHZ Actual performance may vary due to the user’s habits, different modes of operation, and mobile phone settings. This manual is for reference purposes only. The specifications and design of the headphones may change without prior notice.
- Page 13 Product Warranty All Jarv products come with a one year limited warranty. Please email customer support at customerservice@jarvmobile.com for any related information or questions. Warning and Precautions WARNING: To prevent fire or shock hazard, do not expose this unit to rain or moisture. WARNING: Do not place this unit directly onto furniture surfaces with any type of soft, porous, or sensitive finish. As with any rubber compound made with oils, the feet could cause marks or staining where the feet reside. We recommend using a protective barrier such as cloth or a piece of a glass between the unit and the surface to reduce the risk of damage and/or staining. WARNING: Lithium batteries, like all rechargeable batteries are recyclable and should be recycled or disposed of in normal household waste. Contact your local government for disposal or recycling practices in your area. They should be incinerated since they might explode. NOTE: This device uses an internal rechargeable lithium-ion battery that should last the lifetime of the device. If you suspect your battery may be dead after several attempts to charge, please visit www. jarvmobile.com for support.
- Page 14 Never disassemble the unit or attempt to remove the battery as that could cause leakage of an electrolyte substance FCC Warnings Warning: Changes or modifications to this unit not expressly approved by the party responsible for compliance could void the user’s authority to operate the equipment. NOTE: This equipment has been tested and found to comply with the limits for a Class B digital device, pursuant to Part 15 of the FCC rules. These limits are designed to provide reasonable protections against harmful interference in a residential installation. This equipment generates, uses, and can radiate radio frequency and, if not installed and used in accordance with the instructions, may cause harmful interference to radio communications. However, there is no guarantee that interference will not occur in a particular installation. If this equipment does cause harmful interference to radio or television reception, which can be determined by turning the equipment on and off, the user is encouraged to try to correct the interference by one or more of the following measures. • Reorient or relocate the receiving antenna • Increase the separation between the equipment and receiver • C onnect the equipment into an outlet on a circuit different from that to which the receiver is connected...
Need help?
Do you have a question about the Joggerz BT-301 and is the answer not in the manual?
Questions and answers