Advertisement
Advertisement
Table of Contents

Related Manuals for Jarv NMOTION


Summary of Contents for Jarv NMOTION
- Page 3 Features: • Wireless technology using Bluetooth 4.0 A2DP • Comfortable lightweight in-ear design with detach- able sports ear hooks for added support • High Definition Stereo Sound with Noise Reduction • Rechargeable battery with Up to 5 Hours of Talk/Music time •...
-
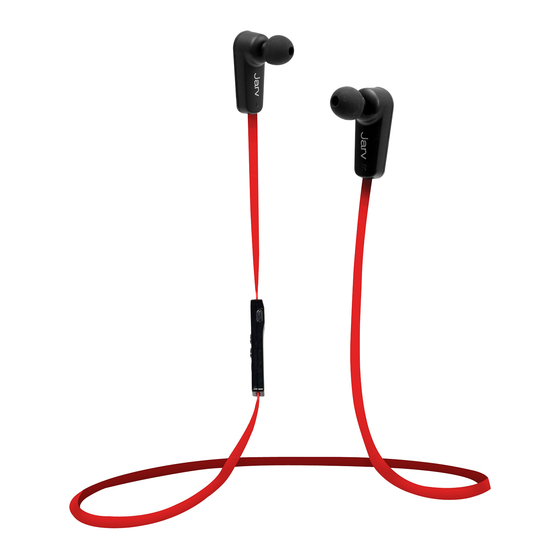
Page 4: Package Contents
Package Contents:: • Jarv Nmotion Pro BTHL-201 Bluetooth Stereo Earbuds • Universal Sports Armband • Micro USB Charging Cable • 3 sets of ear bud tips (S,M,L) • 2 detachable sport ear hooks • 2 stabilizers (optional- for added support) •... - Page 6 Headphone assembly: To install the Ear Stabilizers: 1-Remove the ear bud tip 2- Slide the ear stabilizer on with the flap facing outward 3-Push the ear bud tip back on 4-Adjust stabilizer to a comfortable fit. Both stabiliz- ers should be facing outward –away from the ear bud Note: For correct fit, stabilizer should tuck into the back of your ear.
-
Page 7: Control Unit
Control Unit: • Micro USB Charging port • Volume +/Previous Track • Power/Play/Pause/Pair • Volume – / Next Track • Pairing/Power LED Indicator • Microphone... -
Page 8: Led Indicator Guide
LED Indicator Guide:... -
Page 9: Getting Started
Getting Started: To use your Jarv NMotion Bluetooth Stereo headset, please follow the steps below: 1. Ensure your Bluetooth headset is fully charged. 2. Pair your Bluetooth headset to a Bluetooth-enabled device prior to use. (See Pairing your Headset instruc-... -
Page 10: Pairing Your Headset
5. Activate your mobile phone's Bluetooth pairing function. 6. Set the mobile phone to search for Bluetooth devices within range and select “Nmotion BTHL-201” from the list of devices shown. 7. If you are prompted for a Passcode enter “0000” and press “ok”... - Page 11 Powering On the Headset Press and hold down the Power button for 3 seconds until a blue light appears Powering O the Headset Once powered on, Press and hold down the Power button for 3 seconds until a red light appears. Wearing Your Headset The Left / Right indicator is located on the inside of the Earbuds.
- Page 12 Redialing a Call Press the Power button twice to redial the last dialed phone number on your mobile phone. Adjusting the Volume Hold down the Volume + to increase volume or Volume – to decrease volume. You will hear a beep when you reach the maximum or minimum volume level.
-
Page 13: Troubleshooting
Repeat the troubleshooting sequence. Warranty At Jarv, we are dedicated to making the best quality product we can. To back this up, your Jarv Bluetooth earphones are warranted for One (1) full year from the date of purchase. - Page 14 Safety Information Check local laws regarding the use of mobile phones and headsets while driving. If you use the headset while driving, ensure that your attention and focus remains on the road and you drive in a responsible and safe manner. Never allow children to play with the headset, as the small parts may be a choking hazard.
- Page 15 iv. Do not expose the headset to extreme tempera- tures. The best storage temperature range is from 40-80 F, otherwise, the life of the headset will be affected. v. Do not dispose of the headset in fire as it this may result in an explosion.
- Page 16 Product Specifications Bluetooth Version: Bluetooth 4.0 A2DP Digital Volume Control Built-In Microphone Driver: 10mm USB Port for battery recharge Wireless Range: 33 feet DC Battery power: Built-in rechargeable lithium battery Battery life: Up to 5 hours of Talk/Music Time Stand-by Time: Up to 100 hours Actual performance may vary due to the user's habits, different modes of operation, and mobile phone settings.
- Page 17 Warning and Precautions WARNING: To prevent fire or shock hazard, do not expose this unit to rain or moisture. WARNING: Do not place this unit directly onto furni- ture surfaces with any type of soft, porous, or sensi- tive finish. As with any rubber compound made with oils, the feet could cause marks or staining where the feet reside.
Need help?
Do you have a question about the NMOTION and is the answer not in the manual?
Questions and answers