
Related Manuals for West Marine VHF680


Summary of Contents for West Marine VHF680
- Page 1 VHF680 Class ‘D’ DSC Marine Radio with Hailer Radio maritime ASN de classe ‘D’ avec appel à la voix Owner’s Manual Guide d’utilisation Model/modèle 12019147...
-
Page 2: Making A Voice Distress Call
Making a VOiCE DistrEss Call Lift the red cover. Press and hold the DISTRESS button for three seconds. Your radio transmits your boat’s location every few minutes until you receive a response. NOTE: If the radio displays Enter User MMSI, cancel the automatic distress call and make a normal voice distress call. -
Page 3: Faire Un Appel De Détresse Vocal
FairE un appEl DE DétrEssE VOCal Soulevez le couvercle rouge. Maintenez la touche DISTRESS enfoncée pendant trois secondes. La radio transmet la position de votre bateau à intervalles réguliers de quelques minutes, jusqu’à ce que vous receviez une réponse. REMARQUE : Si la radio affiche Enter User MMSI (Entrer l’ISMM de l’utilisateur), annulez l’appel de détresse automatique et faites un appel de détresse couvercle rouge et vocal standard. -
Page 4: Cómo Hacer Una Llamada De Apuro Por Voz
13. Termine el mensaje diciendo: “EstE Es {nombre o señal de su nave}, OVEr.” 14. Suelte el botón PUSH-TO-TALK y escuche. Si no recibe una contestacion dentro de 30 segundos, repita su llamada, comenzando con el paso 3, descrito arriba. Visite www.westmarine.com para bajar el manual en español de la radio VHF680. -
Page 5: Table Of Contents
Contents Making a Voice Distress Call ..........ii Making DSC Calls ..............16 Faire un appel de détresse vocal .......... iii Making an Automatic Distress Call........17 Receiving DSC Calls .............. 17 Cómo hacer una llamada de apuro por voz ......iv Test Calls ................ -
Page 6: Getting Started
What’s included Flush mount bracket kit VHF680 DSC radio Mounting bracket, knobs, and hardware Microphone hanger and mounting hardware DC power cord Hailer cable Accessory cable Spare fuse E - 2... -
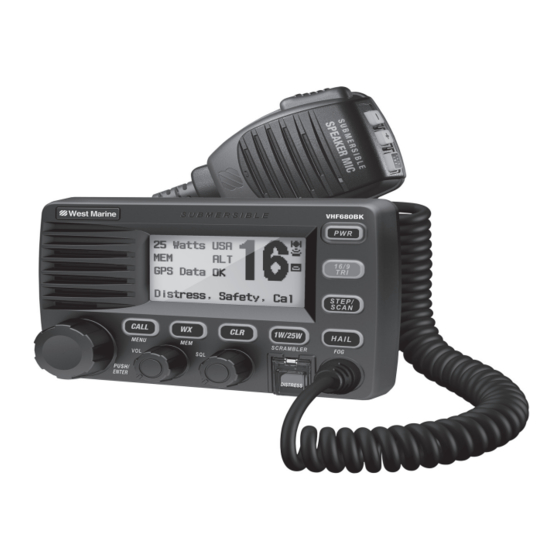
Page 7: Parts Of The Radio
parts of the radio Front view (power) button 1W/25W-SCRAMBLER CALL-MENU button button (triple/ 16/9-TRI dual-watch) WX-MEM (clear) button button button STEP/SCAN button HAIL-FOG button Microphone cord button DISTRESS (behind cover) PUSH/ENTER knob VOLUME knob SQUELCH knob (turn clockwise to (turn clockwise to (turn clockwise to move up channels;... -
Page 8: Rear View
Rear view Accessory Hailer cable pigtail cable Antenna pigtail connector (SO238) 13.8V Power Heat sink cable pigtail Connector Connects to... For details, see ... External VHF antenna with a male PL259 (SO238) connector and 50 Ω impedance. Minimum 4 ft, 3dB Antenna connector Connecting the radio (see page 24). -
Page 9: Turning On The Radio
turning on the radio Press to turn on the radio. As it powers on, the radio displays the user MMSI number, then goes to the last channel used. If there is no MMSI set, the radio displays MMSI not entered. See page 14 for information on entering MMSI number. setting the uiC Channel Mode (usa/Can/int) The radio comes preset to use the UIC channels assigned for the United States. -
Page 10: Normal Mode
Watch mode What it does Use it when To turn it on/off... Select WX Alert Mode in the You want to be made aware of Checks for alerts on the last-used Setup menu, and then choose ON Weather Alert severe weather conditions in your weather channel every 7 seconds. -
Page 11: Scan Mode
CALL-MEnU To turn Weather Alert Watch on or off, press and hold while the radio is idle. Select Setup and then WX Alert Mode. Turn the PUSH/EnTER knob to choose On or Off, and press PUSH/EnTER to select. normal mode with Triple and Dual Watch If you activate Triple Watch while operating in normal mode, the radio checks channels 16 and 9 every 2 seconds;... -
Page 12: Weather Mode
To activate Triple/Dual Watch with scan mode: Turn off scanning mode. Press and hold 16/9-TRI (on the radio or the microphone) for 2 seconds. (To change between Triple or Dual Watch, see page 11.) STEP/SCAn Activate scan mode (press and hold Memory Channel Scan Scan mode with both Weather Alert and Triple/Dual Watch... -
Page 13: Using Your Radio
using YOur raDiO using the Menu Press and hold - USA/CAN/INT To open the radio call Dual/TriWatch menu, press CALL-MEnU . To open the normal menu, press and hold CALL-MEnU . The options on the normal GPS Setup menu are shown to the right. FIPS Codes •... -
Page 14: Making A Transmission
Turn the PUSH/EnTER knob to select the channel you want to change and press PUSH/EnTER Select Rename to enter a new name for this channel. The radio prompts you to enter a new name for this channel. Each name can be up to 12 characters. Turn the PUSH/EnTER knob to change the first character. -
Page 15: Choosing Triple Watch Or Dual Watch
Choosing triple Watch or Dual Watch In Triple Watch mode, the radio checks channels 16 and 9 every 2 seconds; in Dual Watch mode, the radio checks channel 16 only. Generally, Triple Watch is used in areas where channel 9 is used as a hailing frequency; Dual Watch is used in areas where channel 16 is used for distress and hailing. -
Page 16: Using The Scrambler
If you are satisfied with the list of FIPS codes, select [Exit] to close the menu. To edit an existing FIPS code, select the code you want to change from the list. PUSH/EnTER To delete the FIPS code, select Delete. To edit the code, select Edit, then use the knob to change each of the six digits as described above. -
Page 17: Setting The Gps Position Manually
setting the gps position Manually Any time the radio does not receive valid GPS data for four hours, it displays Input Position. If the GPS is also connected, the radio will sound an alert tone as well as display Input Position. Follow the steps below to manually input your position. NOTE: Be certain any manually-entered position is correct. -
Page 18: Entering Mmsi Numbers In Your Radio
Advanced DSC features Your radio supports the following DSC features: Feature Menu Item Function Individual Call Individual Contact another vessel from your directory. Group Call Group Contact all vessels that share your group MMSI code. All Ships Call All Ships Broadcast to all vessels within range (used for safety or advisory messages). -
Page 19: Using The Directory
The radio reminds you that this is a permanent setting and asks you to confirm. To confirm the entry, press PUSH- EnTER . The radio returns to the Setup menu. Press to return to the MMSI edit screen. group MMSI number You can change the group MMSI number as often as you want. -
Page 20: Making Dsc Calls
To change an existing directory entry, select the entry you want to change. To delete the directory entry, select Delete. To edit the code, select Edit, then use the PUSH/EnTER knob to edit the MMSI number and the name. When you are satisfied with the directory list, select [Exit] to close the menu. Making DsC Calls There are essentially four different types of DSC voice calls: Call type... -
Page 21: Making An Automatic Distress Call
Calling a particular group of stations (group Call) Group calling calls all the stations that share your group MMSI. You must have a group MMSI programmed into the radio to make a group call, and the stations you are calling must have this same group MMSI programmed into their radios. Press CALL-MEnU to open the call menu, and select Group. - Page 22 • If the radio receives a group or all ships call, it sounds an incoming call tone and automatically switches to the designated response channel. • If you disable automatic channel switching, the radio responds differently depending on the type of call it receives. If Auto CH SW is off and: If the radio receives an incoming Distress, Group, or All Ships call, it displays the received call information but does not switch to the required channel.
-
Page 23: Test Calls
Returning a call You can return individual calls directly from the receive log. From the call detail screen, turn the PUSH/EnTER knob clockwise until Call Back appears at the bottom of the display. Press PUSH/EnTER to return that station’s call. test Calls Making Test Calls (Test) You can use the test call feature to make sure your radio is working and configured correctly. - Page 24 Press CALL-MEnU to open the call menu, then select POS Request. The radio displays the names listed in your directory; turn the PUSH/EnTER knob to choose the entry you want to contact and press PUSH/EnTER If you want to contact a station that is not in your directory, select [Manual]. The radio prompts you to enter the MMSI number you want to call.
-
Page 25: Putting The Radio Into Standby
putting the radio into standby If you are leaving your radio or do not wish to answer any DSC calls, you can put your radio in standby mode. If your radio receives an individual call, it will automatically respond with a message that indicates your radio is currently unattended. Follow the steps below to put your radio in standby: Open the Call menu. -
Page 26: Using The Foghorn
using the Foghorn Foghorn settings You can set the vessel type, tone frequency, and default volume for the foghorn. Press and hold - Fog Setup Setup Frequency Fog Setup Vessel Type Fog Volume Back[CLR] Select[ENT] Open the normal menu and choose the Setup sub-menu. Select Fog Setup, then choose one of the following options: To change the tone used by the foghorn for Manual, Underway, Stop, Sail, and Tow signals: PUSH/EnTER... -
Page 27: Installing The Hardware
For Manual, Underway, Stop, Sail, and Tow signals, the radio sounds the foghorn using the tone frequency and volume chosen in the Fog Setup menu. To turn off the foghorn, press installing tHE HarDWarE Mounting the radio Your radio can sit at any angle in the mounting bracket so it can accommodate the best location. First, determine the best place to mount the radio. -
Page 28: Connecting The Radio
Installing the radio Cut the proper-sized hole in your dash. Pass any cables through the hole, then insert the radio until the mounting Radio flange is flush with the dash. front Dash (from inside) Mounting flange Radio Hole rear Use the screws and washers to attach the right angle brackets to the radio as shown. -
Page 29: Connecting To A Gps Receiver
Connecting the Accessory Cable Use the accessory cable to connect the radio to a GPS receiver, a GPS chartplotter, and an external speaker.The wiring diagram below shows the connections for each accessory: Accessory cable wires Connects to... Yellow: NMEA 0183 IN (-) GPS receiver GND Orange: NMEA 0183 OUT (-) Chartplotter NMEA Data Input (-) -
Page 30: Connecting To A Chartplotter
When the GPS receiver is correctly connected, the display shows GPS Data OK. Press PUSH/EnTER to open the GPS status screen and see detailed GPS data. • If there is a problem with the Time 06/20 11:00:00 Date GPS connection, the display shows Check GPS. -
Page 31: Maintenance And Troubleshooting
Connect the BROWN wire of the accessory cable to the POSITIVE (+) wire of your external speaker. Be certain all wire connections are secure and that all open wires are adequately covered. NOTE: To extend the life of the radio, use waterproof tape to seal electrical connections. MaintEnanCE anD trOuBlEsHOOting Due to its rugged design, your radio requires very little maintenance. -
Page 32: Performing A Self Test
performing a self test The radio can check the electrical, hailer, and GPS connections. Open the normal menu and choose the System sub-menu. Select Self Test. The radio checks all connections and displays where connections are good and an X beside an item that contained a problem. -
Page 33: Reference Tables
Hum and Noise Signal-to-Noise 45 dB@1 kHz with 3 kHz deviation with 1000 Hz modulating frequency (nominal) Audio Distortion Less than 8% with 3 kHz deviation with 1000 Hz modulating frequency Spurious Suppression –25 dBm @ Hi, –25 dBm @ Lo Output Power Stabilization Built-in automatic level control (ALC) Frequency Range... - Page 34 Ch No. RX Freq TX Freq Status Name on display 156.3000 156.3000 Simplex Inter-ship safety 156.3500 156.3500 Simplex Commercial 156.4000 156.4000 Simplex Commercial 156.4500 156.4500 Simplex Non commercial 156.5000 156.5000 Simplex Commercial 156.5500 156.5500 Simplex Vessel traffic system 156.6000 156.6000 Simplex Vessel traffic system 156.6500...
- Page 35 Ch No. RX Freq TX Freq Status Name on display 157.1250 157.1250 Simplex Government 157.1750 157.1750 Simplex Coast guard 161.8250 157.2250 Duplex Marine operator 161.8750 157.2750 Duplex Marine operator 161.9250 157.3250 Duplex Marine operator 87** 157.3750 157.3750 Simplex Marine operator 88** 157.4250 157.4250...
- Page 36 Ch No. RX Freq TX Freq Status Name on display 156.1250 156.1250 Simplex Canadian coast guard 156.1750 156.1750 Simplex Port operation 160.8250 156.2250 Duplex Marine operator 156.2250 156.2250 Simplex Port operation 156.2750 156.2750 Simplex Port operation 156.3250 156.3250 Simplex, 1W Port operation 156.3750 156.3750...
- Page 37 Ch No. RX Freq TX Freq Status Name on display 156.5500 156.5500 Simplex Vessel traffic system 156.6000 156.6000 Simplex Vessel traffic system 156.6500 156.6500 Simplex Bridge to bridge 156.7000 156.7000 Simplex Vessel traffic system 156.7500 156.7500 Simplex, 1W Environmental 156.8000 156.8000 Simplex Distress, Safety, Calling...
-
Page 38: Nmea Operation
Ch No. RX Freq TX Freq Status Name on display 161.6250 157.0250 Duplex Port operation 161.6750 157.0750 Duplex Port operation 161.7250 157.1250 Duplex Port operation 161.7750 157.1750 Duplex Port operation 161.8250 157.2250 Duplex Marine operator 161.8750 157.2750 Duplex Marine operator 161.9250 157.3250 Duplex... -
Page 39: Three Year Limited Warranty Statement
West Marine warrants to the original retail purchaser of the http://www.navcen.uscg. gov/marcomms/boater.htm). Here West Marine product, where the purchase is made in the United are a few guidelines that affect nearly all boaters. States or Canada, that for thirty-six (36) months from date of original retail purchase said product will be free from defects •... - Page 40 (as explained here), then we will: • At West Marine’s option, we will repair the product or, if we are unable to repair it, we will replace it with a comparable product that is new or refurbished;...
Need help?
Do you have a question about the VHF680 and is the answer not in the manual?
Questions and answers