Casio 3311 Operation Manual
Hide thumbs
Also See for 3311:
- Operation manual (7 pages) ,
- Operation manual (4 pages) ,
- Operation manual (6 pages)
Advertisement
Table of Contents
- 1 Charging Precautions
- 2 Power Supply
- 3 Power Saving
- 4 Display Illumination
- 5 How a Radio-Controlled Watch Works
- 6 Calibration Signal
- 7 To Perform Manual Receive
- 8 World Time Mode
- 9 Troubleshooting
- 10 Using the Alarms and Hourly Time Signal
- 11 Stopwatch Mode
- 12 Configuring Time and Date Settings Manually
- Download this manual
MA0406-EA
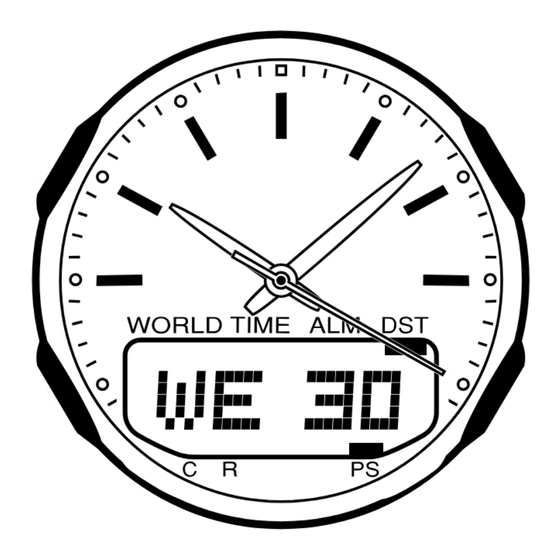
Modes and Display Screens
C
C button sounds a confirmation tone and cycles through available modes in the sequence shown below.
C
Each press of the C
C
Timekeeping Mode
❚ Changing Display Screen Contents
Each press of the
Hour Hand
shown below.
Minute Hand
Day of the Week
(Light)
Button
Button
Button
Button
Second Hand
Digital Display
PM indicator
(no indicator for AM)
Days of the Week
SU: Sunday
TH: Thursday
Power Supply
The power supply of this watch uses a solar cell to generate
electrical power, which is stored by a rechargeable battery. Using
or storing the watch where it is not regularly exposed to light, or
allowing it to be blocked from light by your sleeve for long periods
as you are wearing it can cause the power of the rechargeable
battery to run down. To ensure stable operation, be sure to allow
the watch to be exposed to light as much as possible when you
are wearing or storing it.
Important!
Note that all data in memory and all settings are cleared whenever
you allow the level of the rechargeable battery to drop to Level 4.
❚ Checking the Battery Level
Use the Battery Level Screen to check the current level of the
watch's rechargeable battery.
• In the Timekeeping Mode, press the C button once to change to
the Battery Level Screen.
Timekeeping Mode
Battery Level Screen
Or
Example: Day of the Week
Operation Guide 3311/3356
button cycles digital display contents in the sequence
Calendar Screen
Day
Day of the Week
Or
•
For more information, see "To configure digital settings".
Current Time Screen
Seconds Screen
Hour
Minutes
Seconds
Receive Icon
(Indicates time calibration
signal reception was
successful.)
MO: Monday
TU: Tuesday
WE: Wednesday
FR: Friday
SA: Saturday
Level 1
Normal operation enabled.
Normal operation enabled.
Level 2
Signal reception, tones (alarms,
hourly time signal), display
Level 3
illumination, digital display, and
analog timekeeping disabled.
All functions, including
Level 4
timekeeping, disabled.
• Exposing the watch to direct sunlight or other strong light may
cause the battery level indicator to momentarily indicate a level
that is higher than the actual battery level. Because of this, you
should wait for a short while after charging to check the battery
level indicator.
• Alarms and the hourly time signal cannot be turned on, and signal
reception is disabled while the battery is at Level 3.
• Signal reception will become enabled again when the battery is
recharged up to Level 2.
• Even after the battery drops to Level 4, watch operation will
resume as soon as charging starts. However, you should wait until
the digital display operation resumes before setting the time and
date.
• The display will automatically revert to the Timekeeping screen if you leave the Battery Level, Alarm, or Hand Setting screen displayed
without performing any operation for about two or three minutes.
Battery Level Screen
Or
❚ Start charging at Level 3!
Battery Level 3 indicates that remaining battery power is very low.
Be sure to expose the watch to light for recharging as soon as
possible after the Level 3 indicator starts to flash.
❚ Flashing Recover Indicator
If you use the light or alarms a number of times during a short
period, a recover (R) indicator flashes on the display and the
following operations become disabled as battery power recovers.
• Display illumination
Recover (R) Indicator
• Alarm and hourly time signal
• Analog timekeeping
• Time calibration signal reception
Normal operation will return after the
battery recovers.
World Time Mode
Alarm Mode
Alarm
City Code
Number
2-second
interval
Hand Setting Mode
Stopwatch Mode
Mode Indicator
❚ Charging Precautions
Avoid charging the watch in the following locations, and anywhere
else where the watch may become very hot.
• On the dashboard of an automobile parked in the sun
• Very close to an incandescent light source or other sources of
heat
• In a location exposed to direct sunlight for long periods
Note that the display panel may become black under very high
temperatures. This is temporary, and the display will appear
normal again at lower temperatures.
Depending on the light source you are using, the
case of the watch may become quite hot during
charging. Take care to guard against burn injury after
charging.
❚ To charge the battery
Point the solar panel (face) of the watch at a light source.
• Remember that even a partial blockage of the solar cell reduces
charging efficiency.
Example: Positioning the watch
Solar Cell
• The illustration shows the resin band model.
Mode
Indicator
1
Advertisement
Table of Contents

Related Manuals for Casio 3311


Summary of Contents for Casio 3311
-
Page 1: Charging Precautions
Operation Guide 3311/3356 MA0406-EA Modes and Display Screens C button sounds a confirmation tone and cycles through available modes in the sequence shown below. Each press of the C • The display will automatically revert to the Timekeeping screen if you leave the Battery Level, Alarm, or Hand Setting screen displayed without performing any operation for about two or three minutes. -
Page 2: Power Saving
Operation Guide 3311/3356 ❚ Charging Guide Required Daily Charging Time Power Saving • The following is the daily Starting from a full charge, the watch amount of charging required should be able to continue operating each day to support the for about five months without further operations under “Daily Use”. -
Page 3: How A Radio-Controlled Watch Works
Operation Guide 3311/3356 Reception Range How a Radio-controlled Watch Works This watch is designed to receive the standard time calibration signal of Japan (JJY) or of the United States (WWVB). The signal that is received depends on the current Home City setting. - Page 4 Operation Guide 3311/3356 ❚ To view the last reception date and time ❚ Selecting Your Home City Signal Reception Settings Note that time calibration signal reception is performed only when one of the city codes shown below is selected as the Home City.
- Page 5 Operation Guide 3311/3356 ❚ Configuring Auto Receive Settings ❚ Configuring Transmitter Selection Mode Settings Auto receive settings can be configured only when TYO, LAX, DEN, CHI, or NYC is selected as the Home City. Note that the transmitter selection mode setting can be configured only when TYO is selected as the Home City.
-
Page 6: World Time Mode
Operation Guide 3311/3356 Auto receive is turned on (ON), but the receive icon “ ” is not What time is auto receive performed? Troubleshooting on the display. • Auto receive is performed in the middle of the night, when • The receive icon appears when a signal is received successfully reception conditions are best. -
Page 7: Using The Alarms And Hourly Time Signal
Operation Guide 3311/3356 ❚ To set an alarm time (Back) Using the Alarms and Hourly Time Signal D (+) and B B (–) Use the D buttons to change the Example: To set Alarm 2 for 3:30 p.m. hour setting. -
Page 8: Configuring Time And Date Settings Manually
Operation Guide 3311/3356 ❚ Elapsed Time Measurement Configuring Time and Date Settings Manually Start Stop Reset Pressing the A button while timing is stopped resets the stopwatch to all zeros. If you are planning to manually adjust both the digital and analog settings, be sure to adjust the digital setting first. - Page 9 Operation Guide 3311/3356 Digital-Analog Synchronization High-speed Lock Ajusting the Analog Time Setting If the second hand does • While holding down the D button to start high-speed clockwise After adjustment of the digital time, the watch automatically not align properly with the...
Need help?
Do you have a question about the 3311 and is the answer not in the manual?
Questions and answers