Table of Contents
Advertisement
SVC100 / SVC100GPS!
VEHICLE JOURNEY RECORDER!
USER GUIDE
Thank you for purchasing this Journey Recorder.
Please ensure that you read and understand this USER GUIDE
and use it before connecting and installing this Recorder.
Please store the USER GUIDE in an easily accessible location.
VER 2.0.0 2
nd
Edition
Advertisement
Table of Contents

Related Manuals for Smart Witness SVC100


Summary of Contents for Smart Witness SVC100
- Page 1 SVC100 / SVC100GPS! VEHICLE JOURNEY RECORDER! USER GUIDE Thank you for purchasing this Journey Recorder. Please ensure that you read and understand this USER GUIDE and use it before connecting and installing this Recorder. Please store the USER GUIDE in an easily accessible location.
-
Page 3: Safety Advice
SAFETY ADVICE CAUTION RISK OF ELECTRIC SHOCK DO NOT OPEN CAUTION: TO REDUCE THE RISK OF ELECTRIC SHOCK, DO NOT REMOVE COVER. NO USER-SERVICEABLE PARTS INSIDE. REFER SERVICING TO QUALIFIED SERVICE PERSONNEL. Please make sure you follow the safety advice/instructions given in the user guide. Caution RISK OF EXPLOSION IF BATTERY IS REPLACED BY AN INCORRECT TYPE. -
Page 4: Gps Reception
GPS Reception 1. Activate the product in an area without large buildings to improve GPS reception. The commercial purpose GPS has the average rage error of more than 15 meters and the range error could be more than 100 meters due to environmental conditions like buildings, roadside trees etc. - Page 5 CONTENTS Smart Witness SVC100 / SVC100GPS Power Cable Camera/Recording Unit (cigarette jack) including bracket 2GB SD memory card USB 2.0 SD Card Reader (The Analysis Software is on the provided SD card) Spare camera mounting components Wire Splice clips (x5) Includes: a.
-
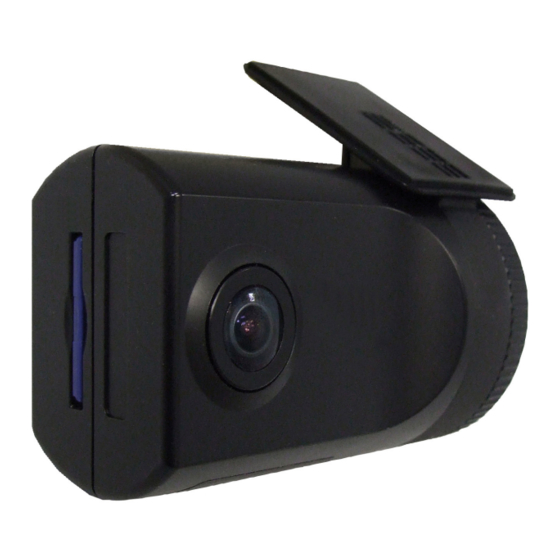
Page 6: Left Side
INTRODUCTION FRONT Bracket Adhere tape on bracket Camera Lens DC Power In SD Memory Card Slot (DC 12~24V) Left side Right Side... -
Page 7: Unit Parts
INTODUCTION BACK Internal GPS Antenna Record LED BLUE LED Overwrite LED RED LED SD Card Format Button Record Button UNIT PARTS Main Unit Bracket Holder NOTE: Formatting [initializing] SD memory card can be done using SD Card Format Button. However we recommend that you format [initialize] the SD card using the PC Viewer software on the PC. -
Page 8: Installation
INSTALLATION Park your vehicle on a flat level surface. Turn off the engine before installing the SVC100 / SVC100GPS. 1. Insert the SD memory card into the SD card slot. Please make sure to disconnect the power cable when inserting or ejecting the SD memory card. - Page 9 Use the provided wire splice clip as seen in the picture on left. 4. SVC100/SVC100GPS unit requires a continuous 12-24V DC power source from the vehicle. Plug in the power. The provided power cord cable route should be from the left side of the SVC100/SVC100GPS towards your power source.
-
Page 10: Automatic Start
FUNCTION Automatic start Connect your vehicle’s power cable to the SVC100 / SVC100GPS after starting the vehicle. Then SVC100 / SVC100GPS will be automatically started. (Use the provided power cable.) NOTE: The unit will not start recording immediately after power on. It takes around 1 minute for the built-in power backup system to charge. -
Page 11: Operation
2. Blue LED & Red LED will be slowly blinking simultaneously and then the Blue LED will remain on. The Blue LED light means SVC100/SVC100GPS is ready for the event recording. 3. The event recording will automatically begin by the G-sensor with one short “Beep”... -
Page 12: Pc System Requirement
SOFTWARE USER GUIDE SVC100/SVC100GPS PC Viewer Guide PC SYSTEM REQUIREMENT Recommended PC specifications for PC Viewer software Windows 2000, Windows XP Windows Vista Pentium4 2.6GHz or higher 512MB or higher Interface SD Memory Card Reader Install 20MB or higher Free space... -
Page 13: Software Installation
3. Double click [SETUP.EXE] at [pcsw] folder. 4. Select the language and then follow the dialog box. 5. The “PCViewer” icon will be displayed on your desktop. NOTE: To Un-install the PC Viewer Open the ‘Control Panel’ Select ‘Remove Program’ and remove Smart Witness Analysis Software. - Page 14 Connect SD memory card 1. Connect SD memory card into the SD card reader. 2. Run “SmartWitness” 3. Select [File] and then click “Select Data Folder” or Click [OPEN] button [OPEN] button 4. Select SD memory card folder at the folder select window.
-
Page 15: Pc Viewer Setting
PC Viewer Setting This setting is for the PC Viewer itself. To set the Recorder, refer to page 27. The ‘date’ formats and ‘speed’ unit will be set automatically according to the PC Windows setting. However it can be changed with this PC viewer setting menu. -
Page 16: Select File For Playback
Select file for playback When Record Method set as “Event record” “G-Senor” means recording was Check activated the event by impact “Switch” means recording was activated by button Load Button Check all files Button When Record Method set as “Normal record” Recording duration Check The maximum... -
Page 17: File Loading
FILE LOADING 6. Click the [Load] button once, the [FileList] tab will be changed to the [PlayList] tab as shown below When Record Method set as “Event record” Now playback this file Return to the [FileList] Check it for the continuous playback When Record Method set as “Normal record”... -
Page 18: Playback Screen
PLAYBACK SCREEN When Record Method set as “Event record” [POST]: post-recorded frame [PRE]: pre-recorded frame Check it for continuous playback Display frame/Total frames number Frame size When Record Method set as “Normal record” Google Map location data only available Event area marking by G-sensor with SVC100GPS or button (5seconds per each event) model... - Page 19 PLAYBACK 7. Click play button for playback. Playback speed GPS Speed, G sensor data & GPS location data Date & Time Drag & Move the white bar to move the playback position. Before 15seconds After 5sec Event Playback buttons X2, 4, 8, 16 X0.5, 1 X0.5, 1 X2, 4, 8, 16...
- Page 20 PLAYBACK NOTE: PC Keyboard hot buttons Function PC keyboard hot buttons 1024x768 mode Enter Return to the previous mode: Enter Full screen mode Alt + Enter Return to the previous mode: Enter Playback speed control Ctrl + F 0.5 => 1 Reverse playback speed Ctrl + B control...
-
Page 21: Google Map
Google map (Supported by the SVC100GPS model only) The route taken will be displayed on the Google map at lower right corner of the software. To see the route & position on Google Maps, the GPS data should be recorded with video. -
Page 22: Thumbnail Function
Thumbnail Function 7. Click the button for 4x4 multi view (Thumbnail function) Click the thumbnail image to change the playback position. Click right the mouse button to single image playback mode. 8. Click [Close] button to quit the playback. Click [Close] to finish the playback. Then the [PlayList] window will be changed to the initial status. - Page 23 Save JPG file & AVI file 9. Pause the playback and click ‘Save Image’ icon to make a JPG file. ‘Save Image’ icon 10. Click ‘Save AVI’ icon to make a AVI file. ‘Save AVI’ icon...
-
Page 24: Print Image
Print image 11. Pause the playback and click ‘Print Image’ icon. Print image icon Type in the File Name [Print Title] & any comments [Print Comment] using the Keyboard. The ‘Print Comment’ window allows up to 7 lines total. -
Page 25: Make Report
Make Report 12. Click [Print] button in the print preview windows for printing. The File Name [Print Title], Comment [Print Comment], G-sensor graph & map (for SVC100GPS Model only) will be printed on the first page. Click [ 2x2 ] and then click [Print] to print 4 images in one page. - Page 26 Backup Event/Log files 13. Click [Backup Event/Log files] icon to backup the files to the PC. [Backup Event/Log files] icon Select [Event data] or [Normal data] and select [Log data] first, before clicking the [Backup Event/Log files] icon. Then selected Event or Normal or Log data list are on the Backup windows.
- Page 27 Setting the Vehicle Journey Recorder 14. Click [Recorder Setting] icon for setup. [Recorder Setting] icon Caution Backup the SD data first, before clicking initialize SD card button. Once done, the old data cannot be recovered. Recording Method Event Record (Automatically starts Recording by G-sensor event or Record Button) Normal Record (Automatically starts continuous Recording just after Power on)
- Page 28 Setting the Vehicle Journey Recorder Beep on record “Beep” sound ON/OFF when Event recording start G-sensor setting Check simple setting mode and then change the sensitivity. High sensitivity like 8 or 9 means recording will be started at very low impact. Date/Time Automatically synchronize with GPS time.
- Page 29 STEP1. Insert new SD memory card into the PC. STEP2. Run “PC Viewer SVC100” STEP3. Select [Tool] and then click [SD Initialize] We recommend the [SD initialize] at least once per month to prevent the SVC100/SV C100GPS from any software errors.
-
Page 30: Product Information
Product Information 15. Click [About] icon to check the product information. About icon... -
Page 31: Log File Playback
LOG FILE PLAYBACK 16. Select [LOG] windows and then check the log from the log list using mouse or click [Check All] button. Then click [Load] button. Log data Log data will be recorded during driving even if there are no events. - Page 32 GPS LOG TO KML CONVERTER (for Google Earth) To see the whole route on Google Earth, select the log file and click Google Earth button. (SVC100GPS only) STEP1. Install the Google Earth on your PC. (http://earth.google.com/ STEP2. Check the log file STEP3.
-
Page 33: Specification
SPECIFICATION Image sensor 1/4" CMOS Standard DSP Angle of View 170° Video resolution 640x480, 320x240 Recording Speed Up to 25 fps Continuous By impact Recording Modes By emergency button. 2GB (37minutes~ 36hours) Recording time 16GB (7hours~167hours) Backup SD Memory Card 2GB SD memory card Memory (supports SDHC cards of up to 32GB) -
Page 34: Recording Time Table
Recording time table Resolution Quality Size 16GB 555 min 1408 min 3115 min 109 hours 111 min 282 min 623 min 22 hours HIGH 40KB 55 min 141 min 311 min 11 hours 37 min 94 min 208 min 7 hours 640x480 1109 min 2816 min 6229 min 167 hours... -
Page 35: Technical Support And Warranty
Technical Support & Warranty TECHNICAL SUPPORT For Technical Support, please contact your local distributor. LIMITED WARRANTY This product is supplied with 1 year warranty. The Warranty excludes products That have been misused, (including accidental damage) and damage caused by normal wear and tear. In the unlikely event that you encounter a problem with this product, it should be returned to the place of purchase. - Page 36 Optional Accessory (Permanent Power Cable) Model name: SVC100PPC The Permanent Power Supply Cable will allow you to hard wire the SVC100/ SVC100GPS unit to the fuse box of your vehicle. Recorder Fuse box (+) Ground Fuse: 250V 1A Connect (+) to the reserve Fuse.
-
Page 37: Appendix (Upgrade)
Copy “SVC100_X.X.X.bin” file to the SD card [program] folder. 2. Upgrade SVC100/SVC100GPS Insert the prepared SD card to SVC100/SVC100GPS unit and turn on the power. The Blue & Red LED will quickly blink while the unit is upgrading. It will also ‘beep’... - Page 38 APPENDIX (Upgrade) 3. Check SVC100/SVC100GPS Turn on the SVC100/SVC100GPS and press the [RECORD] button to check the unit is recording properly. If the SVC100/SVC100GPS records as normal, turn off the power. Insert the SD card into your PC and initialise it using the software once you have successfully tested the SVC100/SVC100GPS.
- Page 39 APPENDIX (Upgrade SVC100/SVC100GPS) 4. Uninstall the old version of PC Viewer from your PC PC Windows [Start] > [Control panel] And uninstall [SmartWitness] 5. Install the new PC Viewer Run setup.exe and install the new SmartWitness X.X.X.X Click “OK” and check [Quick Format] and un-check [Backup configuration file] as below, NOTE: After installation the new PC Viewer, initialise the SD card.
- Page 40 Manufactured exclusively for:! www.smartwitness.com! Smart Witness is a Division of Xvision!
Need help?
Do you have a question about the SVC100 and is the answer not in the manual?
Questions and answers