Table of Contents
Advertisement
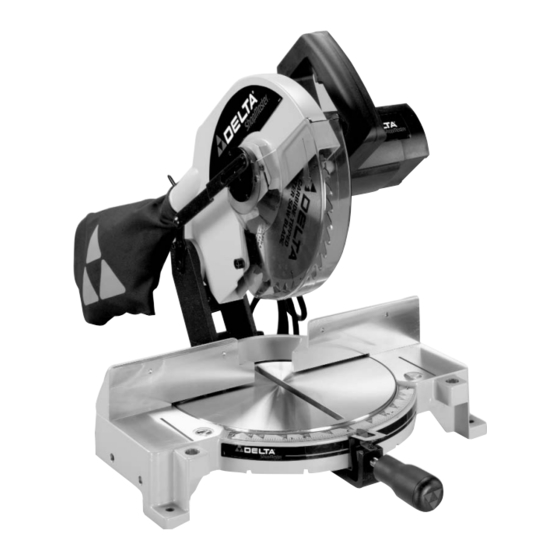
10" Miter Saw
(Model MS210)
U.S. Patent #5,347,902
PART NO. 905590 - 11-26-03
Copyright © 2003 Delta Machinery
To learn more about DELTA MACHINERY
ESPAÑOL: PÁGINA 19
visit our website at: www.deltamachinery.com.
For Parts, Service, Warranty or other Assistance,
1-800-223-7278 (
1-800-463-3582).
please call
In Canada call
Advertisement
Table of Contents

Related Manuals for Delta MS210


Summary of Contents for Delta MS210
- Page 1 10" Miter Saw (Model MS210) U.S. Patent #5,347,902 PART NO. 905590 - 11-26-03 Copyright © 2003 Delta Machinery To learn more about DELTA MACHINERY ESPAÑOL: PÁGINA 19 visit our website at: www.deltamachinery.com. For Parts, Service, Warranty or other Assistance, 1-800-223-7278 ( 1-800-463-3582).
-
Page 2: Safety Guidelines - Definitions
If you have any questions relative to a particular application, DO NOT use the machine until you have first contacted Delta to determine if it can or should be performed on the product. - Page 3 MANUAL BEFORE OPERATING THE MACHINE. accessories and attachments not recommended by Learning the machine’s application, limitations, and Delta may cause damage to the machine or injury to specific hazards will greatly minimize the possibility the user. of accidents and injury.
-
Page 4: Additional Safety Rules For Miter Saws
ADDITIONAL SAFETY RULES FOR MITER SAWS FAILURE TO FOLLOW THESE RULES MAY RESULT IN SERIOUS INJURY. ALLOW THE MOTOR TO COME TO FULL SPEED prior DO NOT OPERATE THIS MACHINE until it is completely to starting cut. Starting the cut too soon can cause assembled and installed according to the instructions. -
Page 5: Power Connections
POWER CONNECTIONS A separate electrical circuit should be used for your machines. This circuit should not be less than #12 wire and should be protected with a 20 Amp time lag fuse. If an extension cord is used, use only 3-wire extension cords which have 3- prong grounding type plugs and matching receptacle which will accept the machine’s plug. -
Page 6: Extension Cords
FOREWORD Delta ShopMaster Model MS210 is a 10" Power Miter Saw designed to cut wood, plastic, and aluminum. Cross cutting and miter cutting are easy and accurate. It can crosscut up to 2-1/4" x 5-3/4", miter at 45 both left and right 2-1/4" x 4- 1/8". -
Page 7: Rotating Table To 90 Degree Position
NOTICE: The manual cover photo illustrates the current production model. All other illustrations are representative only and may not depict the actual color, labeling, or accessories, and are intended to illustrate technique only. For your own safety, do not connect the miter saw to the power source until the machine is completely assembled and you read and understand the entire manual. -
Page 8: Fastening Machine To Supporting Surface
FASTENING MACHINE TO SUPPORTING SURFACE Before operating your miter saw, make sure that it is firmly mounted to a sturdy workbench or other supporting surface. Four holes are provided, two of which are shown at (A) Fig. 7. When frequently moving the saw from place to place, we suggest that the saw be mounted to a 3/4"... -
Page 9: Starting And Stopping Machine
Fig. 11 Fig. 10 STARTING AND STOPPING MACHINE To start the machine, depress switch trigger (A) Fig. 10. To stop the machine, release the switch trigger. This miter saw is equipped with an automatic electric blade brake. As soon as the switch trigger (A) Fig. 10 is released, the electric brake is activated and stops the blade in seconds. -
Page 10: Rear Support/Carrying Handle
ADJUSTING POINTER If it becomes necessary to adjust the pointer (A) Fig. 14, loosen screw (B), adjust the pointer and tighten screw (B). LOCKING CUTTERHEAD IN THE DOWN POSITION When transporting the miter saw, the cutterhead should always be locked in the down position. Lower the Fig. -
Page 11: Adjusting Fence 90 Degrees To Blade
ADJUSTING FENCE 90 DEGREES TO BLADE If the fence (A) Fig. 19 is removed from the saw, re-adjust it so that it is 90 degrees to the blade when the fence is replaced. Disconnect machine from power source. 1. Place one end of the square (B) Fig. 19 against the fence (A) and the other end against the blade. 2. -
Page 12: Auxiliary Wood Fence
AUXILIARY WOOD FENCE When performing multiple or repetitive cut-off operations that result in small cut-off pieces, one inch or less, it is possible for the saw blade to catch the cut-off pieces and project them out of the machine or into the blade guard and housing, possibly causing damage or injury. -
Page 13: Cutting Aluminum
CUTTING ALUMINUM Aluminum extrusions, such as used for making aluminum screens and storm windows, can be cut with your miter saw. To cut aluminum extrusions, or other sections that can be cut with a saw blade and are within the capacity of the machine, position the material so that the blade cuts through the smallest cross-section (Fig. - Page 14 FILLER BLOCK FOR CROWN MOULDING IF JOINT IS TO HAVE MITERED FILLER BLOCK FOR CROWN MOULDING IF JOINT IS TO HAVE MITERED CORNER FIT OR COPE CUT CORNER FIT OR COPE CUT Fig. 30 Fig. 31 2. When a large number of repetitive cuts of crown moulding are required, we suggest the use of filler blocks, as shown in Fig.
-
Page 15: Maintenance
Fig. 36A Fig. 36B 6. Fig. 36A illustrates the two outside corner pieces (B) and (E) 7. Fig. 36B illustrates the two inside corner pieces (C), and (D). MAINTENANCE CHANGING THE BLADE Use only cross-cutting saw blades. Use carbide-tipped blades with a negative hook angle. Do not use blades with deep gullets that can deflect and contact the guard. -
Page 16: Brush Inspection
Remove screw (A) Fig. 37, and rotate cover (B) to the rear as shown in Fig. 38. To remove the saw blade, insert hex wrench (C) Fig. 39 into the hex hole located in the rear end of the motor shaft, to keep the shaft from turning. -
Page 17: Parts, Service Or Warranty Assistance
Two Year Limited New Product Warranty Delta will repair or replace, at its expense and at its option, any new Delta machine, machine part, or machine accessory which in normal use has proven to be defective in workmanship or material, provided that the customer returns the product prepaid to a Delta factory service center or authorized service station with proof of purchase of the product within two years and provides Delta with reasonable opportunity to verify the alleged defect by inspection. - Page 18 NOTES...
- Page 19 Delta Distributor, Authorized · Service Center, or Porter-Cable Delta Factory Service Center. If you do not have access to any of these, call 800-223-7278 and you will · be directed to the nearest Porter-Cable Delta Factory Service Center. Las Estaciones de Servicio Autorizadas están ubicadas en muchas grandes ciudades.
Need help?
Do you have a question about the MS210 and is the answer not in the manual?
Questions and answers