Table of Contents
Advertisement
Advertisement
Table of Contents

Related Manuals for ProRunner 300


Summary of Contents for ProRunner 300
- Page 1 USER’S MANUAL MOTORIZED TREADMILL USER WEIGHT LIMITATION: 120kgs. (265lbs.)
- Page 2 PRO RUN 300 MOTORIZED TREADMILL PRECAUTIONS Precautions: WARNING: To reduce the risk of burns, fire, electric shock, or injury to persons, read the following important precautions and information before operating the treadmill. It is the responsibility of the owner to ensure that all users of this treadmill are adequately informed of all warnings and precautions.
-
Page 3: Pre-Assembly
PRO RUN 300 MOTORIZED TREADMILL PREASSEMBLY Open the boxes: You are now ready to open the boxes of your new equipment. Make sure to inventory all of the parts that are included in the boxes. Check the Hardware Comparison Chart for a full count of the number of parts included for this product to be assembled properly. -
Page 4: Hardware Comparison Chart
PRO RUN 300 MOTORIZED TREADMILL HARDWARE COMPARISON CHART Hardware chart: For your convenience, we have identified the hardware used in the assembly of this product. This chart is provided to help you identify those items that may be unfamiliar to you. -
Page 5: Parts List
PRO RUN 300 MOTORIZED TREADMILL PARTS LIST DESCRIPTION QTY. ORDER NO. DESCRIPTION QTY. ORDER NO. Motor Hood PR300-01 Cushion PR300-35 Cushion PR300-02 4.5 x 12mm Washer PR300-36 Side Rail PR300-03 M8 x 15 Screw PR300-37 Deck End Cap-Left PR300-04 M14 x 90mm Bolt... - Page 6 PRO RUN 300 MOTORIZED TREADMILL PARTS LIST DESCRIPTION QTY. ORDER NO. DESCRIPTION QTY. ORDER NO. Bumper PR300-69 U Bracket PR300-70 Upright Cross Brace PR300-104 M8 x 89mm Bolt PR300-71 M5 x 8mm Bolt PR300-105 M8 Nut PR300-72 Plastic Cover PR300-106...
-
Page 7: Parts Diagram
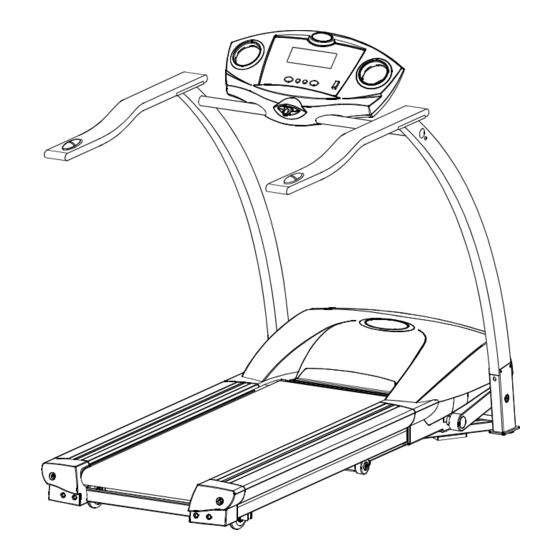
PRO RUN 300 MOTORIZED TREADMILL PARTS DIAGRAM A MAJORITY OF THE PARTS SHOWN HERE HAVE BEEN PREASSEMBLED AT THE FACTORY. - Page 8 PRO RUN 300 MOTORIZED TREADMILL PARTS DIAGRAM A MAJORITY OF THE PARTS SHOWN HERE HAVE BEEN PREASSEMBLED AT THE FACTORY.
- Page 9 PRO RUN 300 MOTORIZED TREADMILL PARTS DIAGRAM A MAJORITY OF THE PARTS SHOWN HERE HAVE BEEN PREASSEMBLED AT THE FACTORY.
- Page 10 PRO RUN 300 MOTORIZED TREADMILL ASSEMBLY STEP 1: First remove your treadmill from the carton as shown in FIG1. Next rotate up the Left and Right Uprights (26 and 27) and secure with two 10mm Washers (86), two M10 x 53mm Bolts...
- Page 11 PRO RUN 300 MOTORIZED TREADMILL ASSEMBLY STEP 2: Attach one Plastic Cover (106) to the Left Upright (26) and secure using one Plastic Cover Screw (105). Repeat on Right Upright (27).
- Page 12 PRO RUN 300 MOTORIZED TREADMILL ASSEMBLY STEP 3: First connect the Sensor Wires as shown in FIG2. Next attach the two Handlebars (22) to the Left and Right Uprights (26 and 27) and secure using four 8mm Washers (63) and four 8M x 18mm Bolts (89),...
- Page 13 PRO RUN 300 MOTORIZED TREADMILL ASSEMBLY STEP 4: Rotate up the Console (18) and secure by tightening both M8 x 18mm Bolts (89), located on the Left and Right Uprights (26 and 27), two M5 x 14mm Bolts (108).
-
Page 14: Leveling The Treadmill
PRO RUN 300 MOTORIZED TREADMILL LEVELING THE TREADMILL How to level the treadmill: An uneven floor can cause the treadmill to wobble during use as well as the incline adjustment to function incorrectly. Please follow the procedure described below to make sure the treadmill cushions are adjusted correctly prior to use. You may need the assistance of another person to perform this adjustment. -
Page 15: Folding Instructions
PRO RUN 300 MOTORIZED TREADMILL FOLDING INSTRUCTIONS How to fold up the treadmill: Your treadmill can be folded up for space saving storage. To do this follow the instructions here: To fold the deck you first need to bring the treadmill to the lowest incline level. -
Page 16: Unfolding Instructions
PRO RUN 300 MOTORIZED TREADMILL UNFOLDING INSTRUCTIONS How to unfold the treadmill: To unfold the treadmill for use follow the instructions here: Begin by standing behind and supporting the deck with your hands. Next release the lock with your foot by stepping on the release lever. -
Page 17: Transport Instructions
PRO RUN 300 MOTORIZED TREADMILL TRANSPORT INSTRUCTIONS How to transport the treadmill: After folding the treadmill tilt it to one side (you may need the help of a friend), reach under the Base Frame and rotate down the Transportation Wheel Bracket (96). Repeat this procedure on the other side. -
Page 18: Computer Operation
PRO RUN 300 MOTORIZED TREADMILL COMPUTER OPERATION Safety Key SPEED SLOW Button START Button LCD Window INCLINE UP/DOWN Switch STOP/ENTER Button SPEED FAST Button BUTTONS: START – Press to start exercise. The initial belt speed is 0.8 KPH (0.5 MPH). - Page 19 PRO RUN 300 MOTORIZED TREADMILL COMPUTER OPERATION SPEED SLOW – Press to decrease the belt speed by 0.1 KPH (0.1 MPH). b. Hold the button to decrease the belt speed by 0.5 KPH (0.5 MPH) each second and release the button to stop the function.
- Page 20 PRO RUN 300 MOTORIZED TREADMILL COMPUTER OPERATION SPEED: Displays the current speed in KPH or MPH (which ever your computer is set to). PROGRAM 4 – CALORIES Press the STOP/ENTER button to confirm the program. CALORIES (Under the setting mode): Press the SPEED SLOW/FAST buttons to preset the target calories value and then press the START button to start exercising.
-
Page 21: Maintenance
PRO RUN 300 MOTORIZED TREADMILL MAINTENANCE HOW TO MAINTAIN YOUR TREADMILL: Proper maintenance is very important to ensure your treadmill is always in top working condition. Improper maintenance could cause damage or shorten the life of your treadmill. • Important: Never use abrasives or solvents to clean the treadmill. To prevent damage to the computer, keep liquids away and keep it out of direct sunlight. - Page 22 PRO RUN 300 MOTORIZED TREADMILL MAINTENANCE To apply lubricant to the walking belt: Position the walking belt so that the seam is located on top and in center of the walking board. Insert the spray nozzle into the spray head of the lubricant can.
-
Page 23: Important Steps
PRO RUN 300 MOTORIZED TREADMILL IMPORTANT STEPS Warning: Before using this product, please consult your personal physician for a complete physical examination. Frequent and strenuous exercise should be approved by your doctor first. If any discomfort should result from your use of this product, stop exercising and consult your doctor. -
Page 24: Target Heart Rate
PRO RUN 300 MOTORIZED TREADMILL TARGET HEART RATE Finding your pulse: To make sure your heart is beating in its target zone, you’ll need to know how to monitor your heart rate. The easiest way is to feel the pulse in the carotid artery on either side of your neck, between the windpipe and the large neck muscles. -
Page 25: Muscle Chart
PRO RUN 300 MOTORIZED TREADMILL MUSCLE CHART Targeted muscle groups: The exercise routine that is performed on this product will develop primarily lower body muscle groups. These muscle groups are shown in gray color on the chart below. Shoulder muscles... -
Page 26: Stretching Routine
PRO RUN 300 MOTORIZED TREADMILL STRETCHING ROUTINE Warm up and cool down: A successful exercise program consists of a warm-up, aerobic exercise, and a cool-down. Do the entire program at least two or three times a week, resting for a day between workouts. After several months, you can increase your workouts to four or five times per week. - Page 27 PRO RUN 300 MOTORIZED TREADMILL STRETCHING ROUTINE Hamstring Stretch: Sit with your right leg extended. Rest the sole of your left foot against your right inner thigh. Stretch toward your toe as far as possible. Hold for 15 counts. Relax and then repeat with left leg extended.
Need help?
Do you have a question about the 300 and is the answer not in the manual?
Questions and answers