Table of Contents
Advertisement
Advertisement
Table of Contents

Related Manuals for ProRunner X1


Summary of Contents for ProRunner X1
- Page 1 X1 Walk treadmill Operating Instructions Special tips: A. Before installation and operation, please read this operation manual carefully. B. Please save this manual for future reference. C. Product may vary slightly from the item pictures due to model upgrade.
-
Page 2: Important Safety Instructions
IMPORTANT SAFETY INSTRUCTIONS WARNING - Read all instructions before using this treadmill. It is important your treadmill receives regular maintenance to prolong its useful life. Failing to regularly maintain your treadmill may void your warranty. Danger To reduce the risk of electric shock disconnect your treadmill from the electrical –... - Page 3 16) Wear proper shoes. High heels, dress shoes, sandals or bare feet are not suitable for use on your treadmill. Quality athletic shoes are recommended to avoid leg fatigue. 17) Allowed temperature: 5 to 40 degrees. Remove the safety key after use to prevent unauthorized treadmill operation. IMPORTANT ELECTRICAL INFORMATION WARNING! 1) NEVER use a ground fault circuit interrupt (GFCI) wall outlet with this treadmill.
- Page 4 7) A safety key is provided with this machine. Remove the safety key will stop the walking belt immediately; the treadmill will shut off automatically. Insert the safety key will reset the display. 8) Do not use excessive pressure on console control keys. They are precision set to function properly with little finger pressure.
-
Page 5: Carton Contents
CARTON CONTENTS: Description Specification Walking treadmill Remote control Power wire Safety key Wrench Lubricant Oil 20ml/bottle Manual 4... -
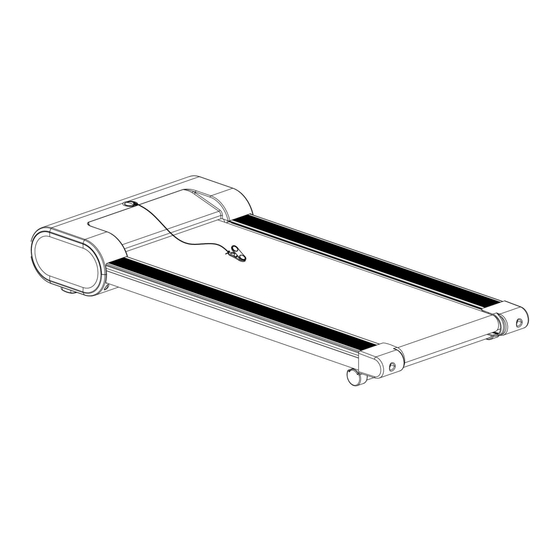
Page 6: Function Instructions
FUNCTION INSTRUCTIONS 1.WALKING TREADMILL ①.WALKING BELT ②.DISPALY PANEL ③.SAFETY KEY HOLE ④.WHEEL ⑤.OVERLOAD PROTECTOR BUTTON ⑥.SQUARE SWITCH ⑦.POWER SOCKET ⑧.WHEEL 2.LED WINDOW DISPLAY: Displays time, distance, calories, steps and speed value in turn every 5 seconds. Display time Display speed Display distance Display calories Display steps ROGRAMS Initial... - Page 7 3.REMOTE CONTROL FUNCTIONS: Note: If the treadmill does not respond to the remote control, you will need to resync the treadmill and remote control. To sync the remote control with the treadmill, press witch button to switch off the treadmill first, then press switch button to switch on the treadmill, meanwhile hold on (Keep pressing around 5 second ) START/PAUSE button before power on till you hear one "BI"...
-
Page 8: Power Save Function
display to remind you when it’s time. Please read the LUBRICATING THE TREADMILL on Page 12 to learn the proper steps to lubricating your machine. Apply the lubricating oil to the middle of the running deck on both sides. After application, press and hold the STOP button for 3 seconds to clear the reminder. - Page 9 OPERATING INSTRUCTIONS 8...
-
Page 10: Troubleshooting
TROUBLE SHOOTING PROBLEM POSSIBLE CAUSE SUGGESTED ACTION Not plugged in Plug cord into outlet Treadmill will not start Safety Key not inserted Insert Safety Key Running belt tension not Tighten the adjustment bolts on Running belt not correct on the left or right the left and right side of the rear centered sides of the running board... - Page 11 Inspect moving parts of the A moving part of the treadmill treadmill to ensure that they are is stuck and therefore the operating correctly. Check the motor is unable to rotate motor, listen for strange noise properly. and check for a burning smell. Replace the motor if necessary.
-
Page 12: Maintenance And Care
MAINTENANCE & CARE General cleaning will help prolong the life and 1.Clean the machine performance of your treadmill. Keep the unit clean and maintained by dusting the components on a regular basis. Clean both sides of the running belt to prevent dust from accumulating underneath the belt. -
Page 13: Exploded Drawing
EXPLODED DRAWING 12... -
Page 14: Parts List
PARTS LIST Description Specification Qty No. Description Specification A01 Main frame 1 D15 Screw ST2.5*6.0 Running board 1 D16 Screw ST2.9*6 strengthen tube B01 Front roller 1 D17 Spring Washer B02 Rear roller 1 D18 Flat Washer B03 Allen wrench 1 D19 Washer B04 Safety key plate 1 D20 Washer... - Page 15 D07 Bolt M6*55 2 E18 Grounding Wire D08 Bolt M6*28 2 E19 Power socket D09 Bolt M5*16 4 F01 AC Single Line Optional D10 Bolt M5*12 2 F02 AC Single Line Optional D11 Screw ST4.2*50 6 F03 Grounding Wire Optional D12 Screw ST4.2*12 2 F04...
Need help?
Do you have a question about the X1 and is the answer not in the manual?
Questions and answers