Table of Contents

Related Manuals for ProRunner X5


Summary of Contents for ProRunner X5
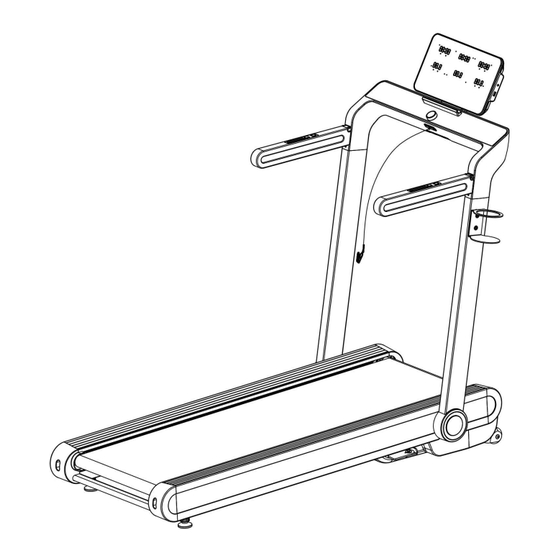
- Page 1 X5 Treadmill Instructions Manual Special tips: 1.Before installation and operation, please read this operation manual carefully. 2.Please save this manual for future reference. 3.Product may vary slightly from the item pictures due to model upgrades.
-
Page 2: Important Safety Instructions
IMPORTANT SAFETY INSTRUCTIONS WARNING - Read all instructions before using this treadmill. It is important your treadmill receives regular maintenance to prolong its useful life. Failing to regularly maintain your treadmill may void your warranty. Danger To reduce the risk of electric shock disconnect your treadmill from the electrical outlet –... -
Page 3: Important Electrical Information
IMPORTANT ELECTRICAL INFORMATION WARNING! 1) NEVER use a ground fault circuit interrupt (GFCI) wall outlet with this treadmill. Route the power cord away from any moving part of the treadmill including the elevation mechanism and transport wheels. 2) NEVER operate treadmill on Generator or UPS power supply. 3) NEVER remove any cover without first disconnecting AC power. - Page 4 minutes. Warning: Now here we suggest that you should consult with your physician or health professional before starting your workout, especially for the age up to 35 old or once-health problem people. We take no responsible for any troubles or hurts if you don’t following our specification. Treadmill will be carefully assembled and covered the motor shield, then connect to the power.
- Page 14 LATERAL FOLDING...
- Page 16 VERTICAL FOLDING...
- Page 17 VERTICAL FOLDING...
-
Page 21: Grounding Methods
IMPORTANT ELECTRICAL INFORMATION WARNING: This treadmill requires a right power source in order to properly operate. For your safety, as well as the safety of others, please verify that the power source is correct before plugging the equipment. Any incorrect power source could cause significant damage to the equipment and or user. -
Page 22: Button Functions
OPERATION GUIDE BUTTON FUNCTIONS 1.INSTANT INCLINE: Press 6%-9%-12% to choose incline quickly. 2.INCLINE-/INCLINE+:Press triangle button to adjust the incline. 3.FOLD: Before vertical folding, please press FOLD button under standby/stop mode, the incline will go to the maximum for folding stability. 4. - Page 23 COMPUTER FUNCTIONS: 1.STEP/ODO: Display the total steps you have walked, ODO is to display the total distance.. 2.TIME: Display the time has run. 3.DISTANCE: Display the distance has run. 4.INCLINE:Display current incline. Press INCLINE triangle button to adjust the incline of the machine. 5.CALORIES:Display the calories has consume.
-
Page 24: Lubrication Remind Function
SPEED INCLINE SPEED INCLINE SPEED INCLINE SPEED INCLINE 9.2 Set of 2 user programs: From standby mode, press PROG button until you see U1,U2; - Press SPEED+/- or INCLINE triangle button or turn the knob button to set the time. - Press MODE button to confirm and enter next section, repeat until you finish the setting of all 10 sections. -
Page 25: Power On ( )And Power Off
SAFETY LOCK FUNCTION: Under any mode, if you pull away the safety key, the machine will stop. The window will show “---” with reminding sound. The machine cannot work until safety key is inserted back. ENERGY SAVING FUNCITON To reduce energy consumption, this treadmill will enter into sleeping mode if without any operation for 10 minutes. -
Page 26: Maintenance And Care
MAINTENANCE & CARE General cleaning will help prolong the life and performance of your treadmill. Keep the unit clean and maintained by dusting the components on a regular basis. Clean both sides of the running belt to prevent dust from accumulating underneath the belt. Keep your running shoes clean so that dirt from your shoes does not wear out the running board and belt. -
Page 27: Lubricating The Treadmill
LUBRICATING THE TREADMILL IMPORTANT NOTE: You will need to lubricate your treadmill before the first use. RUNNING BELTS & TREADMILL LUBRICANT: Lubricating the running board and running belt is essential as the friction between the two affects the life span and function of the treadmill, therefore it is suggested that the running board and belt be inspected regularly. -
Page 28: Exploded Drawing
EXPLODED DRAWING 1... - Page 29 EXPLODED DRAWING 2...
-
Page 30: Parts List
PARTS LIST Part description Remark Remark Main frame Power wire Left upright turning Wire length 200mm AC signle wire bracket -Brown Right upright turning Wire length 350mm AC signle wire -Brown bracket Wire length 350mm Console base bracket AC signle wire -Blue Left handrail bracket Grounding wire... - Page 31 Pulse plate - L USB wire Upper roller bolt Pulse plate - R φ8*29 assembly bottom roller bolt Spring plate 2 φ0.8*φ8*15 φ8*36.5 assembly Limit bushing - Short Bolt M8*15 φ7*7.5 Limit bushing - Long Bolt M8*20 φ7*15 Console top cover Bolt M10*55 Console bottom cover...
- Page 32 Button Bolt M5*16 Button+ Lock washer Button- Spring washer Silicone oil Bolt M6*30 Turning knob overlay Screw ST4.2*40 Console panel overlay Filter Button overlay Inductance Anti-rotating washer Single wire Running board Ground wire DC motor Screw ST4.2*12 Polar wireless Incline motor receiver HRC connecting On-off button...
-
Page 33: Troubleshooting
TROUBLESHOOTING PROBLEM POSSIBLE CAUSE SUGGESTED ACTION Not plugged in Plug cord into outlet Treadmill will not start Safety Key not inserted Insert Safety Key Running belt tension not Tighten the adjustment bolts on Running belt not centered correct on the left or right sides the left and right side of the rear of the running board roller... - Page 34 The incoming voltage is too Restart the treadmill. low or too high. The control Check the incoming voltage to board is damaged. ensure it’s correct. Inspect moving parts of the treadmill to ensure that they are E05: Current overload operating correctly. protection (Self Protecting A moving part of the treadmill Check the motor, listen for strange...
Need help?
Do you have a question about the X5 and is the answer not in the manual?
Questions and answers