Whirlpool AKT 809 Product Description Sheet
Hide thumbs
Also See for AKT 809:
- Product description sheet (2 pages) ,
- Instructions for use manual (7 pages)
Table of Contents
Advertisement
Quick Links
AKT 809
GB
2
1
DIMENSIONS OF THE HOB (mm)
Type PLEAT 230-240 V ~ 50/60 Hz 5.7 kW
5019 319 01890/A
PRODUCT DESCRIPTION SHEET
3
1.
2.
3.
4.
5.
Be careful:
To avoid permanently damaging the glass-
4
ceramic top, do not use:
- Pots with bottoms that are not perfectly
flat.
- Metal pots with enamelled bottom.
Any aesthetic defects (scratches, surface
marks, etc.) must be reported immediately
5
upon installation.
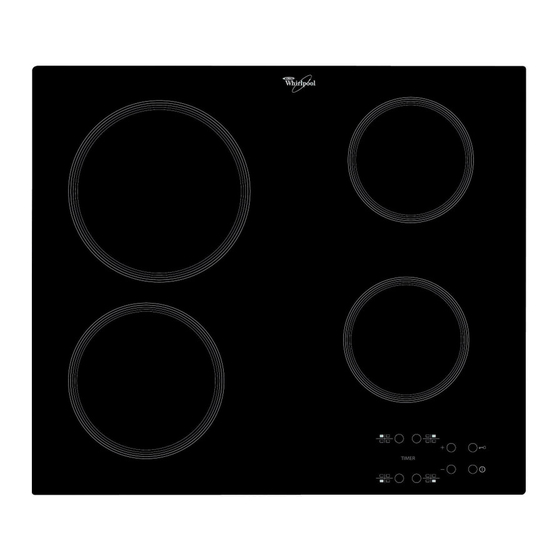
Radiant cooking zone Ø 180
Radiant cooking zone Ø 210
Radiant cooking zone Ø 145
Radiant cooking zone Ø 145
Display
Advertisement
Table of Contents

Related Manuals for Whirlpool AKT 809


Summary of Contents for Whirlpool AKT 809
- Page 1 AKT 809 PRODUCT DESCRIPTION SHEET Radiant cooking zone Ø 180 Radiant cooking zone Ø 210 Radiant cooking zone Ø 145 Radiant cooking zone Ø 145 Display Be careful: To avoid permanently damaging the glass- ceramic top, do not use: - Pots with bottoms that are not perfectly flat.
- Page 2 On/Off Heat setting increase and decrease Cooking zone and timer selection Key lock Upon first installation, the control panel performs a functional test for about 1 second, after which it automatically switches to the “Key lock” function. To deactivate the function, press and hold button “D”; an acoustic signal will sound and the corresponding led will turn off.
- Page 3 INSTRUCTION FOR USE BEFORE USING THE GLASS CERAMIC INSTALLATION ELECTRICAL CONNECTIONS ENERGY SAVING TIPS SAFEGUARDING THE ENVIRONMENT PRECAUTIONS AND GENERAL RECOMMENDATIONS HOB ACCESSORIES CARE AND MAINTENANCE OF THE GLASS-CERAMIC HOB TROUBLESHOOTING GUIDE AFTER SALES SERVICE...
-
Page 4: Installation
BEFORE USING THE GLASS CERAMIC HOB • To make the most of your new appliance, please read the user instructions carefully and keep them handy for future consultation. INSTALLATION Cooktop • The cooktop must be set into a worktop between 20 Rear wall mm and 50 mm deep •... - Page 5 INSTALLATION...
-
Page 6: Electrical Connections
ELECTRICAL CONNECTIONS Electrical connection must be made before connecting the appliance to the electricity supply. The appliance must be installed by a qualified electrician who is fully aware of current safety and installation regulations. Specifically, installation must be carried out in compliance with the regulations of the local electricity supply company. -
Page 7: Energy Saving Tips
ENERGY SAVING TIPS • Use pots and pans whose bottom diameter is equal to that of the cooking zone or slightly larger. • Only use flat-bottomed pots and pans. • If possible, keep pot lids on when cooking. • Cook vegetables, potatoes, et. with little water in order to cut down cooking time. -
Page 8: Precautions And General Recommendations
PRECAUTIONS AND GENERAL RECOMMENDATIONS Warning: Accessible parts become very hot • The cooktop features different size hotplates/ when the equipment is in operation. Keep cooking zones. Use pots whose base diameter children away from the appliance in order to is the same as that of the hotplate/cooking avoid the risk of scalding and burns. -
Page 9: Troubleshooting Guide
CARE AND MAINTENANCE OF THE GLASS- CERAMIC HOB Clean the cooktop, when it is cool, after each use. This will prevent the build-up of dirt and make cleaning easier. Important: at all costs avoid the use of high pressure water or steam cleaning equipment.
Need help?
Do you have a question about the AKT 809 and is the answer not in the manual?
Questions and answers