Table of Contents
Advertisement
Quick Links
Advertisement
Table of Contents

Subscribe to Our Youtube Channel
Related Manuals for CDA EVPK90


Summary of Contents for CDA EVPK90
- Page 1 Manual for Installation, Use and Maintenance Passionate about style Customer Care Department • The Group Ltd. • Harby Road • Langar • Nottinghamshire • NG13 9HY T : 01949 862 012 F : 01949 862 003 E : service@cda.eu W : www.cda.eu...
- Page 2 Under no circumstances should any external covers be removed for servicing or maintenance except by suitably qualified personnel. Appliance information: Please enter the details on the appliance rating plate below for reference, to assist CDA Customer Care in the event of a fault with your appliance and to register your appliance for guarantee purposes. Appliance Model...
-
Page 3: Using Your Extractor
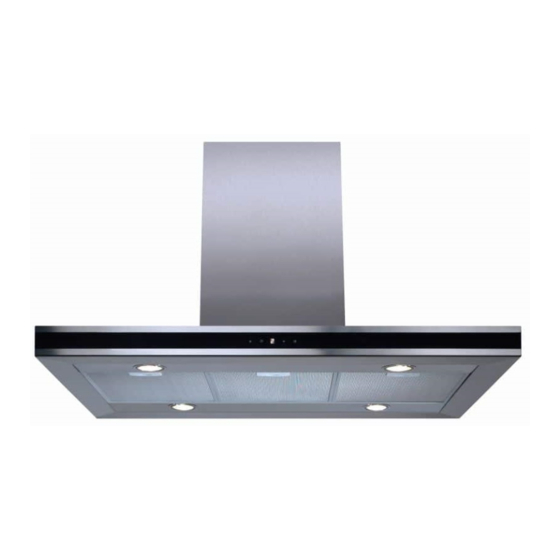
Using your Extractor For best performance, you should switch on the extractor 15 minutes before starting to cook and leave it to run for approximately 15 minutes after the end of cooking. Control Panel A - Light key B - Decrease speed key C - Display D - Increase speed key E - Timer key... -
Page 4: Care And Maintenance
Care and Maintenance IMPORTANT : DO NOT PERFORM MAINTENANCE OR CLEANING OF THE EXTRACTOR WITHOUT FIRST SWITCHING OFF THE ELECTRICITY SUPPLY. Cleaning You should use a nonabrasive cleaner. Any abrasive cleaner (including Cif) will scratch the surface and could erase the control panel markings. Fig. - Page 5 Care and Maintenance Changing the charcoal filter (re-circulating only) When the display flashes alternating the speed selected with the letter F, the charcoal filters must be replaced. After the charcoal filter has been replaced, the electronic memory must be reset by touching key A for approximately five seconds, until the letter F stops flashing.
-
Page 6: Changing The Light
Changing the Light DO NOT CHANGE THE LIGHT BULB IMMEDIATELY AFTER USE AS THE BULB WILL BE HOT. ALLOW IT TO COOL BEFORE REMOVING IT. Using a flat blade screwdriver, carefully prise off the lamp cover as shown in figure 4. Remove the bulb and replace with a 12V 20W halogen light bulb. Finally, replace the light bulb cover. -
Page 7: Mains Electricity Connection
Mains Electricity Connection THIS APPLIANCE MUST BE CONNECTED TO THE MAINS SUPPLY BY A COMPETENT PERSON, USING FIXED WIRING VIA A DOUBLE POLE SWITCHED FUSE SPUR OUTLET AND PROTECTED BY A 3A FUSE. We recommend that the appliance is connected by a qualified electrician, who is a member of the N.I.C.E.I.C. -
Page 8: Electrical Information
Electrical Information Mains electrical voltage: 230 – 240Vac, 50Hz Total rated power consumption: 330W Troubleshooting If your extractor is not working: Check that the mains supply has not been switched off. Check that the fuse in the spur has not blown. -
Page 9: Ducting And Ventilation
Mounting your Extractor IMPORTANT: The extractor is intended to be mounted directly to the ceiling using fixings appropriate for the ceiling. Ensure that there is adequate ceiling strength and supports at the fixing points; if in doubt, consult a joiner or electrician. When the extractor is to be installed above an electric hob, the minimum distance between the hob and extractor must exceed 600mm (650mm is recommended). -
Page 10: Installation
Installation Note: We recommend that you seek the help of another individual when installing this product. Preparing the extractor The electronic control box and ventilation pipe need to be fitted to the motor body before proceeding with the install. To connect the electronic control box, proceed as shown below using screws (G) (figs 7,8,9). Finally, attach the ventilation pipe (H) to the pipe adaptor (F) and place on the exhaust outlet, as shown in fig 10. - Page 11 Installation Assembling the extractor ready for mounting: 1. Place the extractor body on a table and fix the support sections (D) using the supplied screws (E) as shown in fig 11 below. 2. Remove the screws(A) fastening the lower and upper(B) support sections as shown in fig 12 below.
- Page 12 Installation Assembling the extractor ready for mounting: 4. Assemble the upper (B) and lower (C) support sections at the desired height (as calculated in step 3) using the supplied screws (G) as shown in fig 13. 5. When the support sections have been securely fastened together, fit the upper(B) and lower(A) chimney sections over the supports, as shown in fig 14.
- Page 13 Installation Mounting the extractor to the ceiling: 1. Using the supplied template, drill four holes in the ceiling and fit suitable wall plugs into the holes, if required. Note that plugs may not be required if the extractor is to be mounted directly to the ceiling joists. Ensure that the wall plugs used are suitable for the intended purpose.
- Page 14 Installation Mounting the extractor to the ceiling: 4. Recirculating mode: If the extractor is to be used as a recirculation device, filtering the air before recycling into the kitchen then the vent diverter needs to be fitted. Fit the diverter(M) to the upper support section using screw (I) and connect the ventilation pipe (H).
- Page 15 Mains Electricity Connection THIS APPLIANCE MUST BE CONNECTED TO THE MAINS SUPPLY BY A COMPETENT PERSON, USING FIXED WIRING VIA A DOUBLE POLE SWITCHED FUSE SPUR OUTLET AND PROTECTED BY A 3A FUSE. We recommend that the appliance is connected by a qualified electrician, who is a member of the N.I.C.E.I.C.
- Page 16 Passionate about style Customer Care Department • The Group Ltd. • Harby Road • Langar • Nottinghamshire • NG13 9HY T : 01949 862 012 F : 01949 862 003 E : service@cda.eu W : www.cda.eu...
Need help?
Do you have a question about the EVPK90 and is the answer not in the manual?
Questions and answers