Table of Contents
Advertisement
Available languages
Available languages
Get it fixed, at your home or ours!
For expert troubleshooting and home solutions advice:
For repair – in your home – of all major brand appliances,
lawn and garden equipment, or heating and cooling systems,
no matter who made it, no matter who sold it!
For the replacement parts, accessories and
owner's manuals that you need to do-it-yourself.
For Sears professional installation of home appliances
and items like garage door openers and water heaters.
1-800-4-MY-HOME
(1-800-469-4663)
For repair of carry-in items like vacuums, lawn equipment,
and electronics, call anytime for the location of the nearest
Sears Parts & Repair Service Center
1-800-488-1222
www.sears.com
To purchase a protection agreement on a product serviced by Sears:
1-800-827-6655
Para pedir servicio de reparación
a domicilio, y para ordenar piezas:
1-888-SU-HOGAR
(1-888-784-6427)
© Sears Brands, LLC
® Registered Trademark /
® Marca Registrada /
TM
MC
Marque de commerce /
Your Home
www.managemyhome.com
www.sears.com
Our Home
(U.S.A.)
(U.S.A.)
®
TM
SM
Trademark /
Marca de Fábrica /
SM
MD
Marque déposée de Sears Brands, LLC
®
Call anytime, day or night
(U.S.A. and Canada)
www.sears.ca
1-800-469-4663
www.sears.ca
1-800-361-6665
Au Canada pour service en français:
1-800-LE-FOYER
(1-800-533-6937)
www.sears.ca
Service Mark of Sears Brands, LLC
Marca de Servicio de Sears Brands, LLC
(Canada)
(Canada)
MC
Advertisement
Chapters
Table of Contents

Subscribe to Our Youtube Channel
Related Manuals for Kenmore 251-99701-0001


Summary of Contents for Kenmore 251-99701-0001
- Page 1 Get it fixed, at your home or ours! Your Home For expert troubleshooting and home solutions advice: www.managemyhome.com For repair – in your home – of all major brand appliances, lawn and garden equipment, or heating and cooling systems, no matter who made it, no matter who sold it! For the replacement parts, accessories and owner’s manuals that you need to do-it-yourself.
- Page 2 Use and Care Guide Dehumidifier with Wireless Remote Monitoring Station Model 251-99701-0001 CAUTION: Read and follow all safety rules and instructions En Español: p.13 before operating this equipment Sears, Roebuck and Co. Hoffman Estates, IL 60179 U.S.A. www.sears.com...
-
Page 3: Table Of Contents
Spanish/Español........13 Dehumidifier Set-Up........6-7 Sears Service......Back Cover WARRANTY Kenmore Elite Limited Warranty When installed, operated and maintained according to all instructions supplied with the product, if this appliance fails due to a defect in material and workmanship within one year from the date of purchase, call 1-800-4-MY-HOME to arrange for free repair. If the sealed ®... -
Page 4: Safety Instructions
SAFETY INSTRUCTIONS IMPORTANT CAUTIONS FOR USING YOUR DEHUMIDIFIER. To reduce the risk of fire, electrical shock, injury, or damage to the dehumidifier, these safety precautions must be followed: • Do not remove plug from outlet by pulling • Do not place the power cord near a heater. on the cord. • Do not use an electrical outlet near • When not in use, turning the unit off will flammable or combustible materials such save energy. Unplug the dehumidifier as gasoline, propane, paint thinners, etc. -
Page 5: Installation
ELECTRICAL REQUIREMENTS RECOMMENDED GROUNDING METHOD OBSERVE ALL LOCAL CODES AND For your personal safety, this appliance ORDINANCES. must be grounded. This appliance has a power supply cord with a 3-prong grounded DO NOT, UNDER ANY CIRCUMSTANCES, plug. To minimize possible shock hazard, REMOVE THE POWER SUPPLY CORD the cord must be plugged into a matching GROUND PRONG. -
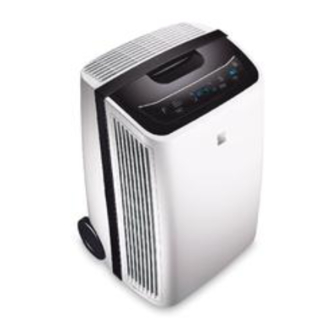
Page 6: Key Features
CHOOSING THE PROPER LOCATION AUTOMATIC SHUT OFF Use the dehumidifier: • When the bucket is full, or when the buck- et is not in the proper position, the Bucket • in the basement to help prevent moisture Full light goes on and the unit automati- damage. cally shuts off. • in the kitchen, laundry room, bathroom, • The bucket must be replaced in the and spa/exercise areas that have exces- proper position for the dehumidifier to sive moisture. work. The light will stay on and the dehu- • to prevent moisture damage anywhere midifier will not run if the bucket is not in books or valuables are stored. -
Page 7: Control Panel
CONTROL PANEL Press SETTINGS (2) a third time = POWER ON/OFF (1) HUMIDITY (4) setting is on. HUMIDITY Pressing button once turns the dehumidifier allows you to manually set the the desired “ON” and pressing it again turns the humidity level by using the humidity arrow dehumidifier “OFF.” keys (9) up or down . Changes are When the unit is turned on, it operates made in 5% increments;... -
Page 8: Water Disposing Options
WATER DISPOSING OPTIONS OPTION 1, EMPTYING MANUALLY OPTION 3, PUMP DRAIN 1. Remove the PUMP DRAIN CAP by turn- 1. Pull out the bucket, grasping upper and ing clockwise (Reverse thread). (Fig.1) lower handles. 2. Remove the drain-hole PLUG by pulling out 2. Carry the bucket by grasping the inside while pressing in on the coupler. (Fig.2) handle of the bucket. 3. Feed the 1/4-inch hose provided through 3. -
Page 9: Care And Maintenance
CARE AND MAINTENANCE CLEANING THE EXTERIOR WARNING Clean the exterior using a soft brush or dry towel. But do not spray water directly on the • Disconnect power supply cord from exterior. receptacle before performing any maintenance. Fig.1 Fig.2 CLEANING THE BUCKET Pull the bucket out. Lift off bucket cover. (Fig.1) Clean the inside of bucket every week using mild detergent in order to block buildup of mold and bacteria. (Fig.2) After cleaning, replace the bucket cover Fig.3... -
Page 10: Product Specifications
PRODUCT SPECIFICATIONS Classification Spec Remark Model DIV 251-99701-0001 Power Supply AC 115V/60(Hz) Moisture Capacity 70 Pints 24-Hour Period Control Type Electronic Refrigerant R-22/8.82 oz. 250g Humidity Humidity Setting: 35%-70% 5% Increments Display Display Range: 20%-90% 1% Increments. Current Humidity. Display Range: Lo, 36-99°F, Hi 1° F Increments. Current Temp. Temperature Display Display Range: Lo, 2-37°C, Hi 1° C Increments. Current Temp. -
Page 11: Troubleshooting
TROUBLESHOOTING Before calling for service, try the suggestions below to see whether you can solve your problem without outside help. PROBLEMS CHECK POINT SOLUTIONS Dehumidifier does not Is the power cord plugged into Plug the power cord securely into a work when pressing a grounded 3-prong outlet? grounded 3-prong outlet. the POWER ON Is BUCKET FULL light on? Empty the water bucket and button. -
Page 12: Wireless Remote Station
WIRELESS REMOTE MONITORING STATION will reduce the range to 165 feet, and the second wall will reduce the range to 87 feet. Factoring in the 10-foot room, this leaves a maximum of 77 feet of remaining signal range. Passing up through the floor has now reduced the effective range to 38 feet. The remote monitoring station is a receiver Typically this allowance is enough for most with a receiving range of only 330 feet in frame-constructed homes;... -
Page 13: Receiver Setting Instructions
RECEIVER SETTING INSTRUCTIONS SETTING PREFERENCES SENSOR ICON (1) flashes, indicating Press SET (11) once and hold down signal is being received from the main unit. for 3 seconds to enter the "Setting If no signal is being received, the icon will Mode."... -
Page 14: Spanish/Español
Guía de Uso y Cuidados Deshumidificador con Estación Remota Inalámbrica de Monitorización Modelo 251-99701-0001 ADVERTENCIA: Lea y siga todas las reglas de seguridad e instrucciones antes de operar este equipo. Sears, Roebuck and Co. Hoffman Estates, IL 60179 U.S.A. www.sears.com... -
Page 15: Contenido Del Paquete
Instrucciones de Seguridad ..... 16 Solución de Problemas ......24 Requisitos Eléctricos .......17 Estación Remota Inalámbrica de Instalación ..........18 Monitorización .........25 Características Principales ......19 Instrucciones de Configuración Especificaciones del Producto ....19 del Receptor........26-27 Panel de Control ........20 Servicio Sears.....Contra Portada Configuración del Deshumidificador ..21 CONTENIDO DEL PAQUETE • Deshumidificador Kenmore Elite • Guía de Uso y Cuidado • Estación Remota de Monitorización • Manguera de Desagüe de Bomba de 18 pies. • 2 pilas (2AAA) -
Page 16: Garantía
GARANTÍA Garantía Limitada Kenmore Elite Cuando sea instalado, operado y mantenido según todas las instrucciones proveídas con el producto, si este electrodoméstico falla debido a un defecto en materiales y manufactura dentro de 1 año después de la fecha de compra, llame al 1-800-4-MY- HOME para concertar la reparación gratis. Si el sistema refrigerante sellado está... -
Page 17: Instrucciones De Seguridad
INSTRUCCIONES DE SEGURIDAD ADVERTENCIAS IMPORTANTES PARA EL USO DE SU DESHUMIDIFICADOR. Para reducir el riesgo de incendio, descarga eléctrica, lesión, o daño al deshumidificador, se deben de seguir estas precauciones de seguridad: • No colocar el cable de alimentación cerca •... -
Page 18: Requisitos Eléctricos
REQUISITOS ELÉCTRICOS OBSERVAR TODOS LOS CÓDIGOS Y Este electrodoméstico tiene un cable de ORDENANzAS. alimentación con una clavija de tres patillas con toma de tierra. Para minimizar una NO QUITE, BAJO NINGUNA posible descarga eléctrica, el cable debe CIRCUNSTANCIA, LA PATILLA DE estar enchufado en un enchufe eléctrico TOMA DE TIERRA DEL CABLE DE con toma de tierra apropiado que cumpla ALIMENTACIÓN. -
Page 19: Instalación
INSTALACIÓN DE SU DESHUMIDIFICADOR • Instale el deshumidificador sobre un seguirá funcionando para deshelar las suelo nivelado suficientemente fuerte bobinas. para sostener la unidad con su cubeta UBICACIÓN ADECUADA DEL llena de agua. DESHUMIDIFICADOR • Para un mejor rendimiento, deje un espa- Utilice el deshumidificador: cio de al menos 12-18 pulgadas a cada •... -
Page 20: Características Principales
CUBETA PARRILLA LATERAL RUEDECILLA FILTRO DE ADMISIÓN DE AIRE ESPECIFICACIONES DEL PRODUCTO Espec Clasificación Comentario Modelo DIV 251-99701-0001 Suministro de Energía CA 115V/60 (Hz) Capacidad de Humedad 70 Pintas Periodo de 24 horas Tipo de Control Electrónico Refrigerante R-22/8.82 onzas. 250g Visualizador de Ajuste de Humedad: 35%-70%... -
Page 21: Panel De Control
PANEL DE CONTROL POWER ON/OFF (1) manualmente el nivel deseado de humedad, Si pulsa el botón una vez se enciende el utilizando las teclas con las flechas de deshumidificador, “ON”, y si lo vuelve a humedad (9) hacia arriba o abajo pulsar se apaga el deshumidificador, “OFF”. Se hacen los cambios por incrementos de un 5%; el rango de ajustes es el 35% al Cuando la unidad está encendida, opera 70%. Se ve el NIVEL DE HUMEDAD en el automáticamente en modo COMFORT (3). -
Page 22: Configuración Del Deshumidificador
OPCIONES DE ELIMINACIÓN DE AGUA OPCION 1, VACIAR MANUALMENTE Tire de la cubeta agarrando las asas superior e inferior. Lleva la cubeta agarrando el asa interior de la cubeta. Después de vaciar la cubeta, coloque de nuevo la cubeta en el deshumidificador. NOTA: El deshumidificador no funcionará cuando la luz de advertencia de cubeta llena (BUCKET FULL) está encendida o cuando la cubeta no ha sido colocada en la unidad de forma adecuada. - Page 23 OPCIONES DE ELIMINACIÓN DE AGUA DESHUMIDIFICADOR OPCION 3, DRENAJE DE BOMBA Quite La TAPA de DRENAJE de la BOMBA, girando en dirección de las agujas del reloj (Enrosque al revés) (Figura 1) Pressing Quite la TAPA del orificio de drenaje, tirando hacia fuera mientras este presionando el enganche hacia dentro. (Figura 2) Introduzca la manguera de ¼ pulgada proveída, en el orificio de la TAPA de Fig.1 Fig.2 DRENAJE. (Figura 3) Introduzca el final de la manguera dentro del orificio de drenaje (Figura 4); a continuación enrosque la TAPA de DRENAJE en la unidad de nuevo (Figura 5). Coloque el otro final de la manguera en el sitio por el cual usted quiere que...
-
Page 24: Cuidados Y Mantenimiento
CUIDADO Y MANTENIMIENTO LIMPIEzA DEL EXTERIOR ADVERTENCIA Limpie el exterior con un cepillo suave o Desconecte el cable de alimentación toalla seca. Pero no aplique agua con un del receptáculo antes de efectuar algún atomizador directamente sobre el exterior. mantenimiento. Fig.1 Fig.2 LIMPIEzA DE LA CUBETA Saque la cubeta del la unidad. Quite la tapa de la cubeta. (Figura 1) Limpie el interior de la cubeta con detergente suave cada semana para bloquear la acumulación de moho y... -
Page 25: Solución De Problemas
SOLUCIONES DE PROBLEMAS Antes de llamar para un servicio técnico, intente las siguientes sugerencias para ver si puede solucionar su problema sin ayuda ajena. PROBLEMAS POSIBLES CAUSAS SOLUCIONES El deshumidificador ¿Está enchufado el cable de ali- Enchufe de forma segura el cable de no funciona cuando mentación en un enchufe de tres alimentación en un enchufe de tres... -
Page 26: Estación Remota Inalámbrica De Monitorización
ESTACIÓN REMOTA INALÁMBRICA DE MONITORIzACIÓN La estación de monitorización remota es un máximo de 77 pies de rango de señal un receptor con un rango de recepción de restante. Subiendo por el suelo ha reducido el solamente 330 pies al aire libe sin ninguna rango efectivo a unos 38 pies. obstrucción. -
Page 27: Instrucciones De Configuración Del Receptor
INSTRUCCIONES DE CONFIGURACIÓN DE RECEPTOR Setup Guide Introduzca las pilas en el monitor. Después en la pantalla del monitor. Revise el deshu- de que las pilas sean insertadas, la Estación midificador para averiguar si está funcionan- de Monitorización empezará a recibir datos do correctamente, si esto no pasa después de señal del deshumidificador: temperatura, de 2 minutos. Quite las pilas del monitor, humedad, etc. deberían de estar expuestos espere un minuto y vuelva a ponerlas. - Page 28 CONFIGURAR PREFERENCIAS Presione SET (11) una vez y mantenga presionado durante 3 segundos para entrar en “Setting Mode”. CONFIGURAR HORA DEL DÍA (4) Presione SET (11) una segunda vez. “Hour” empezará a centellear. A continuación presione + (13) o – (12) para fijar la hora 1-12 a.m. o 1-12 p.m. CONFIGURAR MINUTOS (4) Presione SET (11) una tercera vez. “Minutes” empezará a parpadear. Utilice para fijar los minutos 00-59. RELOJ DE 24 HORAS (4) Presione SET (11) una cuarta vez. Utilice para ir pasando entre el reloj 12H y 24H.
Need help?
Do you have a question about the 251-99701-0001 and is the answer not in the manual?
Questions and answers