Table of Contents
Advertisement
Advertisement
Table of Contents

Related Manuals for Bticino Terraneo 335022


Summary of Contents for Bticino Terraneo 335022
- Page 1 Instructions for use 335032 335022 ® 335033 335023...
-
Page 3: Basic Functions
Pivot Telephones BASIC FUNCTIONS To answer a call To make a call 1. Lift the receiver. 1. Lift the receiver. 2. If the line is free, dial the number. 3. If the line is busy, hang up. Calling a number in the phone book Calling the emergency number 1. - Page 4 Terraneo Opening the door lock Repeating the last number called 1. Lift the receiver. Warning: only with telephones in systems 2. Press the key (REPEAT). with Terraneo telephone exchange. 1. Press the (DOOR LOCK) key. Switching on the staircase light Self-switching on the outdoor station Warning: only with telephones in systems Warning: only with telephones in systems...
- Page 5 Pivot Telephones...
-
Page 6: Table Of Contents
Terraneo INDICE INTRODUCTION ......................PACKAGE CONTENTS ....................GENERAL VIEW COMPACT TELEPHONE (335022 - 335023) ........8 GENERAL VIEW STANDARD TELEPHONE (335032 - 335033) ........USING THE MAIN FUNCTIONS .................. HOW TO ANSWER A CALL • HOW TO MAKE A CALL •... -
Page 7: Introduction
Pivot Telephones INTRODUCTION Telephones items 335022, 335023, 335032 and 335033 are mainly intended for setting up an integrated home system which supports telephone, door entry and video door entry services. The system is normally formed of: Terraneo PABX telephone exchange to perform the telephone functions and to interface the telephones with the door entry and video door entry systems;... -
Page 8: Package Contents
Plug Plaited cable Instructions Receiver fastening pins Compact Standard Item No. Colour Item No. Colour 335022 white 335032 white 335023 anthracite grey 335033 anthracite grey Complete with: RJ-RJ cable for table installation (2 m long), plaited RJ cable for wall installation (20 cm long),... -
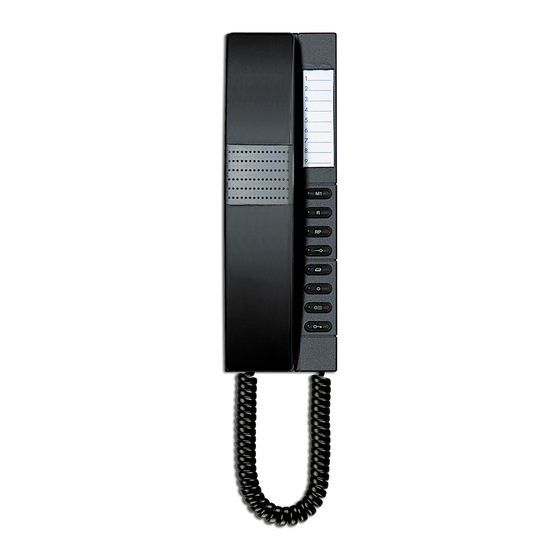
Page 9: General View Compact Telephone (335022 - 335023)
Pivot Telephones GENERAL VIEW COMPACT TELEPHONE (335022 - 335023) Short number list. 12-key dialling keypad. 1....2....key for emergency number. 3....4....5....6....“FLASH” key; 7....• put on hold with Terraneo telephone 8....9....exchange; • activate supplementary telephone services (STS). -
Page 10: General View Standard Telephone (335032 - 335033)
Terraneo GENERAL VIEW STANDARD TELEPHONE (335032 - 335033) 1. Short number list. 2. 12-key dialling keypad. key for emergency number. “FLASH” key; • put on hold with Terraneo telephone 1....4....7....exchange; 2....5....8....• activate supplementary telephone 3.... -
Page 11: Using The Main Functions
Pivot Telephones USING THE MAIN FUNCTIONS HOW TO ANSWER A CALL The bell rings to signal a call: Lift the receiver to answer. HOW TO MAKE A CALL Lift the receiver dialling tone Wait for the dialling tone Dial the number required telephone No. -
Page 12: Repeating The Last Number Called
Terraneo REPEATING THE LAST NUMBER CALLED The last number dialled manually, maximum length 31 digits including pauses, can be dialled automatically. To dial the last number again proceed as follows: dialling tone Lift the receiver Wait for the dialling tone Press the RP (REPEAT) key Hang up at the end of the conversation. -
Page 13: Configuration
Pivot Telephones CONFIGURATION BASIC CONFIGURATION When the telephone is installed it is set with the following basic configuration: Bell volume level = max Receiver volume level = max Call tune Dialling mode = TOUCH TONE (9) Operating mode = EXT FLASH (R) impulse time = 100 ms Telephone book... -
Page 14: Telephone Setting
Terraneo TELEPHONE SETTING The following functions can be programmed and personalised by dialling the correct sequences of keys: ADJUSTING THE BELL VOLUME The bell sound level can be set on 4 levels: Lift the receiver Press the (PROGRAM) key Press the (ASTERISK) key Press one of the following keys: 0= bell off... -
Page 15: Selecting The Bell Tune
Pivot Telephones SELECTING THE BELL TUNE There is a choice of 4 different bell tunes: Lift the receiver Press the (PROGRAM) key Press the (HASH) key Press the 0,1,2 or 3 to select the tune Press the (PROGRAM) key to confirm the selection Wait for the confirmation tone (3 beeps) and hang up. -
Page 16: Selecting Ol/Ext Connection
Terraneo SELECTING OL/EXT CONNECTION When installed the telephone is set up for connection to the telephone exchange (EXT mode). If the telephone is connected directly to the outside line it must be programmed with the OL mode. To alter the mode proceed as follows: Lift the receiver Press the (PROGRAM) key... -
Page 17: Saving Telephone Numbers
Pivot Telephones SAVING TELEPHONE NUMBERS To save a telephone number in the book or in the emergency number ( ), dial the sequence of keys described in the section on this. At the end of the programming, if the sequence is correct, the telephone gives a confirmation tone (3 beeps). -
Page 18: Saving The Emergency Numbers (M1)
Terraneo SAVING THE EMERGENCY NUMBERS (M1) An emergency number can be programmed and associated with the dedicated key ( ). The telephone number saved can contain up to 24 digits including: numbers from 0 to 9, characters such as and one or more pauses. Use the (REPEAT) key to enter the pauses. -
Page 19: Extra Functions With The Telephone Connected To The Telephone Exchange
Pivot Telephones EXTRA FUNCTIONS WITH THE TELEPHONE CONNECTED TO THE TELEPHONE EXCHANGE OPENING THE DOOR LOCK 1....2....3....4....5....(Service available if the telephone is connected to the 6....7....8....9....telephone exchange in a Terraneo door entry or video door entry system). -
Page 20: Activating The Actuator Relays
Terraneo ACTIVATING THE ACTUATOR RELAYS If the telephone is connected to an exchange item 335818 or item 335828, using the dedicated staircase light key ( ) and a sequence of appropriate keys, the other actuator relays (1 - 8) can be activated individually if the extra expansion modules item 335916 are installed. - Page 21 Pivot Telephones EXAMPLE 2: DEACTIVATING RELAY 1 (garden light) Lift the receiver Press the (STAIRCASE LIGHT) key Press the 0 (to activate) Press the 1 (relay 1 on extra module) Wait for the continuous exchange tone and hang up. We have deactivated relay 1 on the extra module, switching the garden light off.
-
Page 22: Installation
Terraneo INSTALLATION SET UP AND CONNECTION A - Connect the base and receiver with the spiral cord (A) fitted with plug-in jack. B - Connect the network cord (B) to the base and the telephone line jack directly with the RJ connector (C) or using the three-pole adapter (D). -
Page 23: Installation With Base Supplied
Pivot Telephones INSTALLATION WITH BASE SUPPLIED Use the base supplied with the phone to position it as follows: 1. horizontal table mounted using the 2-metre cable supplied. 2. inclined wall mounted using the base and the short cable supplied. 3. table mounted using the base and 2-metre cable supplied. -
Page 24: Installation On The Wall With Bracket Item 337140 Or Item 337150
Terraneo INSTALLATION ON THE WALL WITH BRACKET Use the metal bracket item 337140 for the compact telephone and item 337150 for the standard telephone to install the telephone on the wall, as described below: a - anchor the metal bracket on the wall using the screws in correspondence with the flush-mounted box. rectangular box round box b - connect the short cable (1) -
Page 25: Flush Installation With Multibox Series For Compact And Standard Telephone
Pivot Telephones FLUSH INSTALLATION WITH MULTIBOX SERIES FOR COMPACT TELEPHONE Use the Multibox series items to flush mount the telephone. CLICK item 16101 item 16101LT item 16122 item 16101LTG item 16122 (mm) 16122... - Page 26 Terraneo FLUSH INSTALLATION WITH MULTIBOX SERIES FOR STANDARD TELEPHONE Use the Multibox series items to flush mount the telephone. CLICK item 16102 item 16122 item 16102LT item 16122 item 16102LTG ....7..7 ..
-
Page 27: Technical Data
The item which is the subject of the manual comes with EC Declaration of Conformity according to the requirements indicated below: BTicino S.p.A., Via Messina, 38 - 20154 Milan, indicates that the product with item No.: 335022 - 335023 - 335032 - 335033... - Page 28 Terraneo NOTES ○ ○ ○ ○ ○ ○ ○ ○ ○ ○ ○ ○ ○ ○ ○ ○ ○ ○ ○ ○ ○ ○ ○ ○ ○ ○ ○ ○ ○ ○ ○ ○ ○ ○ ○ ○ ○ ○ ○...
- Page 30 ® BTicino s.p.a. Via Messina, 38 20154 Milano - Italia www.bticino.com...
Need help?
Do you have a question about the Terraneo 335022 and is the answer not in the manual?
Questions and answers