Philips MC-320 User Manual
Micro hi-fi system
Hide thumbs
Also See for MC-320:
- Service manual (52 pages) ,
- Manual (25 pages) ,
- Specifications (2 pages)
Table of Contents
Advertisement
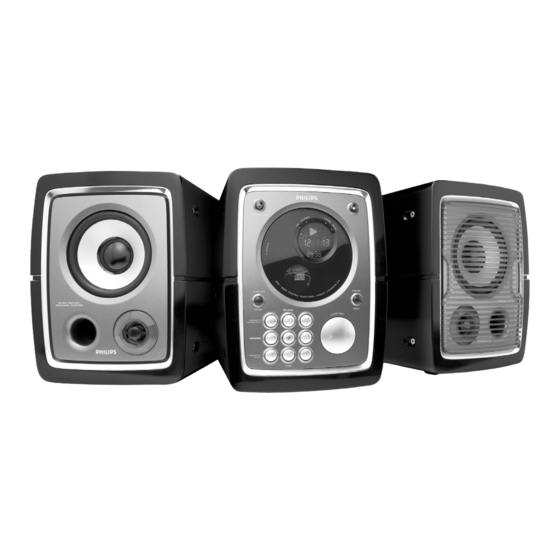
Micro Hi-Fi System
Need help? Call us!
Philips representatives are ready to help you with
any questions about your new product. We can guide you
through Connections, First-time Setup, or any of the Features.
We want you to start enjoying your new product right away!
CALL US BEFORE YOU CONSIDER
RETURNING THE PRODUCT!
Visit us on the web at www.philips.com
1-800-531-0039
or
320
320
MC-
MC-
Return
your Warranty
Registration Card
within 10 days
1
MC-320/37-1
Advertisement
Table of Contents
Troubleshooting

Subscribe to Our Youtube Channel
Related Manuals for Philips MC-320


Summary of Contents for Philips MC-320
- Page 1 Micro Hi-Fi System Need help? Call us! Return Philips representatives are ready to help you with your Warranty any questions about your new product. We can guide you Registration Card within 10 days through Connections, First-time Setup, or any of the Features.
-
Page 2: English
AVOID DIRECT EXPOSURE TO BEAM. AVATTAESSA JA SUOJALUKITUS OHITETTAESSA OLET VARO! ALTTIINANAKYMATTOMAALLE LASERSATEILYLLE. ALA KATSO SATEESEEN. OSYNLIG LASERSTRÅLNING NÄR DENNA DEL ÄR ÖPPNAD. VARNING! OCH SPARREN AR URKOPPLAD.BETRAKTA EJ STRÅLEN. DANGER - Invisible laser radiation when open. AVOID DIRECT EXPOSURE TO BEAM. MC-320/37-1... - Page 3 & MC-320/37-1...
- Page 4 Return your Warranty Registration card today to ensure you receive all the benefits you’re entitled to. • Once your Philips purchase is registered, • So complete and return the Warranty you’ r e eligible to receive all the privileges Registration Card enclosed with your of owning a Philips product.
- Page 5 As a member of the Philips “family,” you’re entitled to protection by one of the most comprehensive warranties and outstanding service networks in the industry.
-
Page 6: Important Safety Instructions
Remove batteries when the unit is not used for a long time. Protect the power cord from being walked on or pinched, particularly at plugs, EL 6475-E004: 02/8 convenience receptacles, and the point where they exit from the apparatus. Only use attachments/accessories specified by the manufacturer. MC-320/37-1... - Page 7 Index English ------------------------------------------------ 8 Français -------------------------------------------- 24 Español --------------------------------------------- 43 MC-320/37-1...
-
Page 8: Table Of Contents
Tape playback ............17 Switching tape sides ........... 17 Reverse mode options ........17 General information on recording ....17 Synchro start CD recording ......18 Recording from the radio ......... 18 Recording from the Aux ........18 Recording timer ..........18 MC-320/37-1... -
Page 9: General Information
G When the system is switched to Standby mode, it is still consuming some power. To disconnect the system from the power supply completely, remove the AC power plug from the wall socket. MC-320/37-1... -
Page 10: Preparations
Standby mode automatically under extreme conditions. If this happens, let the system cool down before reusing it (not available for all versions). G Position the antenna as far as possible from a TV, VCR or other radiation source. MC-320/37-1... -
Page 11: Optional Connection
(a single audio out terminal), connect it to CAUTION! the AUX left terminal. Alternatively, you can use a Batteries contain chemical substances, so “single to double” cinch cable (the output sound they should be disposed off properly. still remain mono). MC-320/37-1... -
Page 12: Controls On The System And Remote Control
TAPE ....switches tape direction keys on the remote control (for example iR SENSOR CD, TUNER). – infrared sensor for remote control. – Then select the desired function (for STANDBY ON2 example – switches the system to standby. MC-320/37-1... -
Page 13: Basic Functions
Power-saving automatic standby As a power-saving feature, the system automatically switches to standby 15 minutes after a tape or CD has reached the end and no control is operated. MC-320/37-1... -
Page 14: Cd Operation
Put a disc with the printed side facing up and press down. Push the front panel to close. ➜ READING is flashing as the CD player scans the contents of a disc, and then the total number of tracks and playing time are shown. MC-320/37-1... -
Page 15: Selecting A Different Track
➜ If you have selected SHUFFLE, playback starts automatically. To return to normal playback, press the respective SHUFFLE or REPEAT button until the various SHUFFLE / REPEAT modes are no longer displayed. G You can also press STOP 9 to cancel your play mode. MC-320/37-1... -
Page 16: Radio Reception
Repeat the above four steps to store other stations. G You can override a preset station by storing another frequency in its place. Tuning to preset radio stations G Press PRESET until the desired preset station is displayed. MC-320/37-1... -
Page 17: Tape Operation / Recording
– The sound source cannot be changed while If, however, you wish to record over this side recording a tape. again, cover the tabs with a piece of adhesive – “NO TAPE” will be shown if no tape inserted. tape. MC-320/37-1... -
Page 18: Synchro Start Cd Recording
Repeat steps 6-8 to set the finish time. recording. Press TIMER SET / to confirm the timer Press REC to start recording. settings. ➜ REC is shown during recording. ➜ is shown and the recording timer is now To stop recording, press STOP 9. set. MC-320/37-1... -
Page 19: Clock/Timer
Activating and deactivating – The clock will only be displayed without TIMER backlight in standby. G In standby or during playback, press TIMER ON / OFF on the remote control once. ➜ Display shows if activated, and disappears if deactivated. MC-320/37-1... -
Page 20: Activating And Deactivating Sleep
– mono, 26 dB signal-to-noise ratio .... 2.8 µV – stereo, 46 dB signal-to-noise ratio ..61.4 µV Selectivity ..............≥ 28 dB Subject to modification Total harmonic distortion ........≤ 5% Frequency response ..63 – 12500 Hz (± 3 dB) Signal-to-noise-ratio ........≥ 50 dBA MC-320/37-1... -
Page 21: Maintenance
Cleaning the disc lens G After prolonged use, dirt or dust may accumulate at the disc lens. To ensure good playback quality, clean the disc lens with Philips Demagnetising the heads CD Lens Cleaner or any commercially available G Use a demagnetising tape available at your cleaner. -
Page 22: Troubleshooting
– Press TIMER ON•OFF to switch on the timer. – If a recording is in progress, stop the recording. The Clock/Timer setting is erased. – Power has been interrupted or the power cord has been disconnected. Reset the clock/timer. MC-320/37-1... -
Page 23: Limited Warranty
PUERTO RICO, OR U.S. VIRGIN ISLANDS... Warranty coverage begins the day you buy your product. For one Take the product to a Philips factory service center (see enclosed year thereafter, all parts will be repaired or replaced, and labor is list) or authorized service center for repair.When the product has... - Page 24 PHILIPS CONSUMER ELECTRONICS NORTH COMPANY Knoxville, Tennessee 37914-1810, U.S.A. MC-320 CLASS 1 LASER PRODUCT Printed In China hk-0309...
Need help?
Do you have a question about the MC-320 and is the answer not in the manual?
Questions and answers