Table of Contents
Advertisement
Advertisement
Table of Contents

Related Manuals for AEG MC1752E


Summary of Contents for AEG MC1752E
- Page 1 MC1752E / MC1762E User Manual Microwave Oven...
-
Page 2: Dear Customer
Dear Customer Thank you for choosing one of our high-quality products. With this appliance you will experience the perfect combination of functional design and cutting edge technology. Convince yourself that our appliances are engineered to deliver the best performance and control - indeed we are setting the highest standards of excellence. In addition to this you find environmental and energy saving aspects as an integral part of our products. -
Page 3: Table Of Contents
Contents Contents Important safety instructions Appliance overview Microwave oven & accessories Control panel Before first use Econ mode Setting the clock Adjusting the time when the clock is set Using the stop button Child safety lock Microwave cooking advice Food characteristics Cooking techniques Microwave safe cookware Microwave operation... -
Page 4: Important Safety Instructions
Important safety instructions Important safety instructions Important safety instructions: Read carefully and keep for future reference To avoid the danger of fire T T h h e e m m i i c c r r o o w w a a v v e e o o v v e e n n s s h h o o u u l l d d n n o o t t b b e e l l e e f f t t u u n n a a t t t t e e n n d d e e d d d d u u r r i i n n g g o o p p e e r r a a t t i i o o n n . . P P o o w w e e r r l l e e v v e e l l s s t t h h a a t t a a r r e e t t o o o o h h i i g g h h o o r r c c o o o o k k i i n n g g t t i i m m e e s s t t h h a a t t a a r r e e t t o o o o l l o o n n g g m m a a y y o o v v e e r r h h e e a a t t f f o o o o d d s s r r e e s s u u l l t t i i n n g g i i n n a a f f i i r r e e . - Page 5 Important safety instructions b) The hinges and door safety latches; check to make sure they are not broken or loose. c) The door seals and sealing surfaces; ensure that they have not been damaged. d) Inside the oven cavity or on the door; make sure there are no dents. e) The power supply cord and plug;...
- Page 6 Important safety instructions M M i i c c r r o o w w a a v v e e h h e e a a t t i i n n g g o o f f b b e e v v e e r r a a g g e e s s c c a a n n r r e e s s u u l l t t i i n n d d e e l l a a y y e e d d e e r r u u p p t t i i v v e e b b o o i i l l i i n n g g , , t t h h e e r r e e f f o o r r e e c c a a r r e e h h a a s s t t o o b b e e t t a a k k e e n n w w h h e e n n h h a a n n d d l l i i n n g g t t h h e e c c o o n n t t a a i i n n e e r r .
- Page 7 Important safety instructions Children should be supervised to ensure that they do not play with the appliance. Do not lean or swing on the oven door. Do not play with the oven or use it as a toy. Children should be taught all important safety instructions: use of pot holders, careful removal of food coverings;...
-
Page 8: Appliance Overview
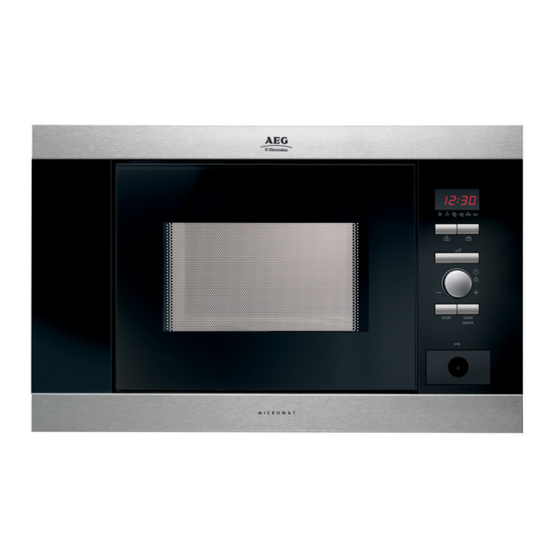
Appliance overview Appliance overview Microwave oven & accessories 1. Front trim 2. Oven lamp 3. Control panel 4. Door opening button 5. Waveguide cover 6. Oven cavity 7. Seal packing 8. Door seals and sealing surfaces 9. Fixing points (4 points) 10. -
Page 9: Control Panel
Appliance overview Control panel 1 Digital display indicators Microwave Clock Cooking stages Plus/Minus Auto defrost bread Auto defrost Weight 2 AUTO COOK indicators 3 AUTO COOK button 4 AUTO DEFROST button 5 POWER LEVEL button 6 TIMER/WEIGHT knob 7 START/QUICK button 8 STOP button 9 DOOR OPENING button... -
Page 10: Before First Use
Before first use Before first use Econ mode The oven is set in ‘ENERGY SAVE’ mode (‘Econ’). 1. Plug in the oven. 2. The display will be blank. 3. Open the door and the power comes on. 4. Close the door and ‘Econ’ will be displayed. 5. -
Page 11: Adjusting The Time When The Clock Is Set
Before first use Adjusting the time when the clock is set or oven is in ‘Econ’ mode E E x x a a m m p p l l e e : : To set the clock to 12:45. 1. Open the door. 2. -
Page 12: Microwave Cooking Advice
Microwave cooking advice Microwave cooking advice Microwave cooking To cook/defrost food in a microwave oven, the microwave energy must be able to pass through the container to penetrate the food. Therefore it is important to choose suitable cookware. Round/oval dishes are preferable to square/oblong ones as the food in the corners tends to overcook. -
Page 13: Microwave Safe Cookware
Microwave cooking advice Microwave safe cookware Cookware Microwave Comments safe / / $ Aluminium foil / Small pieces of aluminium foil can be used to shield food from foil containers overheating. Keep foil at least 2 cm from the oven walls, as arcing may occur. -
Page 14: Microwave Operation
Microwave operation Microwave operation Microwave cooking Your oven can be programmed for up to 90 minutes. The input unit of cooking time varies from 10 seconds to five minutes. It depends on the total length of cooking time as shown in the table. Cooking time Increasing unit 0-5 minutes... -
Page 15: Kitchen Timer
Microwave operation Example: To heat soup for 2 minutes and 30 seconds on 560 W microwave power. 1. Press the power level button twice. 2. Enter the time by rotating the TIMER/WEIGHT knob clockwise/anti-clockwise until 2:30 is displayed. 3. Press the START/QUICK button. 4. -
Page 16: Add 30 Seconds
Microwave operation Add 30 seconds The START/QUICK button allows you to operate the two following functions: 1. Direct Start You can directly start cooking on 800 W/HIGH microwave power level for 30 seconds by pressing the START/QUICK button. 2. Extend the cooking time You can extend the cooking time for multiples of 30 seconds if the button is pressed while the oven is in operation. -
Page 17: Multiple Sequence Cooking
Microwave operation Note: To cancel PLUS / MINUS, press the power level key 3 times. If you select PLUS the display will show If you select MINUS, the display will show Multiple sequence cooking A sequence of 3 stages (maximum) can be programmed using MICROWAVE. Example: To cook: 5 minutes on 800 W power (Stage 1) 16 minutes on 240 W power (Stage 2) -
Page 18: Auto Cook & Auto Defrost Operation
Microwave operation Auto cook & auto defrost operation AUTO COOK and AUTO DEFROST automatically work out the correct cooking mode and cooking time. You can choose from 6 AUTO COOK and 2 AUTO DEFROST menus. Auto Cook Food Symbol Beverage Boiled Potatoes/ Jacket Potatoes Frozen Vegetables... - Page 19 Microwave operation Auto Defrost Food Symbol Meat/Fish/Poultry Bread Example: To defrost 0.2 kg of bread. 1. Select the menu required by pressing the AUTO DEFROST button twice. 2. Turn the TIMER/WEIGHT knob until 0.2 is displayed. 3. Press the START/QUICK button. 4.
-
Page 20: Programme Charts
Programme charts Programme charts Auto cook & auto defrost charts Auto cook Weight (increasing Button Procedure unit) / Utensils Beverage 1-4 cups • Place cup towards edge of turntable. (Tea/Coffee) 1 cup=200 ml x x 1 1 Boiled and 0,1 - 0,8 kg (100 g) Boiled Potatoes: Peel the potatoes and cut them into jacket potatoes Bowl and lid... - Page 21 Programme charts Auto defrost Weight (increasing Button Procedure unit) / Utensils Meat, fish 0,2 - 0,8 kg (100 g) • Place the food in a flan dish in the centre of the poultry Flan dish turntable. • When the audible bell sounds, turn the food over, x x 1 1 rearrange and separate.
-
Page 22: Recipes For Auto Cook
Programme charts Recipes for auto cook Fish fillet with piquant sauce 1. Mix ingredients for the sauce. 0,4 kg 0,8 kg 1,2 kg 2. Place the fish fillet in a round gratin dish with 140 g 280 g 420 g canned tomatoes (drained) the thin ends toward the centre and sprinkle 40 g 80 g... -
Page 23: Cooking Charts
Programme charts Cooking charts Abbreviations used tbsp = tablespoon Cup = cupful g = gram ml = millilitre min = minutes tsp = teaspoon KG = kilogram l = litre cm = centimetre Heating food & drink Food/ Quantity Power Time Method Drink... - Page 24 Programme charts Defrosting & cooking Food Quantity Power Time Method Standing -Level- -Min- time -Min- Fish fillet 800 W 10-12 cover One plate meal 800 W 9-11 cover, stir after 6 minutes Cooking meat & fish Food Quantity Power Time Method Standing -Level-...
-
Page 25: Recipes
Recipes Recipes All the recipes in this book are calculated on the basis of 4 servings unless otherwise stated. Adapting recipes for the microwave oven If you would like to adapt your favourite recipes for the microwave, you should take note of the following: Shorten cooking times by a third to a half. Follow the example of the recipes in this book. - Page 26 Recipes Ratatouille 1. Place the olive oil and garlic in the bowl. Add the Utensils Bowl with lid (2 l capacity) prepared vegetables, except the artichoke hearts, 5 tbsp olive oil and season with pepper. Add the bouquet garni, 1 clove garlic, crushed cover and cook, stirring once.
- Page 27 Recipes Zürich veal stew 1. Cut the veal into strips. Utensils Dish with lid (2 l capacity) 2. Grease the dish with the butter. Put the meat and 600 g veal fillet onion into the dish, cover and cook. Stir once 10 g butter or margarine during cooking.
- Page 28 Recipes Lasagne 1. Chop the tomatoes, mix with the ham and onion, Utensils Bowl with lid (2 l capacity) Shallow square gratin dish with lid garlic, minced beef and tomato puree. Season, (approx. 20 x 20 x 6 cm) cover and cook 300 g tinned tomatoes 7-9 min.
-
Page 29: Care & Cleaning
Care & cleaning Care & cleaning C C A A U U T T I I O O N N ! ! D D O O N N O O T T U U S S E E C C O O M M M M E E R R C C I I A A L L O O V V E E N N C C L L E E A A N N E E R R S S , , S S T T E E A A M M C C L L E E A A N N E E R R S S , , A A B B R R A A S S I I V V E E , , H H A A R R S S H H C C L L E E A A N N E E R R S S , , A A N N Y Y T T H H A A T T C C O O N N T T A A I I N N S S O O D D I I U U M M H H Y Y D D R R O O X X I I D D E E O O R R S S C C O O U U R R I I N N G G P P A A D D S S O O N N A A N N Y Y P P A A R R T T O O F F Y Y O O U U R R M M I I C C R R O O W W A A V V E E O O V V E E N N . -
Page 30: What To Do If
800 W (IEC 60705) Microwave Frequency 2450 MHz * (Group 2 / Class B) Outside Dimensions: MC1752E 494 mm (W) x 371 mm (H) x 316 mm (D) MC1762E 594 mm (W) x 371 mm (H) x 316 mm (D) -
Page 31: Installation
Installation Installation The microwave can be fitted in position A, B, C or D: Position Niche size Position A Position B Position C Position D 560 x 550 x 360 462 x 300 x 350 462 x 300 x 360 560 x 300 x 350 560 x 300 x 360 Conventional... -
Page 32: Connecting The Appliance To The Power Supply
Installation Safe use of the appliance If fitting the microwave in position B or C (see diagram on page 31): • The cupboard must be a minimum of 500mm (E) above the worktop & must not be installed d d i i r r e e c c t t l l y y above a hob. •... -
Page 33: Electrical Connections
Installation Electrical connections W W A A R R N N I I N N G G ! ! T T H H I I S S A A P P P P L L I I A A N N C C E E M M U U S S T T B B E E E E A A R R T T H H E E D D T T h h e e m m a a n n u u f f a a c c t t u u r r e e r r d d e e c c l l i i n n e e s s a a n n y y l l i i a a b b i i l l i i t t y y s s h h o o u u l l d d t t h h i i s s s s a a f f e e t t y y m m e e a a s s u u r r e e n n o o t t b b e e o o b b s s e e r r v v e e d d . -
Page 34: Environmental Information
Ecologically responsible disposal of packaging materials and old appliances Packaging materials AEG-Electrolux microwave ovens require effective packaging to protect them during transportation. Only the minimum packaging necessary is used. Packaging materials (e.g. foil or styrofoam) can place children at risk. -
Page 35: Service & Spare Parts
Service & spare parts Service & spare parts If you wish to purchase spare parts or require an engineer, contact your local AEG- Electrolux Service Force Centre by telephoning: 08705 929 929 Your telephone call will be automatically routed to the Service Force Centre covering your post code area. -
Page 36: Guarantee Information
Guarantee conditions Standard guarantee conditions We, AEG-Electrolux, undertake that if within 12 months of the date of the purchase this AEG-Electrolux appliance or any part thereof is proved to be defective by reason only of faulty workmanship or materials, we will, at our... -
Page 37: European Guarantee
Guarantee information European Guarantee If you should move to another country within Europe then your guarantee moves with you to your new home subject to the following qualifications: • The guarantee starts from the date you first purchased your product. •... - Page 38 www.electrolux.com Albania +35 5 4 261 450 Rr. Pjeter Bogdani Nr. 7 Tirane Belgique/België/ +32 2 363 04 44 Bergensesteenweg 719, 1502 Lembeek Belgien ˘ ˘ Ceská republika +420 2 61 12 61 12 Budejovická 3, Praha 4, 140 21 Danmark +45 70 11 74 00 Sjællandsgade 2, 7000 Fredericia...
- Page 40 www.electrolux.com...
Need help?
Do you have a question about the MC1752E and is the answer not in the manual?
Questions and answers