
Related Manuals for Jensen VM9214


Summary of Contents for Jensen VM9214
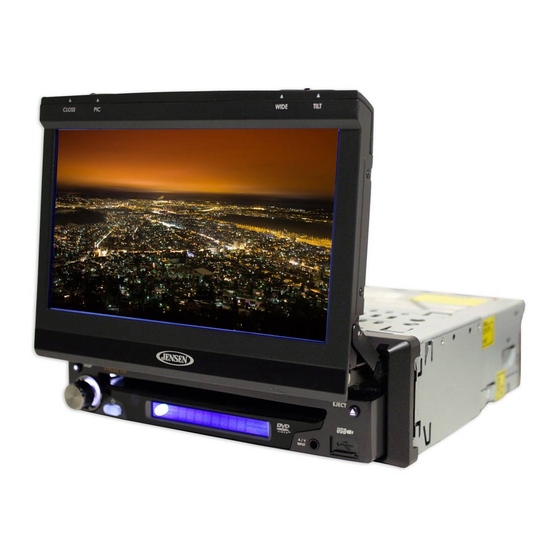
- Page 1 VM9214 Operating Instructions CLOSE TILT WIDE VM9214 A / V INPUT 1 1 60 watts peak 40W x 4...
-
Page 2: Table Of Contents
VM9214 CONTENTS Thank you for choosing a Jensen product. We hope you will find the instructions in this owner’s manual clear and easy to follow. If you take a few minutes to look through it, you’ll learn how to use all the features of your new Jensen VM9214 Mobile Multimedia Receiver for maximum enjoyment. -
Page 3: Features
VM9214 FEATURES Congratulations on your purchase of the Jensen VM9214 Mobile Multimedia Receiver. It’s a good idea to read all of the instructions before beginning the installation. We recommend having your Jensen VM9214 installed by a reputable installation shop. •... -
Page 4: Optional Equipment
See “Bluetooth Operation” on page 48. • Rear Camera The VM9214 is "camera ready." Before accessing any camera features, you must purchase and install a rear video camera. Once the rear camera is connected and operating properly, the CAMERA source mode will become active. - Page 5 VM9214 WARNING! Never install this unit where operation and viewing could interfere with safe driving conditions. WARNING! To reduce the risk of a traffic accident (except when using for rear view video camera) never use the video display function while driving the vehicle.
-
Page 6: Controls And Indicators
Press to adjust the display aspect of the picture to one of two settings: Full, Normal or STANDBY. With the monitor closed, press to seek backward. When the NAV102 is connected to the VM9214, press and hold to display the navigation user interface. The TFT screen must be open for this function to operate. - Page 7 VM9214 12. RESET Press to reset system settings to factory default (except the password and parental lock setting). 13. A/V Input Attach a compatible A/V device. 14. USB Interface Connector Connect a USB device for playback of music/video files. 15. TFT Display...
-
Page 8: Remote Control
VM9214 REMOTE CONTROL See Table 1 for remote control functions. iPod MUSIC PHOTO VIDEO... - Page 9 VM9214 Table 1: Remote Control Functions Button Function CD/MP3/ Name TUNER iPod MENU Enters the Turns on/off Selects main menu PBC when Photo mode of the disc playing TITLE Enters the Plays first Selects title menu of ten seconds Music mode...
- Page 10 VM9214 Table 1: Remote Control Functions Button Function CD/MP3/ Name TUNER iPod DISP/ Displays Displays Displays Display Displays CLEAR playing playing playing playing playing information information information information information Delete entry Delete entry Delete entry Delete entry Delete entry or move...
- Page 11 VM9214 Table 1: Remote Control Functions Button Function CD/MP3/ Name TUNER iPod >>| Selects the Selects the Searches Selects the Selects the next chap- next chap- an avail- next track next track ter for play- ter for play- able radio...
- Page 12 VM9214 Table 1: Remote Control Functions Button Function CD/MP3/ Name TUNER iPod 1, 2, 3, Directly 1-6 selects Directly 4, 5, 6, accesses preset for accesses 7, 8, 9, chapter current track band (Numer ic Key- pad) Press Selects FM/ ||>...
-
Page 13: Using The Tft Monitor
VM9214 USING THE TFT MONITOR Open/Close TFT Monitor Open TFT Monitor Press the OPEN button (1) on the front panel or press the ( ) button (25) on the remote control to activate the mechanism that moves the display panel into the viewing position. -
Page 14: Aspect Ratio
VM9214 Aspect Ratio Press the DISP button (10) on the remote control or WIDE button (4) on the monitor to adjust the aspect ratio as follows: FULL The entire screen is extended horizontally to the aspect ratio of 16 to 9. The extension ratio is the same at any point. -
Page 15: Parking Brake Inhibit
VM9214 Parking Brake Inhibit When the pink "Parking" wire is connected to the vehicle Parking Brake circuit, the front TFT monitor will display video when the Parking Brake is engaged. (When the pink wire is grounded via the Parking Brake circuit, video will be displayed.) -
Page 16: Operating Instructions
VM9214 OPERATING INSTRUCTIONS Power On / Off Press the /SRC button (10) on the unit (or the button (4) on the remote control) to turn the unit on. The buttons on the front of the unit light up and the current mode status appears in the LCD (7). - Page 17 VM9214 Source Menu You can also use the touch screen to change the source through the SOURCE MENU. To access the SOURCE MENU, touch the top left corner of the screen or press the SRC button on the front panel (10) or remote control (8).
-
Page 18: Volume Adjustment
VM9214 information regarding the use of USB devices, see “Inserting a USB Device” on page 40. Volume Adjustment Volume Increase/Decrease To increase or decrease the volume level, turn the rotary encoder (11) on the front panel or press the VOL-/+ buttons (15, 16) on remote control. When the volume level reaches “0”... -
Page 19: System Reset
VM9214 c. Press the |<<, >>|, >>, or << buttons (12, 15, 17, 20) on the remote control to adjust the selected feature to the desired setting. Table 4: Audio Adjustments Audio Function Adjustable Range User Acoustic Urban Rave Latin... - Page 20 VM9214 Steering Wheel Control (SWC) The VM9214 is compatible with the PAC (Pacific Accessory Corporation) steering wheel control adapter SWI-PS. A 3.5mm female connector (labeled “SWC Interface”) on the back of the head unit allows connectivity to the PAC adapter. Please refer to the instructions included with the PAC adapter for detailed installation information.
-
Page 21: Setup Menu
VM9214 SETUP MENU To access system settings, press the SETUP button (29) on the remote control or touch the button on the screen to enter the “SETUP” menu. The “GENERAL” sub-menu appears highlighted in blue. 05:33 AM RADIO SETUP MENU... - Page 22 VM9214 3. Select a new value by using the touchscreen or pressing the >> or << buttons (14, 22) on the remote control. 4. Use the touchscreen or press the >/|| button (18) on the remote control to confirm setup.
- Page 23 VM9214 Language Sub-menu Features If a DVD supports more than 1 Subtitle or Audio language, all the languages are available for selection during playback. If the selected language is not supported by the DVD, then the default language is used.
- Page 24 VM9214 Bluetooth Sub-menu Features Setting Options Function Bluetooth Disable Bluetooth function. Enable Bluetooth function. Connect Manual Connect the last active mobile phone by touching the CON- NECT icon when disconnected. Auto Automatically connect when your paired phone is in range.
- Page 25 VM9214 NOTE: Record the password and keep it in a safe place for future reference. The rating for each disc is marked on the disc, disc packing, or documentation. If the rating is not available on the disc, the parental lock feature is unavailable.
-
Page 26: Exiting The System Setup Menu
VM9214 P.VOL Sub-menu Features Setting Options Function Source RADIO Choose a source for which you would like to increase the rel- ative volume (LEVEL). DISC USB1 USB2 CAMERA Level Increase relative volume for specified source up to 6 deci- bels. -
Page 27: Tuner Operation
VM9214 TUNER OPERATION Tuner TFT Display 01:02 PM FM-1 P1 87.5 MHz RADIO P1 87.5 MHz P2 90.1 MHz P3 98.1 MHz P4 106.1MHz P5 107.9MHz P6 102.9MHz BAND 1. Current radio band indicator 2. Radio frequency indicator 3. Clock 4. -
Page 28: Seek Tuning
VM9214 16. 1/2: Touch to view a second screen of menu choices : Touch to view the SOURCE MENU and select a new playback source 18. MEM: View screen used to enter current channel into preset memory : Touch to view the SETUP menu 20. -
Page 29: Direct Tuning
VM9214 Direct Tuning To enter a radio station directly, touch the button or press the GOTO button (21) on the remote control to display the direct entry menu. FM: _ _ _ . _ MHz Exit Enter Clear Enter the desired radio station using the on-screen number pad. Press the Enter button to tune to the selected station. - Page 30 VM9214 2. Touch an on-screen preset button (6) to select the corresponding stored station. P1 87.5 MHz P2 90.1 MHz P3 98.1 MHz P4 106.1MHz P5 107.9MHz P6 102.9MHz Auto Store/Preview Scan (AS/PS) Auto Store (AS) To select six strong stations and store them in the current band: 1.
-
Page 31: Dvd/Vcd Video Operation
VM9214 DVD/VCD VIDEO OPERATION NOTE: When properly installed, DVD video cannot be displayed on the main TFT screen unless the parking brake is applied. If you attempt to play a DVD while the vehicle is moving, the TFT screen displays “PARKING”... -
Page 32: Controlling Playback
VM9214 Controlling Playback To access the on-screen controls, touch the bottom 1/3 of the screen while a DVD is playing. Touch the 1/2 button to view a second page of controls AUDIO SUB- TITLE MENU TITLE DISP Stopping Playback Touch the stop button ( ) on the screen or press the ||>/BAND button (20) on the remote control to stop DVD play. -
Page 33: Accessing The Dvd Menu
VM9214 NOTE: For VCD play, the repeat function is not available if PBC is on. Sectional Repeat Function (A-B) Use the A-B function to define a specific area of a disc to repeat. • Press the REPT A-B button (6) on the remote control (or the A-B button on screen) to set the start point (A) of the repeated section. - Page 34 VM9214 • For DVD mode, you can choose Time or Title/Chapter search. DVD Search Search Title – Go to specific Title title Chapter Chapter – Go to Time 00 : 00 : 00 specific chapter Time – Go to specific time in current title •...
- Page 35 VM9214 Touch Screen Direct Entry To select a chapter/track directly, touch the button on screen control to display the direct entry menu. Chapter: _ _ Exit Enter Clear Enter the desired chapter/track using the on-screen number pad. Press the Enter button to tune to the selected station. To exit the screen without changing the station, touch Exit.
-
Page 36: Playback Information
VM9214 PBC - Play Back Control (VCD Only) For VCDs with play back functionality, play back control (PBC) provides additional controls for VCD playback. Press the MENU button (1) on the remote control to toggle the PBC function “On”/”Off”. Once PBC is on, playback starts from track one of the play list. - Page 37 VM9214 Table 6: Disc Symbols Symbol Meaning Number of voice languages recorded. The number inside the icon indi- cates the number languages on the disc (maximum of 8). Number of subtitle languages available on the disc (maximum of 32). Number of angles provided (maximum of 9).
-
Page 38: Dvd/Cd Audio Operation
Instructions for TFT control and Insert/Eject are the same for DVD and CD operation. Please see the DVD/Disc Video Operation section for information about these topics. The VM9214 will play music or other audio files from the following disc media: • CD-DA •... - Page 39 VM9214 11. <<: Touch to rewind current track 12. Touch to activate/deactivate Repeat play mode 13. Touch to activate/deactivate Random mode : Touch to access the direct entry screen : Touch to view the SETUP menu 16. Touch for quick access to Equalizer level settings 17.
-
Page 40: Direct Track Entry
VM9214 NOTE: CD-R and CD-RW will not play unless the recording session is finalized. Fast Forward Touch the >> button on screen or press the >> button (14) on the remote control to fast forward. Keep pressing and releasing the button to increase the rate from “x2”... -
Page 41: Mp3/Wma Operation
VM9214 MP3/WMA OPERATION Instructions for TFT control and Insert/Eject are the same for DVD and MP3 operation. Please see the DVD/Disc Video Operation section for information about these topics. Media and File Requirements This player allows you to play back MP3 and WMA files recorded onto CD-R/ RWs, DVD+R/RWs, and DVD-R/RWs. - Page 42 For example, a medium with the following folder/file hierarchy is subject to Folder Search, File Search or Folder Select, as shown below. The VM9214 player will only recognize three folder levels and does not display folders containing only other folders. In the example above, the unit will display folders 3, 4, 6, and 8, but not 2 and 7 since they do not contain any tracks directly.
- Page 43 VM9214 To remove the USB device, press the SRC button (10) to switch to another mode and then remove the USB device from the USB connector. MP3 User Interface The on-screen indicators and touch key areas for MP3 playback are outlined below.
- Page 44 VM9214 12. DIR -: Touch to view the previous folder 13. DIR +: Touch to view the next folder : Touch to access the direct entry screen : Touch to view the SETUP menu 16. Touch for quick access to Equalizer level settings 17.
- Page 45 VM9214 NOTE: CD-R and CD-RW will not play unless the recording session is finalized. Direct Track Entry Use the numeric keypad (29) on the remote control to access files directly or press the button (see “Direct Track Entry” on page 38).
-
Page 46: Ipod Operation
VM9214 iPod OPERATION NOTE: Be sure your iPod has the latest Apple firmware installed to avoid connectivity issues. Accessing iPod Mode This unit is Made for iPod. You can control your iPod via touch screen to access Playlist, Artist, Album, Songs, etc. Supported models include, but are not limited to, the following: •... -
Page 47: Controlling Your Ipod
VM9214 3. Current time 4. File titles 5. ID3 information (Artist/Album) 6. OK: Touch to “Enter” 7. Touch to play all files in random order 8. >>|: Touch to move to next file 9. |<<: Touch to move to previous file 10. - Page 48 VM9214 During music playback, the following screen is displayed: 01:02 PM iPod2 4/412 Ain't That A Shame Dream Police ALBUM ART Cheap Trick 01:18 05:12 • To return to the iPod music menu from the album art screen, press •...
- Page 49 VM9214 NOTE: To transmit the video from your iPod to the VM9214 screen, you must set the following options through the iPod video settings menu: TV Out = On, TV Signal = NTSC, and Widescreen = On. NOTE: After disconnecting your iPod, the VM9214 will always return to...
-
Page 50: Bluetooth Operation
Before attempting to use the Bluetooth functions on the VM9214, you must purchase and install the BTM10. When connected properly, the blue light appears illuminated. Bluetooth features are only available when the BTM10 is installed. - Page 51 VM9214 • Some mobile phones (like Sony Ericsson) may have a "Power Saving Mode" option. PLEASE DO NOT use the power saving mode with the VM9214. • Before accepting or making a call, make sure your mobile phone's “Bluetooth function” is turned on.
- Page 52 However, depending on your phone, the connection may be made using HSP (Head Set Profile), making some functions unavailable. This is a limitation of your phone, not the VM9214. Since there are a number of Bluetooth mobile phone implementations available on the market, operations with your Bluetooth mobile phone using this unit vary greatly.
-
Page 53: Managing Incoming Calls
Pairing Code field under the Bluetooth SETUP menu. The default pairing code for many phones is “0000”. The default code for the VM9214 is “1234”. See “Bluetooth Sub-menu Features” on page 22 for instructions on entering the pairing code. -
Page 54: Making An Outgoing Call
VM9214 NOTE: The TALK button on the BTM10 can be used to answer calls or hang up. For best reception, speak loudly and clearly. To end the conversation, press the button (12). The screen will display the call duration for 3 seconds, and then return to the previous mode. -
Page 55: Call Transfer
VM9214 Call Transfer While talking, to transfer audio from the head unit back to the mobile phone, touch the button (6). The TFT will display “Transfer”. You can only transfer a call after it has been answered. Menu List The menu list appears on the left side of the screen and can be accessed from other modes by touching the MENU button on the right side of the screen. -
Page 56: Bluetooth Setup
3. Touch the area to the right of “Connect” to select “Auto”. Advanced Audio Distribution Profile (A2DP) The VM9214 allows you to play back audio files from your phone, PDA or personal music player using a Bluetooth connection. Before using an audio player, it may be necessary to enter a PIN code into the unit. -
Page 57: Troubleshooting
VM9214 TROUBLESHOOTING Table 7: Troubleshooting Problem Cause Corrective Action GENERAL Unit will not Radio Fuse blown Install new fuse with correct rating power on Car battery fuse blown Install new fuse with correct rating Illegal operation Press the RESET button located in the... - Page 58 VM9214 Table 7: Troubleshooting Problem Cause Corrective Action Prolonged Improper aspect ratio Use correct aspect ratio setting image or setup improper height/width ratio display Monitor stops Moving path is blocked Press OPEN key to restart monitor at incorrect movement position...
-
Page 59: Error Messages
VM9214 Table 7: Troubleshooting Problem Cause Corrective Action Incorrect play- Message is longer than back message LCD can display displayed Error Messages Table 8: Error Messages Message Cause Corrective Action Displayed Loading Disc is being read No Disc Disc is dirty... - Page 60 VM9214 6. The CD player may not operate properly in extreme hot or cold. If such conditions occur, allow the interior of the vehicle to reach a normal temperature before using player. 7. When the vehicle warms up during cold weather or under damp conditions, condensation may appear on the LCD panel.
-
Page 61: Specifications
VM9214 SPECIFICATIONS DVD/CD Player Compatible Disc Media: DVD + R / RW (Single and Dual Layer) and CD-R / Compatible Media Formats: CD-DA, MP3, WMA, VCD, SVCD, Xvid, AVI, MPEG1 / 2 Signal to Noise Ratio: >95dBA Dynamic Range: >95dB Frequency Response: 20Hz to 20 kHz, -3dB Channel Separation: >... - Page 62 VM9214 Operating Temperature: -20C ~ 65C Fuse: 15-amp, mini ATM type DIN chassis dimensions: 7" X 7" X 2" (178mm x 178mm x 50mm) CEA Power Ratings Power Output: 13 Watts RMS x 4 channels into 4-Ohms @ < 1% THD+N...
- Page 63 Audiovox Electronics Corporation Hauppauge, NY 11788 Technical Assistance: 1-800-323-4815 www.jensen.com © 2010 Audiovox Ver. 020510 Printed in China...
-
Page 64: Tools And Supplies
3.5mm to 3.5mm Media Adaptor Cable Parking Brake Sensor Extension Wire Owners Manual Mounting Hardware Installation Guide Tools and Supplies You will need these tools and supplies to install your VM9214: • Torx type, À at-head and Philips screwdrivers • Wire cutters and strippers •... -
Page 65: Disconnecting The Battery
To prevent a short circuit, be sure to turn off the ignition and remove the negative (-) battery cable prior to in- stallation. NOTE: If the VM9214 is to be installed in a car equipped with an on-board drive or navigation computer, do not disconnect the battery cable. If the cable is disconnected, the computer memory may be lost. Under these conditions, use extra caution during installation to avoid causing a short circuit. -
Page 66: Final Installation
NOTE: When replacing a fuse, be sure to use correct type and amperage to avoid damaging the radio. The VM9214 uses one 15 amp fuse, located in the black ¿ lter box in-line with the main wire harness. Final Installation After completing the wiring connections, turn the unit on to con¿... -
Page 67: Wiring Diagram
For occasional iPod use, keep an iPod cable in your glove box and use it to connect the iPod to the front USB connector. Need Help? CAMERA Rear View YELLOW Video Camera For technical assistance, call the Jensen YELLOW customer support line at 1-800-323-4815. Rear Video VIDEO OUT REAR R REAR L...
Need help?
Do you have a question about the VM9214 and is the answer not in the manual?
Questions and answers