Jensen VM9225BT Operating Instructions Manual
Mobile multimedia receiver
Hide thumbs
Also See for VM9225BT:
- Installation manual (4 pages) ,
- Operating instructions manual (82 pages)
Table of Contents
Advertisement
Advertisement
Table of Contents

Subscribe to Our Youtube Channel
Related Manuals for Jensen VM9225BT


Summary of Contents for Jensen VM9225BT
- Page 1 VM9225BT Operating Instructions watts peak 40W x 4...
-
Page 2: Table Of Contents
Thank you for choosing a Jensen product. We hope you will fi nd the instructions in this owner’s manual clear and easy to follow. If you take a few minutes to look through it, you’ll learn how to use all the features of your new Jensen VM9225BT Mobile Multimedia Receiver for maximum enjoyment. -
Page 3: Features
Congratulations on your purchase of the Jensen VM9225BT Mobile Multimedia Receiver. It’s a good idea to read all of the instructions before beginning the installation. We recommend having your Jensen VM9225BT installed by a reputable installation shop. • Fast Forward/Reverse - 2X, 4X, 8X and 20X •... - Page 4 Rear Camera The VM9225BT is “camera ready. ” Before accessing any camera features, you must purchase and install a rear video camera. Once the camera is connected and operating properly, the CAMERA source mode will become active. While the camera is not installed, the CAMERA option appears gray, indicating the function is not available.
- Page 5 VM9225BT WARNING! Never install this unit where operation and viewing could interfere with safe driving conditions. WARNING! To reduce the risk of a traffi c accident (except when using for rear view video camera) never use the video display function while driving the vehicle.
-
Page 6: Controls And Indicators
VM9225BT CONTROLS AND INDICATORS VM9225BT EJECT MUTE OPEN 1. Disc Slot 2. EJECT Press to eject a disc. 3. Power On/Off ( )/SRC Press to turn the unit ON. Press and hold to turn the unit OFF. Once the unit is ON, momentarily pressing the SRC button will display the Main Source Menu. -
Page 7: Remote Control
VM9225BT REMOTE CONTROL See Table 1 for remote control functions. iPod PHOTO VIDEO MUSIC... - Page 8 VM9225BT Table 1: Remote Control Functions Button Function Name TUNER CD/MP3/ iPod MENU Enters Turns on/off Selects the main PBC when Photo menu of playing mode. the disc. VCD. TITLE Enters the Plays the Selects title menu fi rst ten Music of the disc.
- Page 9 VM9225BT Table 1: Remote Control Functions Button Function Name TUNER CD/MP3/ iPod PHOTO/ Language Selects SUBTITLE selection Photo for subtitle. mode. DISP/ Displays Displays Displays Display Displays playing playing playing playing playing CLEAR information. information. information. information. information. Delete entry...
- Page 10 VM9225BT Table 1: Remote Control Functions Button Function Name TUNER CD/MP3/ iPod VOL + Increases Increases Increases Increases Increases volume. volume. volume. volume. volume. Selects Selects the Searches for Selects Pauses previous an available playback/ previous chapter for radio previous...
- Page 11 VM9225BT Table 1: Remote Control Functions Button Function Name TUNER CD/MP3/ iPod Displays Displays set-up set-up parameters. parameters. OPEN/ Opens/ Opens/ Opens/ Opens/ Opens/ CLOSE closes closes closes closes Closes the TFT the TFT the TFT the TFT the TFT monitor.
- Page 12 VM9225BT Table 1: Remote Control Functions Button Function Name TUNER CD/MP3/ iPod SETUP 31 Displays Displays Displays Displays Displays Setup Setup Setup Setup Setup menu. menu. menu. menu. menu. 32 Accesses Accesses Accesses Accesses Accesses equalizer equalizer equalizer equalizer equalizer menu.
-
Page 13: Operating Instructions
VM9225BT OPERATING INSTRUCTIONS Power On / Off Press the /SRC button to turn the unit on. The buttons on the front of the unit light up and the current mode status appears on the LCD. Press and hold the button to power off the unit. -
Page 14: Volume Adjustment
VM9225BT External Devices External peripheral devices, including a game console, camcorder, navigation unit, iPod®, Zune, etc. can be connected to this unit via RCA output using an A/V Media Adapter Cable (not included). MUTE Right Audio Left Audio VM9225BT Ground V ideo 3.5mm A/V Cable (not included) -
Page 15: Audio Control Menu
VM9225BT Audio Control Menu The Audio Control feature allows you to easily adjust your audio system to meet the acoustical characteristics of your vehicle, which vary depending on the type of vehicle and its measurements. Proper setting of the Fader and Balance boosts the eff ects of the cabin equalizer. - Page 16 VM9225BT Table 2: Equalizer Adjustments Setting Adjustable Function Range 60 Hz Selects the low pass fi lter frequency. Touch the + or - buttons to adjust the 80 Hz settings. 100 Hz 200 Hz 0.5 kHz Selects the mid pass fi lter frequency.
- Page 17 VM9225BT Balance-Fader Touch the BAL-FAD button on the left side of the equalizer screen to display the balance/fader screen. Setting Adjustable Function Range Balance -16 to +16 Balances the audio output levels between the left and right side of the vehicle.
-
Page 18: Parking Brake Inhibit
VM9225BT System Reset [RESET] Button To correct a system halt or other illegal operation, use the tip of a pen to press the reset button located on the front bottom-left corner of the unit behind the protective cover. After a system reset, the unit restores all factory default settings. -
Page 19: Settings Menu
VM9225BT SETTINGS MENU To access system settings, touch the button on the screen to enter the SETTINGS MENU. The GENERAL Sub-menu appears highlighted in blue. Accessing Menu Items Touch the sub-menu name to select a sub-menu (Language, Audio, RDS, etc.). The features available for adjustment under the highlighted sub-menu option will appear in the left of the screen. - Page 20 VM9225BT General Sub-menu Features Setting Options Function Tuner Region USA • AM Frequency Spacing - 10 kHz • AM Frequency Band - 530 kHz ~ 1720 kHz • FM Frequency Spacing - 200 kHz • FM Frequency Band - 87.5 MHz ~ 107.9 MHz S.Amer1...
- Page 21 VM9225BT Setting Options Function Clock (HH:MM) Clock appears in the top right corner of the screen during certain operations. NOTE: The AM/PM indication will change as you continue to adjust the hour past 12. Beep No beep sounds. When turned on, an audible beep tone confi rms each function selection.
- Page 22 VM9225BT Rating Sub-menu Features The DVD system has a built-in parental lock feature to prevent unauthorized persons from viewing restricted disc content. By default, the rating system is unlocked. Once set up, the parental lock is released only by entering the correct password.
- Page 23 VM9225BT Audio Sub-menu Features Setting Options Function Employ the Dynamic Range Control for better playback for low volumes. Loudness Select low frequency boost only or high and low frequency boost. HI/LO Subwoofer Turns the subwoofer output on or off .
- Page 24 VM9225BT Setting Options Function Level 0 to 6 Default level is 3 (0dB reference) 0 = (-6dB) 1 = (-4dB) 2 = (-2dB) 3 = (0dB) 4 = (+2dB) 5 = (+4dB) 6 = (+6dB) Hardware Sub-menu Features Setting Options...
-
Page 25: Exiting The System Setup Menu
VM9225BT Setting Options Function Camera In Normal Reverse the camera image as if looking through a rear-view mirror. Mirror NSTC Video Input (Input The color signals are output in the circuitry auto detects the standard NTSC format. video signal from the The color signals are output in the Aux In source). -
Page 26: Tuner Operation
VM9225BT TUNER OPERATION Tuner TFT Display Menu Page 1 Menu Page 2 RADIO: Touch to view the SOURCE MENU and select a new playback source. 2. Current radio band indicator. 3. Stereo broadcasting indicator. 4. Strong local signal broadcasting indicator. -
Page 27: Seek Tuning
VM9225BT 15. AS: Touch to automatically store stations. 16. PTY: Touch to activate the program type related search function. 17. SCAN: Touch to scan all stations available, stopping for 5 seconds at each and continuing until a station is selected. -
Page 28: Direct Tuning
VM9225BT Direct Tuning To enter a radio station directly, touch DIRECT ENTRY to display the direct entry menu. Enter the desired radio station frequency using the on-screen number pad. If you wish to delete an entry number touch . Press OK to tune to the selected station and touch the OK button. - Page 29 VM9225BT Recalling a Station Select a band (if needed). 2. Touch an on-screen preset button to select the corresponding stored station. Auto Store (AS) To select six strong stations and store them in the current band: Select a band (if needed).
-
Page 30: Dvd/Vcd Video Operation
VM9225BT DVD/VCD VIDEO OPERATION NOTE: When properly installed, DVD video cannot be displayed on the main TFT screen unless the parking brake is applied. If you attempt to play a DVD while the vehicle is moving, the TFT screen displays:... - Page 31 VM9225BT Touch to advance to the next chapter on the DVD. Touch to see the second page of DVD controls. Touch to select a chapter/track directly using the on-screen display direct entry menu display. Touch to stop DVD playback. 5. Sub: Touch during playback to select the subtitle language if the disc is recorded in multiple languages.
- Page 32 VM9225BT Inserting a Disc Upon inserting a DVD disc, DVD mode is entered and disc play begins. NOTE: If Parental Lock (Rating) is activated and the disc inserted is not authorized, the 4-digit code must be entered and/or the disc must be authorized (see “Rating Sub-menu Features”).
-
Page 33: Moving Through Chapters
VM9225BT Sectional Repeat Function (A-B) Use the A-B function to defi ne a specifi c area of a disc to repeat. • Touch A-B on the second page of DVD on-screen controls to set the start point (A) of the repeated section. -
Page 34: Playback Information
VM9225BT Multi-Language Discs (DVD Only) Changing Audio Language If you are watching a disc recorded in multiple languages, touch AUDIO on the second page of DVD on-screen controls to choose a language. Each time the icon is touched the language will change. -
Page 35: General Disc Information
VM9225BT General Disc Information Table 4: Disc Properties Symbol 12cm Disc Properties Max Play Time Single side single layer (DVD-5) (MPEG 2 Method) Single side double layer (DVD-9) 133 minutes Double side single layer (DVD-10) 242 minutes Double side double layer (DVD-18) -
Page 36: Dvd/Cd Audio Operation
Instructions for TFT control and Insert/Eject are the same for DVD and CD operation. Please see the DVD/Disc Video Operation section for information about these topics. Media Requirements The VM9225BT will play music or other audio fi les from the following disc media: • CD-DA • CD-R/RW • DVD •... - Page 37 VM9225BT DISC: Touch to view the SOURCE MENU and select a new playback source. 2. Repeat Play Indicator - This indicator is lit when the repeat mode is active. 3. Random Play Indicator - This indicator is lit when the random mode is active.
- Page 38 VM9225BT Playlist Screen The Playlist screen allows you to directly search for music on your disc. • Touch a track title (if available) or track number to begin playback of that track. • Touch to view the previous playlist page. Touch to view the next playlist page.
-
Page 39: Controlling Playback
VM9225BT Controlling Playback Inserting a Disc Upon inserting a CD, disc play begins. You cannot insert a disc if there is already a disc in the unit or if the power is off . Ejecting a Disc Press the button on the front of the unit to eject the disc. The unit automatically reverts to Tuner mode. -
Page 40: Mp3/Wma Operation
VM9225BT MP3/WMA OPERATION Instructions for TFT control and Insert/Eject are the same for DVD and MP3 operation. Please see the DVD/Disc Video Operation section for information about these topics. Media and File Requirements This player allows you to play back MP3 and WMA fi les recorded onto CD-R/RWs, DVD+R/RWs, and DVD-R/RWs. - Page 41 For example, a medium with the following folder/fi le hierarchy is subject to Folder Search, File Search or Folder Select, as shown below. The VM9225BT player will only recognize three folder levels and does not display folders containing only other folders. In the example above, the unit will display folders 3, 4, 6, and 8, but not 2 and 7 since they do not contain any tracks directly.
- Page 42 VM9225BT MP3/WMA TFT Display The on-screen indicators and touch key areas for MP3/WMA playback are outlined below. Menu Page 1 Menu Page 2...
- Page 43 VM9225BT DISC: Touch to view the SOURCE MENU and select a new playback source. 2. Repeat Play Indicator - This indicator is lit when the repeat mode is active. 3. Random Play Indicator - This indicator is lit when the random mode is active.
- Page 44 VM9225BT Playlist Screen The Playlist screen allows you to directly search for music, video or photo fi les stored on your MP3 disc/USB device. • Touch a folder to view the contents of the directory or touch a track title/fi le name to begin playback of that fi le.
- Page 45 VM9225BT Controlling Playback Inserting a Disc Upon inserting a MP3/WMA disc, disc play begins. You cannot insert a disc if there is already a disc in the unit or if the power is off . Ejecting a Disc Press the button on the front of the unit to eject the disc.
-
Page 46: Ipod® Operation
VM9225BT iPod®/iPhone® OPERATION ® NOTE: Be sure your iPod has the latest Apple fi rmware installed to avoid connectivity issues. ® Accessing iPod Mode This unit is Made for iPod® and iPhone®. You can control your iPod® via touch screen to access Playlist, Artist, Albums, Songs, etc. Supported models include, but are not limited to the following: •... - Page 47 VM9225BT The Search Screen allows you to search for music or video fi les stored in your iPod®/iPhone®. Touch the Music list box to search for music grouped by playlists, artists, albums, songs, genres, composer or podcast. Touch the Video list box to search for videos grouped by movie, music videos, TV shows, video podcasts, rentals and video playlists.
- Page 48 VM9225BT Indicators/Controls The on-screen indicators and touch key areas for iPod® playback are outlined below. iPod: Touch to view the SOURCE MENU and select a new playback source. ll Indicates whether media is playing or paused. 3. Rock: Indicates the current equalizer setting.
-
Page 49: Controlling Your Ipod
X. To clear your entry and start over, touch the back arrow. NOTE: To transmit the video from your iPod® to the VM9225BT screen, you must set the following options through the iPod® video settings menu: TV Out = On, TV Signal = NTSC, and Widescreen = On. -
Page 50: Pandora Radio Operation
VM9225BT PANDORA RADIO OPERATION Pandora Radio is available via your iPhone® (data usage will occur) or iPod® touch (Wi-Fi). NOTE: For basic iPod®/ iPhone® connectivity, you can use the white 30-pin to USB iPod cable that came with your Apple device . For iPod® video or photo playback, you must purchase the jLink-USB cable. - Page 51 VM9225BT Thumbs Down Icon: Press this icon to tell Pandora to not play this track. Pandora will skip to the next track. If the skip limit has been reached, Pandora will continue to play but your feedback will be recorded.
- Page 52 VM9225BT To Launch/Stop Pandora Radio Launch the Pandora app on your iPhone. The Pandora icon appears on the Main Menu Screen. 2. Touch the Pandora icon. The Pandora Screen appears. 3. Touch the icon to begin playback or the icon to pause playback.
-
Page 53: Bluetooth Operation
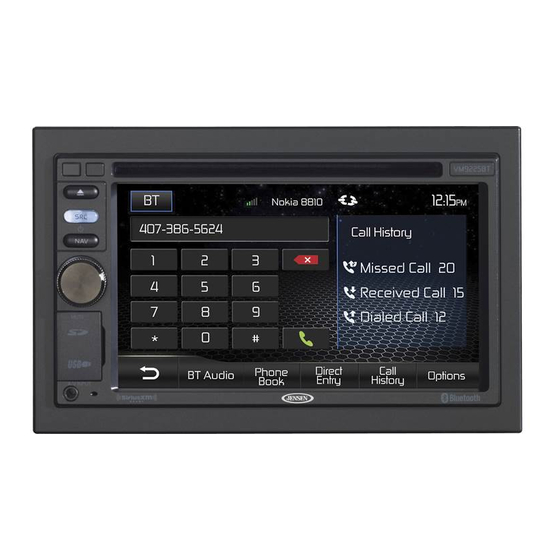
• Some mobile phones (like Sony Ericsson) may have a “Power Saving Mode” option. PLEASE DO NOT use the power saving mode with the VM9225BT. • Before accepting or making a call, make sure your mobile phone’s “Bluetooth®... - Page 54 VM9225BT Bluetooth User Interface The on-screen indicators and touch key areas for Bluetooth® functions are outlined below. BT: Touch to view the SOURCE MENU and select a new playback source. 2. User: Indicates the current equalizer setting. 3. EQ: Touch for quick access to Equalizer level settings.
-
Page 55: Pairing Mobile Phone With Head Unit
VM9225BT Hands Free Profi le (HFP) To use a mobile phone with this unit, it is necessary to fi rst establish a connection using Bluetooth® wireless technology. The connection is normally established using Hands Free Profi le (HFP), which gives you full control of functions available on the mobile phone source. -
Page 56: Managing Incoming Calls
The mobile phone should display a message similar to “Device Connected” and the mobile phone and the unit are now connected. VM9225BT will appear on the mobile phone list of devices. Managing Incoming Calls When connected to a Bluetooth®... -
Page 57: Answering An Incoming Call
VM9225BT Answering an Incoming Call To answer an incoming call touch the icon. For best reception, speak loudly and clearly into the microphone. To end the conversation, touch the icon. Rejecting an Incoming Call Press the Transfer Call icon to reject an incoming call. The call will revert to your mobile phone and be left for voice mail. - Page 58 VM9225BT 4. To end the call touch the icon on the previous screen. Call Transfer While talking, to transfer audio from the unit back to the mobile phone, touch the Transfer Call icon. You can only transfer a call after it has been answered. Pressing the Transfer Call icon again will return the audio from the mobile phone to the unit.
- Page 59 VM9225BT While listening to audio the following functions are available: Pause/Play ( ) icon: Touch to pause playback. Touch again to resume playback. 2. Previous ( ) icon: Touch to play the previous track. 3. Next ( ) icon: Touch to play the next track.
-
Page 60: Siriusxm® Radio Operation
VM9225BT SiriusXM® RADIO OPERATION Everything worth listening to is on SiriusXM®, getting over 130 channels, including the most commercial-free music, plus the best sports, news, talk and entertainment. A Vehicle Tuner (sold separately) and subscription are required. For more information, visit www.siriusxm.com. - Page 61 VM9225BT SiriusXM User Interface The on-screen indicators and touch key areas for SiriusXM® functions are outlined below. Menu Page 1 Menu Page 2 SXM icon: Touch to view the SOURCE MENU and select a new playback source. 2. Band indicator - Displays SiriusXM® radio band currently selected.
- Page 62 VM9225BT 9. Next ( ) icon: Touch to tune to the next channel. 10. Category/Channel icon: Touch to toggle the icon displayed between Category and Channel. 11. Previous ( ) icon: Touch to tune to the previous channel. 12. List icon: When the Category icon is displayed, touch List to go to the Category Screen.
- Page 63 VM9225BT Switching to SiriusXM® Radio • Touch the top left corner of the screen (the radio box) to view the SOURCE MENU. Touch the “SiriusXM” icon. • Press the SRC button on the front panel to switch to the SXM source.
- Page 64 VM9225BT Using Preset Stations Six numbered preset buttons store and recall channels for each band. All six stored channels for the current band appear on the screen. Storing a Channel Select a band (if needed), then select a channel. 2. Touch the on-screen Mem icon to access the Preset Screen.
- Page 65 VM9225BT Searching for a Channel Search by Channel To search by channel: On the SiriusXM® menu page, touch the Category/Channel icon (if needed) to select Channel. 2. Touch List to go to the Channel Screen. The following screen appears. 3. Touch a channel to tune to that channel.
- Page 66 VM9225BT Parental Lock Options The SXM Parental Lock Menu allows you to block access to individual channels or mature channels. Lock Current Channel: Individual channels may be locked. The Lock Current Channel option allows you the ability to lock a certain channel. Locking does not allow the SiriusXM® tuner to access that channel’s audio or metadata.
- Page 67 VM9225BT Change Lock Password: The Change Lock Password option allows you to change the password from the default or current custom password to another password. NOTE: The default password is 1, 2, 3, 4. To change a password: Touch the More icon. On the second menu page, touch the Options icon to enter the SXM Parental Lock Menu.
- Page 68 VM9225BT To unlock one channel: First, tune to the locked channel. Select the channel by “list” function or by direct entry, then unlock the channel by entering the 1,2,3,4, passcode. 2. Touch the More icon. On the second menu page, touch the Options icon.
- Page 69 VM9225BT SiriusXM® Radio Advisory Messages SiriusXM® user advisory messages are listed below: Advisory Displayed Cause Check SXM Tuner Check the SiriusXM® tuner connection on the back of the unit to ensure that it’s correctly connected. Check SXM Antenna Ensure the SiriusXM® antenna cable is connected to the SiriusXM®...
-
Page 70: Rear Camera Operation
VM9225BT REAR CAMERA OPERATION This unit is “camera ready. ” Before accessing any camera features, you must install a rear video camera. When the camera is not installed and the function is accessed by the gear selector being placed in reverse or by the unit’s menu, the message “VIDEO NOT DETECTED”... -
Page 71: Troubleshooting
VM9225BT TROUBLESHOOTING Table 6: Troubleshooting Problem Cause Corrective Action GENERAL Unit will not power Radio Fuse blown Install new fuse with correct rating Car battery fuse blown Install new fuse with correct rating Illegal operation Press the RESET button located in the bottom... - Page 72 VM9225BT Problem Cause Corrective Action TFT Monitor No image Incorrect connection to parking Check wiring and brake wire correct Parking brake is not engage Stop vehicle in safe place and apply parking brake Flashing image DVD is not compatible with...
- Page 73 VM9225BT Problem Cause Corrective Action Disc does not play Disc is warped or scratched Use disc in good back condition Clean disc with soft Disc is dirty or wet cloth Laser pickup is dirty Clean laser pickup with cleaning disc...
-
Page 74: Disc Error Messages
VM9225BT Disc Error Messages Message Displayed Cause Corrective Action Loading Disc is being read No Disc Disc is dirty Clean disc with soft cloth Disc is upside down Insert disc with label side Disc not present in Insert disc loading compartment... -
Page 75: Care And Maintenance
VM9225BT Care and Maintenance Use only a clean silicone cloth and neutral detergent to clean the front panel or monitor. A rough cloth and non-neutral detergent (such as alcohol) may result in scratching or discoloration. 2. Do not get water or cleaning fl uids on the unit. -
Page 76: Specifications
VM9225BT SPECIFICATIONS DVD/CD Player Compatible Disc Media: DVD + R / RW (Single and Dual Layer) and CD-R / RW Compatible Media Formats: CD-DA, MP3, WMA, VCD, SVCD, Xvid, AVI, MPEG 1/2 Signal to Noise Ratio: >95dBA Dynamic Range: >95dB Frequency Response: 20Hz to 20 kHz, -3dB Channel Separation: >... - Page 77 VM9225BT General Auxiliary Input impedance: 10k Power Supply: 11 to 16VDC, negative ground Power Antenna (Blue): 500mA max, current limited protection Amplifi er Remote (Blue/White): 500mA max, current limited protection Operating Temperature: -20C ~ 65C Fuse: 15-amp, mini ATO type DIN chassis dimensions: 7”...
-
Page 78: Common Replacement Parts
VM9225BT VM9225BT Common Replacement Parts Owner’s Manual, Install Manual and Quick Start Guide 30613610 Wire Harness 30313610 Trim Rings (Main and Secondary-Packaged Together) 30413590 External Microphone 30443240 Remote Control 30713610 Parking Wire 38213030 Sleeve and Mounting Brackets 30113070 Hardware Bag... -
Page 79: Notes
VM9225BT Notes... - Page 80 Audiovox Electronics Corporation Hauppauge, NY 11788 Technical Assistance: 1-800-323-4815 www.mobile.jensen.com © 2012 Audiovox Printed in China 128-9053b...
Need help?
Do you have a question about the VM9225BT and is the answer not in the manual?
Questions and answers