Table of Contents
Advertisement
Advertisement
Table of Contents

Related Manuals for Fluid 8004576

Summary of Contents for Fluid 8004576
- Page 1 8004576 HDMI DVD Player with USB HDMI 1080p converting DVD/DVD+/-R/ DVD+/-RW/CD/ CD-R/CD-RW/Kodak picture formats Instruction Manual Please read this User Manual carefully to ensure proper use of this product and keep this manual for future reference.
-
Page 3: Table Of Contents
Contents Important Safety Instructions............2-5 FCC/ICES-003 . -
Page 4: Important Safety Instructions
Important Safety Instructions The lightning flash with arrowhead symbol within an equilateral CAUTION triangle is intended to alert the user to the presence of uninsulated dangerous voltage within the product’ s enclosure that may be of RISK OF ELECTRIC SHOCK sufficient magnitude to constitute a risk of electric shock to persons. - Page 5 Important Safety Instructions Before using the unit, be sure to read all operating instructions carefully. Please note that these are general precautions and may not pertain to your unit. For example, this unit may not have the capability to be connected to an outdoor antenna.
- Page 6 Important Safety Instructions 17) Overloading Do not overload wall outlets and extension cords as this can result in a risk of fire or electric shock. 18) Object and liquid entry Never push objects of any kind into the product through openings as they may touch dangerous voltage points or short out parts that could result in fire or electric shock.
- Page 7 Important Safety Instructions NOTES ON MOISTURE CONDENSATION: NOTES ON HANDLING: • Moisture condensation damages the DVD When shipping the DVD player,always use the player. Please read the following carefully. original shipping carton and packing materials. For maximum protection,repack the unit as it •...
-
Page 8: About Discs
About Discs THE REGION NUMBER FOR THIS DVD PLAYER IS: See below for information regarding region numbers. PLAYABLE DISCS: The following discs can be played back on this DVD player: DISC TYPES: Data on most DVDs is divided into sections called titles and then into subsections called chapters, each of which is given a title or chapter number. -
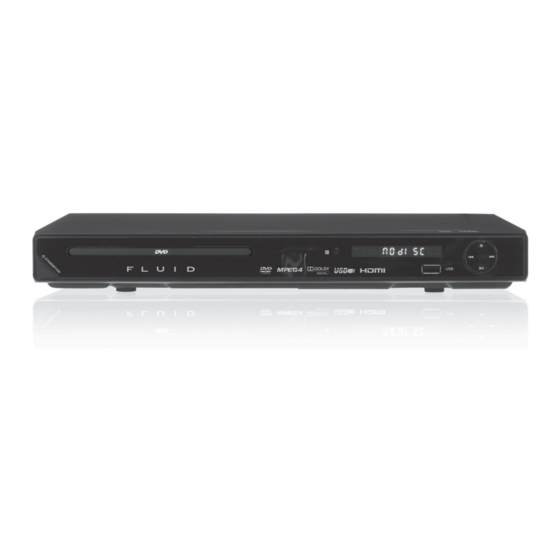
Page 9: Product Overview
Product Overview Front View 5. ( ) Open/Close Button 1. ( ) Power ON/Standby Button 6. USB Port 2. Disc Tray 7. ( ) Previous Button 3. Remote Control Receiver 8. ( ) Play/Pause Button 4. LED Display 9. ( ) Next Button Rear View 1. -
Page 10: Remote Control Overview
Remote Control 1. ( ) OPEN/CLOSE BUTTON Opens and closes the disc tray. 2. 0-9 BUTTONS To locate a title / chapter / track /specific time or enter parental control. 10+ Button To select and switch to a track that is higher than 10. 3. -
Page 11: Title Button
Remote Control 17. POWER BUTTON Turns the power on or restores the DVD player to standby mode. 18. VOL +/– BUTTONS To increase and decrease volume. 19. MUTE BUTTON To mute and restore your DVD sound output. 20. SETUP BUTTON To access or exit the SETUP menu. -
Page 12: Operating The Remote Control
Operating the Remote Control Battery Installation 1. Press the tabs on the back door and lift off. 2. Insert two AAA size batteries (included) into the battery compartment as shown in the illustration and follow the (+) and (–) polarity symbol markings inside the battery compartment. 3. -
Page 13: Connections
Connections Connecting To TV Through VIDEO Output Jacks (connection cable included) Connecting To TV Through Output Jacks (YUV connection cable NOT included) -
Page 14: Connecting To Tv Through 5.1-Channel Output Jacks
Connections Connecting To TV Through 5.1-CHANNEL Output Jacks (5.1-Channel connection cable NOT included) Connecting To TV Through HDMI OUTPUT (connection cable NOT included) -
Page 15: Connecting To Tv Through Coaxial Output Jack
Connections Connecting To An External Audio Amplifier Through Coaxial Output Jack (with built-in digital audio decoder) Connecting to USB Port Selecting USB/ memory card mode: • If a disc is loaded, stop play • Press the DVD/USB button You can now select a different mode. To return to disc mode: •... -
Page 16: Operating Systems
Operating Systems Playback of a DVD Unless otherwise stated, all operations described are based on Remote Control use. 1. Insert the AC plug (with the two blades) from the DVD player to a conveniently located AC outlet. The POWER indicator on the front of the cabinet will light. 2. - Page 17 Operating Systems For CD or JPEG Discs The following menu appears on the screen. 1. In stop mode, press the direction buttons to highlight“Edit Mode”on the screen, then press the ENTER button to confirm. 2. Press the the direction buttons to highlight the desired tracks, then press the ENTER button to confirm.
- Page 18 Operating Systems OSD (ON SCREEN DISPLAY) During playback,press the OSD button repeatedly to read the information of playback status. ZOOM During movie playback, press the ZOOM button repeatedly to zoom in the picture (Q1, Q2, Q3, OFF). Press the direction buttons to select the parts of the zoomed picture to watch.
-
Page 19: Playback Of A Cd
Operating Systems Playback of a CD 1. Press the POWER button to turn the player on. OPEN/CLOSE button to open the disc tray. Place the disc in the center of 2. Press the OPEN/CLOSE button. tray with the label side face up. Close the tray by pressing the The unit will start playback automatically. -
Page 20: System Setup
System Setup Setup Menus Press the SETUP button, the setting menu will appear on the screen as shown. Use the direction buttons to select and highlight the function you wish to set, then press the direction button to enter. Press the , direction buttons to set, then press the ENTER button to confirm the selection. -
Page 21: Audio Setup Page
System Setup Audio Setup Page: SELECT CHANNEL Press the direction button to select the audio type. FRONT SPEAKERS Selecting the Front Speakers output setting allows the user to adjust the front speakers output on the RCA jacks to work in harmony with the audio equipment (e.g. - Page 22 System Setup DIGITAL OUT 1. If Digital Output (selecting the digital audio output format from the COAXIAL jack) is selected, press the direction button to enter. Press the , buttons to select “OFF” , “PCM” or “RAW” to match the decoding system of your connected external audio amplifiers (For details,refer to the instruction manual of your external amplifiers).
-
Page 23: Care And Maintenance
Care and Maintenance CARING FOR DISCS Treat the disc carefully. Handle the disc only by its edges. Never allow your fingers to contact the shiny, unprinted side of the disc. • Do not attach adhesive tape, stickers, etc. to the disc label. •... -
Page 24: Troubleshooting
Troubleshooting Guide CHECK THE FOLLOWING SYMPTOMS BEFORE REqUESTING SERVICE: PROBLEM POSSIBLE CAUSE POSSIBLE SOLUTION No power. AC cord is unplugged. Plug AC cord into an AC outlet. Power is on, but unit Condensation has formed. Unplug the unit and wait about 1-2 hours for unit to dry is not functioning out. -
Page 25: Specifications
Specifications Power Source ..............AC 120 V ~ 60Hz Power Consumption ..........10 W Power Source of the Remote Control ....2 × AAA size batteries (included) Signal System ..............NTSC / PAL Operating Temperature ..........+5°C to +35° C Operating Humidity Range ........5% to 90% (no condensation) DISCS PLAYED: DVD-VIDEO DISC 12cm single-sided, single layer... -
Page 26: Warranty
Imported by: The Source, Barrie, Ontario, Canada, L4M 4W5 Please Recycle Manufactured in China For product support please visit © 2013 The Source www.thesource.ca All rights reserved.
Need help?
Do you have a question about the 8004576 and is the answer not in the manual?
Questions and answers