Table of Contents
Advertisement
Quick Links
Advertisement
Table of Contents

Subscribe to Our Youtube Channel
Related Manuals for ILX Lightwave LDT-5412B


Summary of Contents for ILX Lightwave LDT-5412B
- Page 1 User’s Guide Thermoelectric Temperature Controller LDT-5412B ILX Lightwave Corporation · 31950 Frontage Road · Bozeman, MT, U.S.A. 59715 · U.S. & Canada: 1-800-459-9459 · International Inquiries: 406-556-2481 · Fax 406-586-9405 · ilx.custhelp.com www.newport.com/ilxlightwave 700474 March 2013...
-
Page 3: Table Of Contents
Setpoint Adjustment Knob ........................ 8 Display Mode and 7 Segment LED Display ..................8 Error Indicators ..........................8 Output Off/On Button ........................9 General Operating Procedures ................... 9 Warm-Up and Environmental Considerations .................. 9 March 2013 LDT-5412B... - Page 4 General Guidelines for Sensor Selection and Safety Limits ............10 Sensor Options ..........................10 General Operation ....................13 Chapter 3: Troubleshooting ............... 15 Troubleshooting Guide ..................... 16 March 2013 LDT-5412B...
-
Page 5: Safety Information And The Manual
Failure to perform intended measurements or functions If necessary, return the instrument to ILX Lightwave, or authorized local ILX Lightwave distributor, for service or repair to ensure that safety features are maintained. All instruments returned to ILX Lightwave are required to have a Return Authorization Number assigned by an official representative of ILX Lightwave Corporation. -
Page 6: Safety Symbols
This section describes the safety symbols and classifications. Technical specifications including electrical ratings and weight are included within the manual. See the Table of Contents to locate the specifications and other product information. The following classifications are standard across all ILX Lightwave products: Indoor use only ... -
Page 7: Warranty
This warranty is in lieu of all other warranties, expressed or implied, including any implied warranty of merchantability or fitness for any particular purpose. ILX Lightwave Corporation shall not be liable for any incidental, special, or consequential damages. -
Page 8: Returning An Instrument
Returning an Instrument If an instrument is to be shipped to ILX Lightwave for repair or service, be sure to: Obtain a Return Authorization number (RA) from ILX Customer Service. Attach a tag to the instrument identifying the owner and indicating the required service or repair. -
Page 9: Comments, Suggestions, And Problems
Comments, Suggestions, and Problems To ensure that you get the most out of your ILX Lightwave product, we ask that you direct any product operation or service related questions or comments to ILX Lightwave Customer Support. You may contact us in whatever way is most convenient:... - Page 10 March 2013 viii LDT-5412B...
-
Page 11: Chapter 1: Introduction And Specifications
Prolonged storage under adverse conditions Failure to perform intended measurements or functions If necessary, return the LDT-5412B to ILX Lightwave for service and repair to ensure that safety features are maintained. Initial Inspection When you receive your LDT-5412B Thermoelectric Temperature Controller, verity that the following items were shipped with the instrument ... -
Page 12: Product Overview
This is achieved by modulating the current through a thermoelectric load and continuously monitoring the feedback signal generated from a thermistor temperature sensor. The linear output stage of the LDT-5412B offers the low current noise necessary to achieve the temperature stability required in most low- noise and frequency-stabilized laser applications. -
Page 13: Options And Accessories
Figure 1.2 – LDT-5412B Rear Panel Options and Accessories Options and accessories available for LDT-5412B Thermoelectric Temperature Controller include the following: DESCRIPTION MODEL / PART NUMBER Temperature Controller Interconnect Cable (terminated with 9-pin DSUB) CC-505S Temperature Controller Interconnect Cable (unterminated) CC-501S Calibrated 10 kΩ... -
Page 14: Specifications
Specifications March 2013 LDT-5412B... -
Page 15: Chapter 2: General Operation
With the LDT-5412B connected to an AC power source, pressing POWER supplies AC line power to the instrument. After power-up, make sure that the OUTPUT is off (LED unlit) until you have configured the instrument for your application. -
Page 16: Connections
Fan (+) Fan (-) Figure 2.1 – LDT-5412B Output Connector The TE drive current is available at the 15 pin connector. Pins 1 and 2 and pins 3 and 4 are tied together internally. Pins 1 and 2 source current while cooling and sink current while heating. Pins 3 and 4 sink current while cooling and source current while heating. -
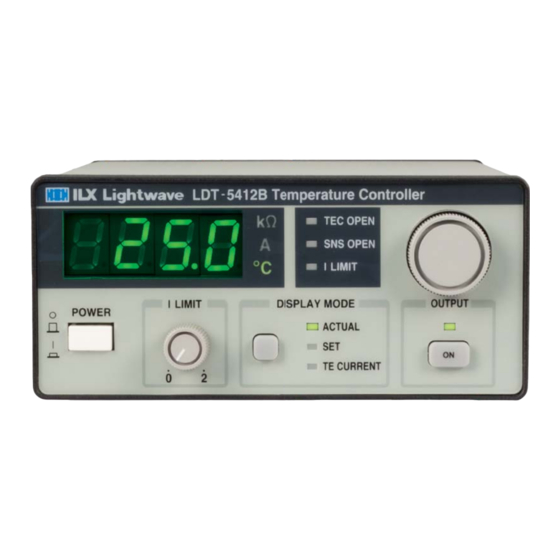
Page 17: Front Panel Operation
GAIN: A single turn potentiometer which adjusts the control loop gain. This adjustment affects the slew rate and settling time of the LDT-5412B when reaching the desired setpoint. If the GAIN is set too low (counter-clockwise,) the LDT-5412B will take longer to reach the desired setpoint. If the GAIN is set too high (clockwise,) the LDT-5412B may oscillate around the desired setpoint. -
Page 18: Power On / Off
(linearized mode) of the thermistor, the SET LED when illuminated displays the set point resistance or temperature (linearized mode), and when the TE CURRENT LED is illuminated the LDT-5412B will display the actual measured TEC current. Error Indicators TEC OPEN: Indicates that the thermoelectric voltage exceeds the rated compliance voltage of the instrument. -
Page 19: Output Off/On Button
The OUTPUT off/on switch is located in the lower right-hand corner of the front panel. This switch has a toggling action which turns the output current of the LDT-5412B off and on. When the output is active, the LED indicator just above the switch will be lit. -
Page 20: General Guidelines For Sensor Selection And Safety Limits
When the rear panel switch is set to 100 µA or 10 µA the LDT-5412B will display resistance. When the rear panel switch is set to °C LINEARIZED FOR 10k the LDT-5412B will display a calculated temperature. -
Page 21: Temperature From Resistance
ILX Lightwave Application Note #2, Selecting and Using Thermistors for Temperature Control. Figure 2.3 Thermistor Temperature Range Temperature from Resistance The LDT-5412B Thermoelectric Temperature Controller primarily displays resistance of the thermistor; several methods can be used to convert the resistance to a temperature. - Page 22 Linearized Thermistor Mode – For users wanting to display a calculated temperature without using one of the methods above the LDT-5412B has a unique mode that when selected will display and control to a calculated temperature. To use this mode the LDT-5412B sensor select switch must be set to °C LINEARIZED FOR 10k.
-
Page 23: General Operation
1. Plug the LDT-5412B into an AC power source within the specified range of the instrument. 2. Turn on the LDT-5412B by pressing and releasing the power switch to latch it to the on or off position. The output will be disabled at power up and the unit display mode will power up in the same mode which existed when the power was last shut off 3. - Page 24 March 2013 LDT-5412B...
-
Page 25: Chapter 3: Troubleshooting
Chapter 3: Troubleshooting This chapter will help you resolve any problems you may experience with your LDT-5412B. If you need additional help, please contact ILX Lightwave Customer Service. ILX Lightwave Corporation provides in-house calibration services for ILX instruments. International customers may contact our service centers for regional calibration support. Most ILX instruments, including the LDT-5412B require yearly calibration to ensure performance to published specifications. -
Page 26: Troubleshooting Guide
This section lists some common problems and corrective actions. In the event that the corrective action does not resolve the problem, please contact ILX Lightwave. For a comprehensive list of frequently asked questions, see the ILX Lightwave website or contact ILX Lightwave Customer Service (see Comments, Suggestions, and Problems on page viii for contact information).
Need help?
Do you have a question about the LDT-5412B and is the answer not in the manual?
Questions and answers