
Related Manuals for Terratek TPDC18134K


Summary of Contents for Terratek TPDC18134K
- Page 1 Cordless Drill TPDC18134K User Manual – Please read and retain for future reference.
- Page 2 Exploded Assembly Diagram...
-
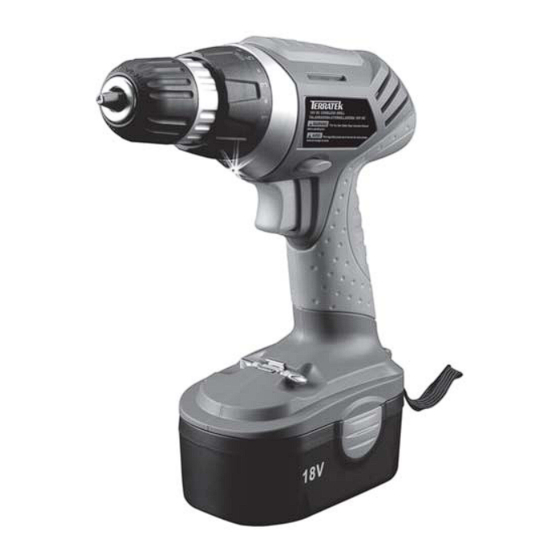
Page 3: Chuck
Fig.1 Chuck Torque control ring For. /Rev./Lockout On/Off/Var.speed switch Battery Battery clip... -
Page 4: Table Of Contents
Contents Parts List Technical Information Safety Instructions Using your drill Maintenance Warranty Parts List Anti-screw Chuck Gear unit Torque Inner torque Motor gear Screw Motor Shell of machine Battery Switch Handspike Level bubble Screw Clip Double end bit 17-1 Light 17-2 Light circuitry board 17-3... -
Page 5: Torque
Copyright© 2011 by ACL Group (Intl) Ltd. All rights reserved. This manual or any artwork contained herein must not be reproduced in any shape or form without the express written consent of Terratek Intl. Ltd. Diagrams within this manual may not be drawn proportionally. Due to continuing improvements, actual product may differ slightly... -
Page 6: Important Safety Information
Read and Keep This Manual Please read carefully all instructions within this manual. Failure to follow all safety warnings can result in serious personal injury. The term “Power Tool” in all of the following warnings refers to your mains operated (corded) or battery operated (cordless) power tool. Important SAFETY Information This symbol is to warn you of potential personal injury hazards. -
Page 7: Personal Safety
Only use grounded extension cords with power tools fitted with proper plugs and if using outdoors ensure any extension cord is suitable for outdoor use. Always try to avoid body contact with grounded surfaces, such as radiators, cooking ranges and any other fixed appliance with metal surfaces. - Page 8 1. KEEP GUARDS IN PLACE and in working order. 2. REMOVE ADJUSTING KEYS & WRENCHES. Before turning on the power tool, make sure the keys and adjusting wrenches have been removed. 3. KEEP WORK AREA CLEAN. Cluttered areas and benches invite accidents. 4.
- Page 9 Only use qualified repair agents to service this power tool. Only use qualified electrician to repair any damaged wiring. NEVER remove the grounding prong from the power toll or extension cord. Power Extension Cords When using any extension cord the machine will suffer a power reduction due to the drop in voltage caused by the length of the cord.
-
Page 10: Screw
When battery pack is not in use, keep it away from other metal objects like paper clips, coins, keys, nails, screws, or other small metal objects that can make a connection from one terminal to another. Shorting the battery terminals together may cause burns or a fire Charging the battery pack Charge battery for 3-5 hours only, when you plug battery into the charger the “GREEN”... -
Page 11: Motor
(with chuck pointed away from you) move the lever to the far left. For reverse rotation move the lever to the far right. To activate trigger lock move lever to the center “off” position. MOUNTING AND DISMOUNTING THE BIT Mounting the bit Loosen the sleeve by turning it toward the left (in the counterclockwise direction as viewed from the front) to open the clip on the keyless chuck. -
Page 12: Battery
Battery packs/batteries: Ni-cd Ni-Cad: Do not dispose of battery packs/batteries into household waste, water or fire. Battery packs/batteries must be collected, recycled or disposed of in an environmentally-friendly way. Only for EC countries: Defective or dead batteries must be recycled according to the directive 2006/66/EC. Declaration of Conformity We ACL Group (Intl.) Ltd, England DN6 8LZ declare that the Cordless Drill has been manufactured according to our full quality assurance procedures. - Page 13 Please read the following carefully ACL Group (Intl) Ltd. and/or it’s distributor has provided the parts list and assembly diagram as a reference tool only. Neither ACL Group (Intl). Ltd. or its distributor makes any representation or warranty of any kind to the buyer that he or she is qualified to do any repairs or replace any parts of this product.
- Page 14 ACL Group (Intl) Ltd Doncaster, England Email: info@terratekintl.com www.terratekintl.com...
Need help?
Do you have a question about the TPDC18134K and is the answer not in the manual?
Questions and answers