Advertisement
Overview
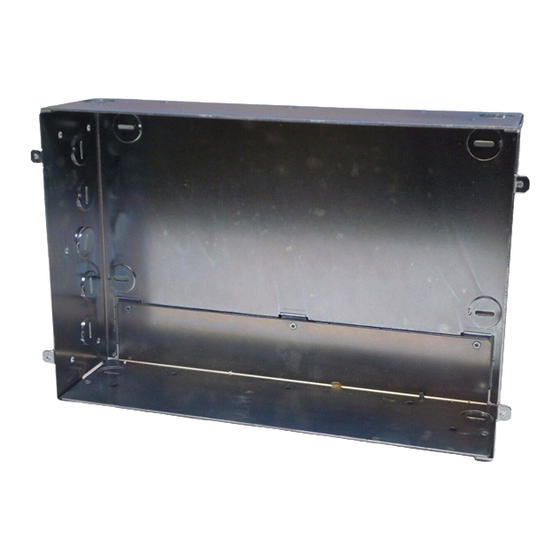
The CB-MVPWDS Rough-In Box allows the MVP-WDS to be installed in a solid
surface (e.g., wall or podium). This Rough-In box includes a removable access
plate to provide better access to wiring. The CB-MVPWDS is symmetric top-to-
bottom, so the access plate may be installed at the top or the bottom.
Specifications
CB-MVPWDS (FG037-10) Specifications
Dimensions (HWD):
• 8 3/16" x 12" x 3 1/4"
• 20.7 mm x 30.4 mm x 8.2 mm
Included Accessories
• Five mountings screws (#4-24 X .188, PFH, BLK,
TYPE B, SELF-TAPPING, SHT MTL)
(80-0203-01)
Certifications:
• UL 508A
WARNING: INSTALLER, LEAVE A GAP BETWEEN THE STUD AND
ROUGH-IN BOX TO ACCOMMODATE THE DRYWALL/SHEETROCK.
This gap allows the installation of the drywall/sheetrock after the CB-MVPWDS
has been mounted onto the beams. The stud notching and Rough-In Box
installation must be done prior to any wall installation.
Note: The most important thing to remember when mounting this Rough-In Box
is that the mounting tabs must be mounted flush against the outside of the
sheetrock. This step determines whether or not the mounting stud is notched
(cutout-out to fit the Rough-In Box).
Drywall or sheetrock
CB-MVPWDS
Stud Fastening Holes
(5 located on left panel)
MVP-WDS mounting tabs
(should lie flush against the
outside of the wall)
Rough-In Box for MVP-WDS Wall Docking Station
Installing the CB-MVPWDS Rough-In Box
The CB-MVPWDS (FG037-10) is a metallic Rough-In Box that can be secured to
a stud in a pre-wall setting. The MVP-WDS can then installed into the Rough-In
Box.
Note: Installation procedures and configurations vary depending on the
installation environment.
When mounting the Rough-In Box, the MVP-WDS Mounting Tabs must lie flush
against the outside of the sheetrock.
Refer to SP596502 for detailed installation dimensions (see reverse).
•
It is recommended that you cut out the surface slightly smaller than what is
outlined in the installation drawings so that you can make any necessary
cutout adjustments.
•
The CB-MVPWDS can be installed with the removable access panel
positioned either on top or bottom. The access panel provides convenient
access to in-wall wiring and must be re-installed prior to mounting the
MVP-WDS.
1.
Place the left side of the Rough-In Box on a stud, making sure that five
Stud Fastening Holes and removable Access Panel are oriented correctly
(installation dependent). Be sure to leave enough of a gap between the
stud and Mounting Tabs to accommodate the installation of the drywall or
sheetrock after the Rough-In Box has been mounted. Ultimately, the
Mounting Tabs should lie flush against the outside of the sheetrock.
Note: Although there are wiring knockouts are on both sides of the Rough-In
Box, the knockouts on the right side will be used for the MVP-WDS (wall docking
station) connectors, so always secure the Rough-In Box to the stud using the
Stud Mounting Holes on the left side of the box.
2.
Using either nails or screws, fasten the Rough-In Box to the stud through
the five Stud Fastening Holes.
3.
Remove the wiring knockouts from the right side of the Rough-In Box to
accommodate cabling to the MVP-WDS.
4.
Thread the USB and Power cables through the knockouts on the right of
the Rough-In Box. It is recommended that you test these connections
before fully installing the WDS.
5.
Install the drywall/sheetrock before inserting the MVP-WDS into the
Rough-In Box.
Stud
Removable Access Panel
Installation Guide
Wiring knockouts
(right side of Rough-In Box)
Advertisement
Table of Contents

Related Manuals for AMX CB-MVPWDS


Summary of Contents for AMX CB-MVPWDS
-
Page 1: Specifications
Overview The CB-MVPWDS Rough-In Box allows the MVP-WDS to be installed in a solid surface (e.g., wall or podium). This Rough-In box includes a removable access plate to provide better access to wiring. The CB-MVPWDS is symmetric top-to- bottom, so the access plate may be installed at the top or the bottom. - Page 2 ©2011 AMX. All rights reserved. AMX and the AMX logo are registered trademarks of AMX. AMX reserves the right to alter specifications without notice at any time. 3000 RESEARCH DRIVE, RICHARDSON, TX 75082 • 800.222.0193 • fax 469.624.7153 • technical support 800.932.6993 • www.amx.com...
Need help?
Do you have a question about the CB-MVPWDS and is the answer not in the manual?
Questions and answers