CST/BERGER SAL20N Instruction Manual
Pal/sal”n” series automatic level
Hide thumbs
Also See for SAL20N:
- Instruction manual (29 pages) ,
- Original instructions manual (119 pages)
Table of Contents
Advertisement
Available languages
Available languages
INSTRUCTION MANUAL
PAL/SAL"N" Series
Automatic Level
I I n n s s t t r r u u c c t t i i o o n n M M a a n n u u a a l l
M M a a n n u u a a l l d d e e I I n n s s t t r r u u c c c c i i o o n n e e s s
M M a a n n u u e e l l d d ' ' I I n n s s t t r r u u c c t t i i o o n n s s
M M a a n n u u a a l l e e d d i i I I s s t t r r u u z z i i o o n n i i
B B e e d d i i e e n n u u n n g g s s a a n n l l e e i i t t u u n n g g
I I n n s s t t r r u u ç ç õ õ e e s s d d e e U U t t i i l l i i z z a a ç ç ã ã o o
Advertisement
Table of Contents

Related Manuals for CST/BERGER SAL20N


Summary of Contents for CST/BERGER SAL20N
-
Page 1: Instruction Manual
INSTRUCTION MANUAL PAL/SAL”N” Series Automatic Level I I n n s s t t r r u u c c t t i i o o n n M M a a n n u u a a l l M M a a n n u u a a l l d d e e I I n n s s t t r r u u c c c c i i o o n n e e s s M M a a n n u u e e l l d d ’... - Page 2 F F i i g g . . 1 1 F F i i g g . . 2 2 2 2 a a 2 2 b b 2 • PAL/SALN AutoLevel...
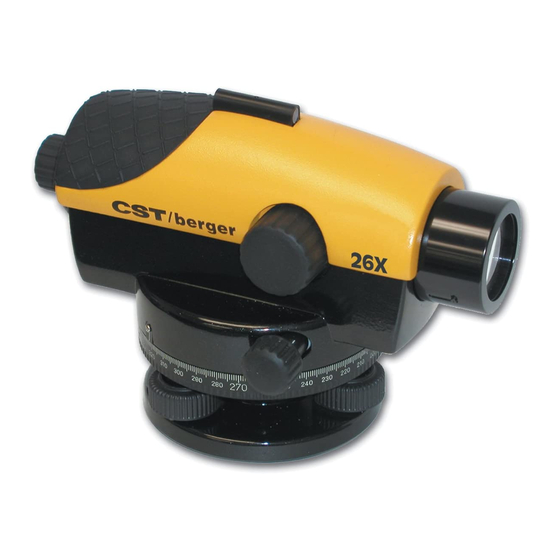
- Page 3 FEATURES (Fig. 1) 1. Base Plate 2. Horizontal Circle 8. Horizontal Drive Screw 3. Horizontal Circle Reference Mark 9. Leveling Screw 4. Compensator Lock 10. Circuclar Bubble Vial 5. Focusing Knobs 11. Vial Sighting Prism 6. Optical Peep Sight 12. Eyepiece Cover 7.
-
Page 4: Using The Instrument
The new readings should agree with the first readings. If the new readings do not agree, you should have the instrument checked by a CST/berger Authorized Repair Center, or try the Line-of-sight adjust- ment. USING THE INSTRUMENT Setting up the instrument and centering the bubble Set up the tripod and attach the level using the tripod mounting screw. - Page 5 Focusing the instrument Focus the cross hairs (Fig. 3) by pointing the telescope towards a bright background or holding a white sheet of paper in front of the objective lens, then turning the eyepiece until the cross hairs are sharp and black.
-
Page 6: Line-Of-Sight
CALIBRATION Your Automatic Level has been factory calibrated; however, you should occasionally check your level for errors caused by shipment or rough han- dling. Compensator lock button Check the compensator for proper operation before use or anytime the oper- ation of the instrument is in question. Push and release the compensator lock button to shake the compensator. -
Page 7: Maintenance
A bag of silica gel dryer is included with each instrument; if it has stopped working effectively, bake it to remove moisture or replace with a new bag. • Any damage to the instrument must be repaired by a CST/berger Authorized Service Center. PAL/SALN AutoLevel • 7... -
Page 8: Technical Data
TECHNICAL DATA M M o o d d e e l l S S A A L L 2 2 0 0 N N S S A A L L 2 2 4 4 N N S S A A L L 2 2 8 8 N N S S A A L L 3 3 2 2 N N P P A A L L 2 2 2 2 P P A A L L 2 2 6 6... -
Page 9: Warranty
Any attempt to repair the product by other thanfactory authorized personnel will void this warranty. Calibration and maintenance are the responsibility of the user. Where permitted by law, CST/berger is not respon- sible for incidental or consequential damages. - Page 10 DESCRIPCIÓN DE LAS PARTES (Fig. 1) 1. Base 2. Círculo horizontal 3. Referencia para la graduación horizontal 4. Bloqueo del compensador 5. Enfoque del objetivo 6. Mira del objetivo ó punto de mira 7. Protector solar del ocular 8. Tornillos de movimiento horizontal 9. Tornillos de nivelación 10.
- Page 11 “ Línea de vista”, o ponerse en contacto con su proveedor o con un centro de Servicio Autorizado CST/Berger. UTILIZACIÓN DEL INSTRUMENTO Ajuste del instrumento y nivelación de la burbuja Colocar el trípode sobre el punto de referencia en el suelo y bloquear...
- Page 12 2a - Utilizar los tornillos de ajuste A y B para centrar la burbuja esférica de la izquierda a la derecha. 2b – Utilizar el tornillo de ajuste C para mover la burbuja esférica hacia el centro. Enfoque del anteojo Apuntar el anteojo a una zona clara o sujetando un papel blanco enfrente del objetivo, y mover el ocular hasta que el retículo esté...
- Page 13 CALIBRACIÓN Todos los instrumentos están calibrados durante el montaje y control de cal- idad; sin embargo el usuario tiene que controlar la calibración a intervalos regulares y también antes de efectuar medidas importantes, porque los parámetros pueden variar con el tiempo o con el trasporte. Bloqueo del compensador Comprobar el correcto funcionamiento del compensador antes del trabajo o cada vez se tenga duda sobre su correcto funcionamiento.
-
Page 14: Mantenimiento Y Conservación
• Cualquier avería, reparación o calibración ha de ser realizada en un servicio autorizado CST/Berger. DATOS TÉCNICOS M M o o d d e e l l o o S S A A L L 2 2 0 0 N N... - Page 15 , , o o C C S S T T / / B B E E R R G G E E R R . Para E.E.U.U., antes de devolver el instrumento a CST/Berger, por favor lla- mar al (815)432-5237 para un Número de Autorización de Devolución del...
- Page 16 Garantía a compensar pérdidas como resultado de deficiencias en el producto. Nada de lo establecido en esta Garantía limitará la responsabilidad de CST/Berger para con los compradores en caso de (1) muerte o daños per- sonales causados por su negligencia o (2) mala conducta intencionada o gran negligencia.
- Page 17 ELEMENTS COMPOSANT L’APPAREIL (Fig.1) 1. Embase 2. Cercle horizontal 3. Repère du cercle gradué 4. Blocage du compensateur 5. Boutons de mise au point 6. Viseur optique 7. Objectif 8. Vis de mouvement fin 9. Vis calante 10. Nivelle circulaire 11.
-
Page 18: Utilisation De L'appareil
S’il n’en est pas ainsi, régler l’ap- pareil en suivant les indications du chapitre “Nivellement de contrôle” ou encore contacter le revendeur le plus proche ou le service après-vente agréé CST/Berger. UTILISATION DE L’APPAREIL Mise sur trépied et réglage de la nivelle sphérique Fixer le niveau sur le trépied à... - Page 19 Mise au point de la lunette de visée Orienter la lunette en direction du jour en plaçant devant l’objectif une feuille de papier blanc. Tourner l’oculaire jusqu’à ce que le réticule soit net bien noir (Fig. 3). A l’aide du viseur située au-dessus de l’appareil, pointer l’instrument sur la mire placée sur le point à...
- Page 20 RÉGLAGE Le niveau automatique vous est livré réglé et contrôlé usine. Toutefois de petits déréglages peuvent intervenir lors de manipulations hasardeuses ou de transport chaotique. Touche de blocage du compensateur. Vérifier le compensateur avant de l’utiliser. Appuyer sur la touche de blocage et la relâcher pour actionner le compensateur.
-
Page 21: Soins Et Entretien
Un sachet de gel de silice accompagne la livraison de chaque appareil. Lorsque le gel n’est plus efficace, remplacer le sachet par un neuf. • En cas de détérioration de l’appareil, confier sa réparation à un service après-vente agréé CST/Berger. PAL/SALN AutoLevel • 21... -
Page 22: Données Techniques
DONNÉES TECHNIQUES M M o o d d e e l l e e S S A A L L 2 2 0 0 N N S S A A L L 2 2 4 4 N N S S A A L L 2 2 8 8 N N S S A A L L 3 3 2 2 N N P P A A L L 2 2 2 2 P P A A L L 2 2 6 6... -
Page 23: Garantie
Si la réparation envisagée ne devait pas rentrer dans le cadre de la garantie, un devis sera établi par le Service Après vente de CST/BERGER et envoyé au client pour acceptation préalable, chaque prestation réalisée hors garantie donnant lieu à... - Page 24 CST/BERGER par l’utilisateur final. Sauf disposition légale contraire, la présente garantie représente l’unique recours du client à l’encontre de CST/BERGER pour la réparation des vices affectant ce produit. CST/BERGER exclue donc tout autre responsabilité au titre des dommages matériels et immatériels, directs ou indirects, et notam- ment la réparation de tout préjudice financier découlant de l’utilisation...
- Page 25 PARTI DELLO STRUMENTO (Fig. 1) 1. Piastra Base 2. Cerchio Graduato 3. Simbolo di Riferim. per il Cerchio 4. Pulsante di Blocco/Test Compens. 5. Manopole di Messa a fuoco 6. Mirino Ottico 7. Lenti dell’Obiettivo 8. Manopola di Rotazione Orizzont. 9.
- Page 26 “Linea di Mira”, oppure potete contattare il vostro rivenditore o un Centro Assistenza Autorizzato CST/Berger. UTILIZZO DELLO STRUMENTO Montaggio dello strumento e centraggio della bolla Montare il treppiedi e bloccare il livello usando la vite di montaggio del treppiedi.
- Page 27 dell’obiettivo; quindi ruotare l’oculare fino a quando i contorni del reti- colo appaiono nitidi. Usando il mirino ottico puntare ad un bersaglio, quale un picchetto di rilevamento. Guardando nell’oculare, mettere a fuoco il cannocchiale usando la manopola 5 fino a che il bersaglio non è nitido. Centrare la linea verticale sul bersaglio usando le manopole orizzontali su entrambi i lati dello strumento.
-
Page 28: Manutenzione
Bolla sferica Centrare la bolla usando le viti di livellamento, quindi ruotare lo strumento di 180°. La bolla dovrebbe rimanere centrata (Fig. 6); se si sposta dal centro, la bolla deve essere regolata (Fig. 7). Ruotare le viti di livellamento per spostare la bolla quasi al centro (Fig. 8). Usando la chiave a brugola che si trova nella valigetta, ruotare le due viti di regolazione della bolla per centrare la bolla (Fig. -
Page 29: Specifiche Tecniche
è più efficace, sostituirlo con uno nuovo. • In caso di danneggiamento, lo strumento deve essere riparato presso un Centro Assistenza Autorizzato CST/Berger. SPECIFICHE TECNICHE M M o o d d e e l l l l o o S S A A L L 2 2 0 0 N N... -
Page 30: Garanzia
La garanzia o la sostituzione in garanzia non modifica la data di scadenza della garanzia stessa. Nei limiti delle leggi in vigore, CST/Berger non sarà responsabile per danni indiretti o consequenziali risultanti da difetti del prodotto. La garanzia non può essere modificata senza l’autorizzazione di CST/Berger. - Page 31 BEZEICHNUNG DER BAUTEILE (Abb. 1) 1. Grundplatte 2. Teilkreis 3. Teilkreisablesung 4. Kompensator Lock 5. Fokussierknöpfe 6. Optisches Grobvisier 7. Objektiv 8. Seitenfeintrieb 9. Fußschraube 10. Dosenlibelle 11. Penta-Prisma zur Ablesung der Dosenlibelle 12. Okularabdeckung 13. Okular GERÄTEMERKMALE • Hochpräzise Fertigung nach internationalen Standards •...
- Page 32 übereinstimmen. Ist dies nicht der Fall, versuchen Sie das Gerät laut den Anweisungen vom Kapitel “ Überprüfung der Zielachse” selbst zu justieren, oder setzen Sie sich mit Ihrem Händler bzw. mit einem von CST/Berger autorisierten Service Center in Verbindung. BEDIENUNGSANLEITUNG Aufstellen und Grundjustierung Stellen Sie das Stativ auf und befestigen Sie das Gerät mit der...
- Page 33 Punkt B an und lesen an der Ablesmarke den gemessenen Winkel ab. JUSTIERUNG Obwohl alle Nivelliergeräte von CST/Berger vor dem Verlassen des Hauses einer sorgfältigen Überprüfung und Justierung unterzogen werden, ist es ratsam die Justierung der Dosenlibelle und der Strichplatte von Zeit zu Zeit zu überprüfen.
- Page 34 Kompensator-Transportsicherung in Bewegung. Notieren Sie nach dem Auspendeln die Höhe, wiederholen Sie den Vorgang und lesen Sie erneut ab. Die beiden abgelesenen Höhen sollten exakt übere- instimmen. Justieren der Libelle Spielen Sie die Dosenlibelle über die Fußschrauben ein und schwenken Sie danach das Gerät um 180°, die Dosenlibelle sollte sich jetzt nach wie vor im inneren Kreis befinden (Abb.
-
Page 35: Pflege Und Wartung
Justierung der Strichplatte Da das Instrument in der Mitte zwischen A und B aufgestellt wurde, ist der aufgetretene Messfehler bei beiden Messpunkten gleich. Diese Fehler heben sich gegeneinander auf und das Ergebnis H = a1 – b1 ist korrekt. Sie erhalten deshalb b3 = a2 –... -
Page 36: Technische Daten
TECHNISCHE DATEN M M o o d d e e l l l l S S A A L L 2 2 0 0 N N S S A A L L 2 2 4 4 N N S S A A L L 2 2 8 8 N N S S A A L L 3 3 2 2 N N P P A A L L 2 2 2 2 P P A A L L 2 2 6 6... - Page 37 Zusätzlich zu jeglichen gesetzlichen oder vertragsgemäßen Garantien, die der Käufer (Verbraucher oder Betrieb) gegenüber seinem Händler haben kann, gewährt CST/Berger, a division of Stanley Works,– auf Wunsch des Käufers – folgende Garantie, die kein gesetzliches Recht des Käufers dieses Produktes beeinträchtigt: CST/Berger als Hersteller gewährt auf seine Messwerkzeuge eine Garantie...
- Page 38 DESCRIMINAÇÂO (Fig. 1) 1. Prato Base 2. Círculo Horizontal 3. Marca Referência do Círculo Horizontal 4. Trinco do compensador 5. Parafuso de focagem 6. Ponto de Mira 7. Lente da Objectiva/Tapa Sol 8. Parafuso de Movimentos Horizontais 9. Parafusos de Nivelamento 10.
- Page 39 Estas leituras têm que estar de acordo com as primeiras. Se as novas leituras não estiverem de acordo o instrumento deve ser envia- do para um Centro de Serviço Autorizado da CST/Berger, ou tentar os ajusta- mentos conforme o Capítulo “Linha de mira”.
- Page 40 Leitura de medições utilizando uma mira falante Leitura de altura Ler na mira onde esta é intersectada pela linha horizontal da objectiva. Por exemplo, a altura lida na Fig. 4/a é de 1,195 m. Medição de distâncias Ler a mira onde é intersectada pelas linhas superior e inferior; na Fig. 4/a estas linhas estão em 1,352 m e 1,038 m.
- Page 41 • O instrumento é fornecido com uma saca de gel secante de silício; quando este material deixar de ser eficiente, substituí-lo. • Qualquer avaria do aparelho deve ser reparada num Centro de Serviço Autorizado da CST/Berger. PAL/SALN AutoLevel • 41...
- Page 42 ESPECIFÍCAÇÕES TÉCNICAS M M o o d d e e l l o o S S A A L L 2 2 0 0 N N S S A A L L 2 2 4 4 N N S S A A L L 2 2 8 8 N N S S A A L L 3 3 2 2 N N P P A A L L 2 2 2 2 P P A A L L 2 2 6 6...
- Page 43 GARANTIA CST/Berger, a division of Stanley Works, garante os seus aparelhos de medi- da em deficiencia de materiais e mão de obra por cinco anos a partir da data de compra. Os produtos deficientes serão reparados ou substituídos, por opção da CST/Berger, quando enviados em conjonto com a prova de compra.
- Page 44 F F i i g g . . 3 3 F F i i g g . . 4 4 F F i i g g . . 4 4 / / a a F F i i g g . . 5 5 44 •...
- Page 45 F F i i g g . . 6 6 F F i i g g . . 7 7 F F i i g g . . 8 8 PAL/SALN AutoLevel • 45...
- Page 46 F F i i g g . . 9 9 F F i i g g . . 1 1 0 0 F F i i g g . . 1 1 1 1 46 • PAL/SALN AutoLevel...
- Page 47 F F i i g g . . 1 1 2 2...
- Page 48 CST/berger 255 W. Fleming Street Watseka IL 60970 USA a division of The Stanley Works 767441 06/05 P/NZ94-55PALSAL-7...
Need help?
Do you have a question about the SAL20N and is the answer not in the manual?
Questions and answers