OneTouch UltraMini User Manual
Blood glucose monitoring system
Hide thumbs
Also See for UltraMini:
- Owner's booklet (55 pages) ,
- User manual (32 pages) ,
- Quick reference manual (2 pages)
Advertisement
Table of Contents
Advertisement
Table of Contents

Subscribe to Our Youtube Channel
Related Manuals for OneTouch UltraMini


Summary of Contents for OneTouch UltraMini
- Page 1 ® Blood Glucose Monitoring System USER GUIDE AW 06629001B Rev. date: 07/2009...
-
Page 2: Table Of Contents
6,413,410, 6,733,655, 7,250,105, 7,468,125. Purchase of this device does not act to grant a use license under these patents. Such a license is granted only when the device is used with OneTouch® Ultra® Test Strips. No test strip supplier other than LifeScan is authorized to grant such a license. - Page 3 Before you begin Before using this product to test your blood glucose, carefully read this User Guide and the inserts that come with the OneTouch® Ultra® Test Strips and OneTouch® Ultra® Control Solution. Take note of warnings and cautions throughout this User Guide, which are identified with .
-
Page 4: Getting To Know Your System
Getting to know your system The OneTouch® UltraMini® Blood Glucose Monitoring System Included with your kit: a. OneTouch® UltraMini® Meter (battery included) b. Lancing Device c. Lancet(s) d. Carrying Case If any of these items are missing from your kit, call LifeScan Customer Service at 1 800 227-8862 (available 24 hours a day, seven days a week). -
Page 5: Getting To Know System
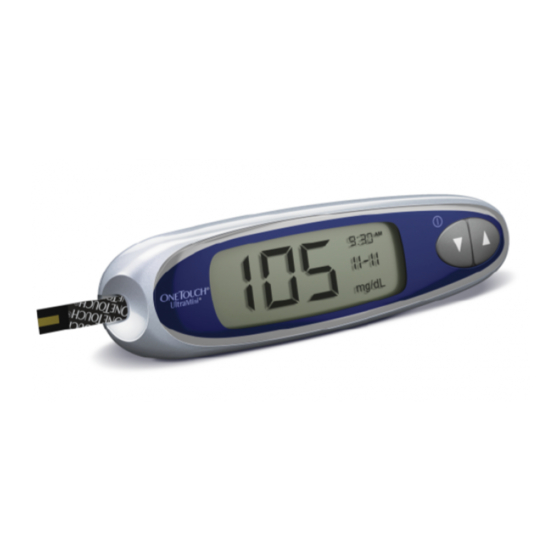
Getting to know your system Test port Display mg/dL is the pre-set Up and down buttons Insert test strip here to unit of measure Turns the meter on or off turn meter on for testing Select or change information METER Contact bars Edge to Insert into test port... - Page 6 Turning your meter on To perform a test, insert a test strip as far as it will go. The display will turn on and the meter will briefly perform system checks. Or, to change the time and date, start with the meter off, then press and hold ▼ for five seconds until the start-up test screen appears.
-
Page 7: Setting The Time And Date, And Coding Your Meter
Setting the time and date Your OneTouch® UltraMini® Meter comes with the time, date and unit of measure pre-set. Before using your meter for the first time or if you change the meter battery, you should check and update the time and date. Make sure you complete steps 1 to 7 below to ensure your desired settings are saved. - Page 8 Set AM or PM “AM” or “PM” will be displayed next to the minutes. Press ▲ or ▼ to set AM or PM, then wait five seconds to move to the next setting. The year (last two digits only), month and day appear on the display and the year flashes.
- Page 9 • Sterile lancets with protective disks NOTE: • Use only OneTouch® Ultra® Test Strips with your OneTouch® UltraMini® Meter. • Make sure your meter and test strips are about the same temperature before you test. • Testing must be done within the operating temperature range (43–111°F). For the most accurate results, try to test as close to room temperature (68–77°F) as you can.
- Page 10 CAUTION: OneTouch® Ultra® Test Strips are for single use only. Never re-use a test strip that had either blood or control solution applied to it. After the start-up test screen appears, the meter will display the code from your last test.
-
Page 11: Testing Your Blood Glucose
Testing your blood glucose Getting a blood sample Overview of the Lancing Device Clear Cap* (for alternate site sampling) Cocking control Release button Depth indicator Protective disk Blue (or black) cap* (for fingertip sampling) Sterile lancet Lancet point *The blue (or black) cap and clear cap are also used for depth adjustment NOTE: If you do not have a lancing device, please refer to the instructions that came with your lancing device. - Page 12 Preparing your sample site Before you test your blood glucose, wash your hands and forearm (if applicable) thoroughly with warm, soapy water. Rinse and dry. Lancing and sampling from your fingertip Remove the blue (or black) cap by snapping it off ...
- Page 13 Choosing the right sampling site at the right time The OneTouch® UltraMini® Meter allows you to sample blood from your fingertip, forearm or palm. Forearm and palm sampling is also referred to as “alternate site testing” (AST). At times, results obtained at the forearm or palm may be different from a fingertip measurement. Talk to your healthcare professional before you begin using your forearm or palm for sampling.
- Page 14 Remember: Consult with your healthcare professional before using your forearm or palm for testing. Choose a different puncture site each time you test. Repeated punctures in the same spot may cause soreness and calluses. If bruising occurs at an alternate site or you have difficulty getting a sample, consider sampling from a fingertip instead. You may want to review the choice of sites with your healthcare professional.
-
Page 15: Applying Blood And Reading Results
When sampling blood from your forearm or palm, make sure the drop of blood is large enough ( approximate size) before you release pressure and remove the lancing device. Remove the lancing device Carefully lift the lancing device away from your skin. Do Not smear the blood sample. NOTE: •... - Page 16 Apply the sample Line up the test strip with the blood drop so that the narrow channel on the edge of the test strip is almost touching the edge of the blood drop. Narrow Channel Gently touch the channel to the edge of the blood drop. Be careful not to push the test strip against your fingertip or the test strip may not fill completely.
- Page 17 Read your result on the meter Your blood glucose level appears on the display, along with the unit of measure, and the date and time of the test. Blood glucose results are automatically stored in the meter’s memory. (Example) ...
- Page 18 CAUTION: Dehydration and low glucose results Severe dehydration resulting from excessive water loss may cause false low results. If you think you are suffering from severe dehydration, contact your healthcare professional immediately. CAUTION: Low glucose results If your test result is lower than 70 mg/dL or is shown as LO, it may mean hypoglycemia (low blood glucose). This may require immediate treatment according to your healthcare professional’s recommendations.
-
Page 19: Reviewing Past Results
Reviewing past results Reviewing past results The meter stores a maximum of 500 blood glucose test results. When the meter memory is full, the oldest result is dropped as the newest is added. Results are stored automatically when you test, along with the time, date and unit of measure. You can review the results stored in the meter memory, starting with the most recent. -
Page 20: Downloading Results To A Computer
Get ready to transfer readings Connect the OneTouch® Interface Cable to the COM or USB port on your computer. Make sure the meter is turned off. If you insert the cable while the meter is already on, the meter will not respond to computer commands. Then connect the other end of the OneTouch®... -
Page 21: Control Solution Testing
Control solution testing When to test with control solution OneTouch® Ultra® Control Solution contains a known amount of glucose and is used to check that the meter and the test strips are working properly. Do a control solution test: •... - Page 22 • use of a test strip or control solution past its discard date, or • a problem with the meter. CAUTION: The control solution range printed on the test strip vial is for OneTouch® Ultra® Control Solution only. It is not a recommended range for your blood glucose level.
-
Page 23: Caring For Your System
Replacing the battery Your OneTouch® UltraMini® Meter uses one 3.0 Volt CR 2032 lithium battery (or equivalent). Replacement batteries can be found in most stores where batteries are sold. Your meter comes with the battery already installed. A battery icon appears in the far right- hand side of the meter display to indicate low battery. - Page 24 WARNING: To avoid a possible shock, Do Not change the battery while the meter is connected to a computer with the OneTouch® Interface Cable. Insert the new battery With the “+” side facing up toward you, place the battery in the compartment within the fold of the ribbon.
- Page 25 Caring for your system Your OneTouch® UltraMini® Blood Glucose Monitoring System does not need any special maintenance. Storing your system Store your meter, test strips and control solution in your carrying case after each use. Store each item in a cool, dry place below 86°F, but Do Not refrigerate.
- Page 26 Cleaning your meter To clean your meter, wipe the outside with a soft cloth dampened with water and mild detergent. Do Not use alcohol or another solvent to clean your meter. Do Not get any liquids, dirt, dust, blood, or control solution inside the meter through the test port or the data port. Never spray cleaning solution on the meter or immerse it in any liquid.
-
Page 27: Error Messages And Details About Your System
Understanding error and other messages The OneTouch® UltraMini® Meter displays messages when there are problems with the test strip, with the meter, or when your blood glucose levels are higher than 600 mg/dL or lower than 20 mg/dL. Messages do not appear in all cases when a problem has occurred. - Page 28 Message What it means What to do No result in memory, such as the first time You can still perform a blood glucose test use of the meter. and get an accurate test result. Contact LifeScan Customer Service at 1 800 227- Your meter was unable to recall this result.
- Page 29 Message What it means What to do One of the following may apply: If you tested in a cool environment, repeat the You may have high glucose and have test in a warmer environment with a new test tested in an environment near the strip;...
- Page 30 CAN/CSA C22.2 61010-1:04, UL 61010-1:04, IEC 61010-1 and IEC 61010-2-101. Guarantee LifeScan guarantees that the OneTouch® UltraMini® Meter will be free of defects in material and workmanship for three years, valid from the date of purchase. The guarantee extends only to the original purchaser and is not transferable.
- Page 31 Notes ERROR MESSAGES AND DETAILS ABOUT YOUR SYSTEM...
Need help?
Do you have a question about the UltraMini and is the answer not in the manual?
Questions and answers