Table of Contents
Advertisement
Quick Links
Advertisement
Table of Contents

Related Manuals for Humminbird Piranha Portable


Summary of Contents for Humminbird Piranha Portable
- Page 1 P O R T A B L E USER‘S GUIDE...
-
Page 2: Thank You
Techsonic has built its reputation by designing and manufacturing top-quality, thoroughly reliable marine equipment. Techsonic has designed your Humminbird Piranha unit to be trouble free even in the harshest marine environments. In the unlikely event that your Humminbird Piranha product does require repairs, Techsonic offers an exclusive Service Guarantee - free of charge during the first year after purchase, and available at a reasonable rate after the one-year period. -
Page 3: Table Of Contents
Section 1: CASE ASSEMBLY Introduction ........2 Portable Case Assembly ......2 Attaching the Control Head . -
Page 4: Section 1: Case Assembly
CASE ASSEMBLY INTRODUCTION / ATTACHING THE CONTROL HEAD Introduction to CASE ASSEMBLY The Piranha Portable is available in several different configurations. You may have purchased the portable case complete with a Piranha unit ready for opera- tion. A Piranha control head you already own may also be used with the portable case. -
Page 5: Attaching The Control Head
ATTACHING THE CONROL HEAD / ASSEMBLING THE TRANSDUCER MOUNT Attaching the Control Head Remove the pivot bolt, gimbal knob, and rub- ber washers from the hardware bags. Place the rubber washers between the control head’s pivot knuckle and the arms from the portable case. -
Page 6: Attaching The Transducer Cable
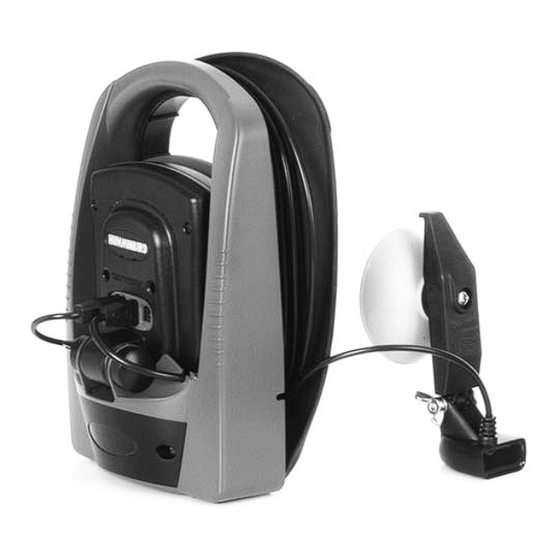
CASE ASSEMBLY ATTACHING THE TRANSDUCER CABLE Attaching the Transducer Cable Flip open the rubber cable retaining cover on the back of the case by pulling on the tab located at the upper left corner. Thread the end of the transducer cable through the transducer cable hole which is located on the back of the case (see illustration). -
Page 7: Installing The Batteries
LCD backlights on, to 60 hours with the backlights off. INTRODUCTION TO MOUNTING Once your Piranha Portable is fully assembled, (see the Piranha Portable Case Assembly section for more informa- tion) it takes just a few easy steps before you are ready to... -
Page 8: Mounting The Case
Nylon web strap (not included). Surface Mount The Piranha Portable surface mount is an easy to install mount that allows for quick and secure attachment to many different surfaces. Place the surface mount on the desired surface and make sure there is enough room to rotate the case 180 degrees. -
Page 9: Nylon Web Strap
NYLON WEB STRAP / REMOVING THE CASE AFTER USE Press the center section and then twist the Piranha Portable case until it is facing you. Six clicks produces maximum clamping and aligns the control head. For fine-tuning, remove the Piranha Portable case and loosen the two screws. -
Page 10: Section 3: Maintenance And Warranty
If the Portable case comes into contact with salt spray, simply wipe the affected surfaces with a cloth dampened in fresh water. Never leave your Humminbird Portable unit in a closed car or trunk - the extremely high tem- peratures generated in hot weather can damage the electronics. Repairs should be performed only by authorized Humminbird technicians. -
Page 11: Warranty
MAINTENANCE AND WARRANTY Hand tighten both with a Thread the other end of the power cable through the power cable hole. Make sure there is enough slack in the wire, then push it under the power cable clip. Plug the power cable into the back of the control head. 10. -
Page 12: Service Policy
SERVICE POLICY/ CUSTOMER RESOURCE CENTER SERVICE POLICY This Service Policy is valid in the United States only. This applies to Humminbird units returned to our factory in Eufaula, Alabama, and is subject to change without notice. All repair work is performed by factory-trained technicians to meet exacting factory specifications. -
Page 13: Section 4: Specifications
SPECIFICATIONS SPECCIFICATIONS Portable Case ......9 " H x " W x " D .
Need help?
Do you have a question about the Piranha Portable and is the answer not in the manual?
Questions and answers