Advertisement
Quick Links
Owners Manual
With the
EKLIPSE
Pre-amplifier
We congratulate you with the purchase of this superb AUDIO VALVE HiFi component.
This handcrafted product has been manufactured with only your most demanding requirements in mind. It was
made to allow you many years of musical joy.
AUDIO VALVE guarantees that this amplifier has been produced under the strictest of guidelines and with
respect for procedures acquired through decades of tube amplifier design. Your Eklipse Pre-amplifier has been
thoroughly tried and tested in all detail.
I personally guarantee the quality of this product
H. Becker
Manager Production & Development
Advertisement

Related Manuals for Audio Valve Eklipse


Summary of Contents for Audio Valve Eklipse
-
Page 1: Owners Manual
AUDIO VALVE guarantees that this amplifier has been produced under the strictest of guidelines and with respect for procedures acquired through decades of tube amplifier design. Your Eklipse Pre-amplifier has been thoroughly tried and tested in all detail. - Page 2 To safeguard maximum functionality and to avoid operating problems, it is important that you carefully study this owners manual and that you follow all instructions therein precisely! General information Important instructions, reagrding safety, securety and operational reliability while using the Eklipse Pre -Amplifier are highlighted throughout this manual. 2. Herstellernachweis Factory address: AUDIO VALVE, H.
- Page 3 Always check powercords and plugs for damage before use. Disconnect the powercord before work is being done on the amplifier. In the unlikely case of a failure of the device repairs may be performed by AUDIO VALVE authorized technicians only. Use ORIGINAL spare parts only!
- Page 4 As a rule of thumb the device should work now. Don’t push the volume up to its maximum just yet, allow the device to burn in smoothly and avoid powerspikes. The Eklipse Pre-Amplifier needs at least a 10 Ampere circuit breaker between its powercord and the mains. Make sure your wallsocket is equiped in such a fashion.
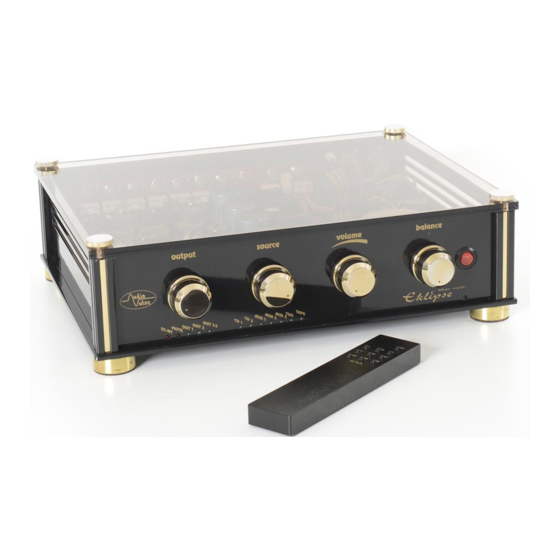
- Page 5 Controls and operation on the front side The frontside of the Eklipse has a number of controls, whose function should be elaborated upon. We start from the left The left selectorswitch balances the outputs and allows you to MUTE the amplifier or put it on STAND BY. The five LEDs under the knob indicate the chosen setting, each possible setting has its own LED.
- Page 6 At the uttermoist righthand side of the front pannel, you find the ON/OFF switch which allows power into the unit or shuts it down. When you touch the white indicator on the switch, the device is switched on. A blue LED under the ON/OFF switch indicates whether the device is switched on or not.
- Page 7 Netx to the XLR outputs you’ll find the Cinch/RCA outputs that provide the output signal of this Pre-Amplifier. The contents of the signal being r elayed ca be determined by the outermost righthand selector switch on the front panel of the Eklipse Pre - Amplifier.
- Page 8 Should a fuse blow regardless, never change it for a fuse with different specifications Fuses blow for a reason. Eventhough AUDIO VALVE equipment is made to last untill the end of time, sometimes things do break. Ask for our help w hen this happens.
- Page 9 The Remote Control The remote control is easy to use, just press the button corresponding with desired functionality. About once a year the two 1.5 Volts batteries must be changed. To change the batteries open the batery cover on the back of the RC.
- Page 10 Eklipse Pre -Amplifier scored in tests That is no mean feat. Like all AUDIO VALVE amplifiers, the Eklipse has been designed to be a timeless p iece, a high closs powder coated 4mm thick lasercut steel with gilded connectors. That concludes the basic technical description of the amplifier, continue reading for the really important stuff.
-
Page 11: Warranty Registration
AUDIO VALVE warrants its components for a three -year period on all electronics and a 90-day period on the tubes from the purchase date. In the event of a failure of your amplifier, AUDIO VALVE will repair or readjust this unit or, should the occasion arise, will replace it provided that all conditions stipulated in this warranty are met.
Need help?
Do you have a question about the Eklipse and is the answer not in the manual?
Questions and answers