Table of Contents
Advertisement
Quick Links
FEATURES
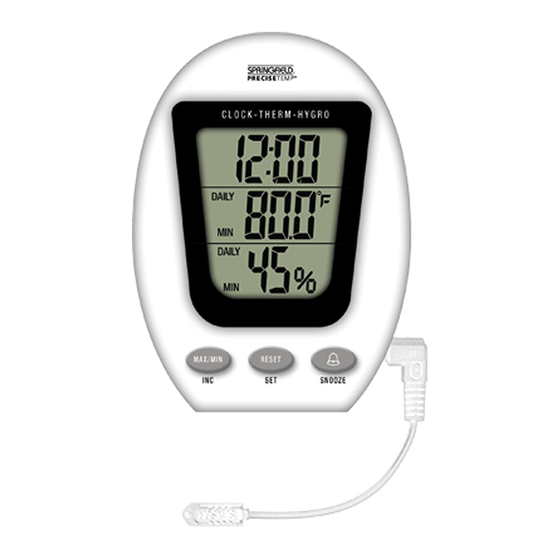
Large 2"H x 1.75"W LCD window with 3 readouts
12 or 24 hour selectable clock
Relative humidity meter with range of 20% to 95%
Humidity tolerance +/-5% at 30% to 90%, +/-7% at 20% to
29% and 91% to 95%
Indoor temperature range of 14˚F to 122˚F (-10°C to 50°C)
Outdoor temperature range of -58˚F to 158˚F (-50°C
to70°C)
Temperature tolerance (+/- 2°F +/-1.1°C)
Min./Max. temperature and humidity memory recall
function with daily reset option
Weatherproof sensor probe with 10ft. long cable
Tabletop or wall-mountable
Requires one AAA alkaline battery (Not Included)
BATTERY INSTALLATION
1. The battery door is located in the back of the unit. To open, push down on the battery door.
2. Insert 1 AAA alkaline battery according to the polarity markings located on the inside of the
battery compartment.
3. Slide the battery door back on and snap down into place.
LCD READOUTS
Upper Display: Clock
Middle Display: Indoor or Outdoor Temperature
Lower Display: Humidity
OPERATION
Setting the Clock:
The clock can be set by following these steps:
1. The clock can be displayed in either a 12 hour or 24 hour format. Press the RESET (SET)
button for approximately 3 seconds. The upper LCD window will be blinking with 12 hr or
INSTRUCTION MANUAL
Tri-View Thermometer and Hygrometer with Clock
MODEL #91066
Advertisement
Table of Contents

Subscribe to Our Youtube Channel
Related Manuals for Springfield 91066


Summary of Contents for Springfield 91066
- Page 1 INSTRUCTION MANUAL Tri-View Thermometer and Hygrometer with Clock MODEL #91066 FEATURES Large 2”H x 1.75”W LCD window with 3 readouts 12 or 24 hour selectable clock Relative humidity meter with range of 20% to 95% Humidity tolerance +/-5% at 30% to 90%, +/-7% at 20% to 29% and 91% to 95% ...
- Page 2 24 hr. Press the INC button to toggle between the two settings. Press the SET button to choose the desired format. 2. The LCD window will now display the hour and minute digits, with the hour digits blinking. Note: The display will read 0:00 after battery installation. Press the INC (MAX/MIN) button to adjust the hour digits then press the RESET (SET) button to lock in the selected hour.
- Page 3 below range. The outdoor temperature will also read LL.L if the detachable probe is not plugged into the jack. Max./Min. Feature & Daily Reset Option: Press the MAX/MIN button once to display the maximum indoor and outdoor temperature readings. When the maximum temperature readings are being displayed, MAX will appear in the lower-left portion of the LCD window.
- Page 4 For additional product information, or warranty information outside the USA, please contact us through www.taylorusa.com or www.springfieldprecision.com. © 2013 Taylor Precision Products, Inc. and its affiliated companies, all rights reserved. Springfield® is a registered trademark of Taylor Precision Products, Inc and its affiliated companies, all rights reserved.
Need help?
Do you have a question about the 91066 and is the answer not in the manual?
Questions and answers