
Related Manuals for LG-Ericsson iPecs GDC-500H


Summary of Contents for LG-Ericsson iPecs GDC-500H
-
Page 1: User Guide
GDC-500H User Guide Please read this guide carefully before operating your new Wireless handset. Retain the guide for future reference. - Page 2 2. This device must accept any interference received, including interference that may cause undesired operation. European Union Declarations of Conformity Ericsson-LG Co., Ltd. declares that the equipment specified in this document, which bears the “CE” mark, conforms to the European Union Radio and Telecommunications Terminal Equipment Directive (R&TTE 1999/5/EC) including,...
- Page 3 Ericsson-LG reserves the right to make changes in specifications at any time without notice. The information furnished by Ericsson-LG in this material is believed to be accurate and reliable, but is not warranted to be true in all cases. If you are not the intended recipient, you should destroy or retrieve this material to Ericsson-LG.
- Page 4 GDC-500H Wireless Handset User Guide Important Safety Information...
- Page 5 GDC-500H Wireless Handset User Guide...
- Page 6 GDC-500H Wireless Handset User Guide...
- Page 7 GDC-500H Wireless Handset User Guide...
- Page 8 GDC-500H Wireless Handset User Guide...
- Page 9 GDC-500H Wireless Handset User Guide...
- Page 10 GDC-500H Wireless Handset User Guide...
-
Page 11: Table Of Contents
Connecting the charger/base Unit ..........9 Charging the handset without charger/base Unit ......9 Installing the Belt Clip ..............10 Installation of Wireless Terminal ..........10 Subscribing the GDC-500H to a System ........11 2.7.1 Enabling Subscriptions ...................11 2.7.2 Subscribing to the System ................11 2.7.3... - Page 12 System Voice Announcements ............ 29 4.21 Using System Voice Mail ............. 29 4.22 User Program Codes ..............29 5 GDC-500H User Menu Features ..........32 Call Register (Call Log) ..............32 Display ..................33 Sound ..................34 Phonebook ................... 35 5.4.1...
- Page 13 Base Choice ....................46 5.7.3 Modify PIN ......................46 5.7.4 Base ID ......................47 5.7.5 Reset ......................47 Appointment ................. 47 Direct Call ..................48 6 Troubleshooting ..............49 7 Specifications ................. 50 8 Dial pad Character Charts ............. 51 9 GDC-500H User Menu ............53...
-
Page 14: Introduction
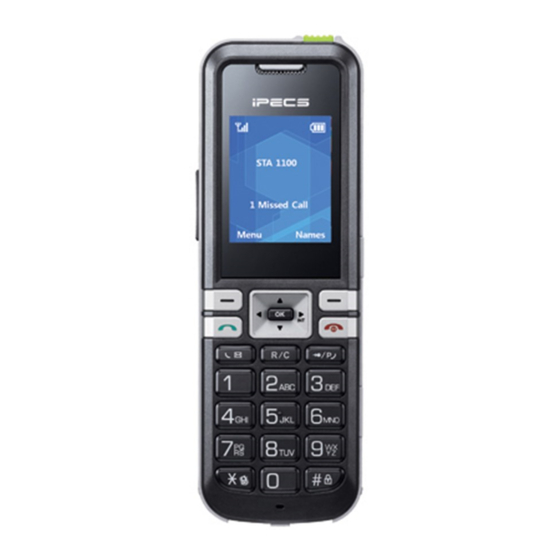
1.1 Description 1.1.1 Handset The GDC-500H, shown in the Handset Diagram, appears much like a mobile cell phone. On the front are the dial pad, a number of control buttons (described in the Handset Buttons and Features list) and a large LCD display. In the lower rear of the unit is the battery compartment. - Page 15 GDC-500H Wireless Handset User Guide Handset Buttons and Features Number Button Description Navigation button: Left arrow – idle state=view missed call, other states=left navigation Right arrow – Idle state=place call (host intercom dial tone), active call state=press to Transfer call, or press and hold 1 second to place call on hold, in User Menu=right navigation.
- Page 16 User Guide GDC-500H (rear view) If an Ear Microphone/Headset is attached to a GDC-500H, it can receive or release a call. It is recommended to use a Headset meeting JIS C-6560 Specification. Press the button on the Ear Microphone/Headset to receive an incoming call when ringing, and do the same action to release the call.
-
Page 17: Gdc-500H Display
User Guide 1.1.2 GDC-500H Display The GDC-500H has a large 176 x 220 pixel full-color TFT LCD (Liquid Crystal Display). The display indicates the status of the handset and provides visual feedback for dialing and other actions. Various icons, detailed in the chart below, are shown at the top of the display. The central area of the display shows messages from the host Ericsson-LG system and the phone itself. - Page 18 Using a headset permits you to move freely around phone and maintain a conversation. Bluetooth headset icon Before using the headset, the headset must be paired with GDC-500H handset. The Bluetooth headset icon is displayed if the paring is successful.
-
Page 19: Charger/Base Unit
D, R 1.1.3 Charger/base Unit The Charger/base unit (p/n GDC-450SSC) is used to charge the GDC-500H handset and to house the handset when not in use. Terminals in the charger mate to terminals in the bottom of the handset to allow the batteries to charge. Fully charged batteries provide about 19 hours of talk-time or about 130 hours of standby-time. -
Page 20: Getting Started
User Guide 2 Getting Started Before you can begin to use your new GDC-500H you must unpack the unit, install the batteries, charge the unit and register the item for service to your telephone system. This section provides you the information needed to complete these steps. -
Page 21: Installing The Batteries
At low battery levels (less than 1 battery power bar), the display backlight turns OFF to maximize battery charge. Use only with batteries provided for the GDC-500H. Use of other types of batteries may cause harm to the unit or explosion. -
Page 22: Connecting The Charger/Base Unit
GDC-500H Wireless Handset User Guide 2.3 Connecting the charger/base Unit The Charger/base unit must be connected to power using the supplied AC/DC Adapter. 1. Plug the DC output plug of the adapter into the DC input of the charger. 2. Insert the AC plug of the adapter into an AC outlet. -
Page 23: Installing The Belt Clip
GDC-500H Wireless Handset User Guide 2.5 Installing the Belt Clip The GDC-500H comes with a belt clip that can be installed on the unit. To install the belt clip, refer to the figure and instructions below. When installing the belt clip: 1. -
Page 24: Subscribing The Gdc-500H To A System
User Guide 2.7 Subscribing the GDC-500H to a System Prior to accepting a connection with a GDC-500H, a subscription to services must be entered into the WMI of your telephone system. This is accomplished in a two step process: the Attendant station enables subscription of a phone to the system, then the GDC-500H subscribes to the system for services. -
Page 25: Terminating A Subscription
GDC-500H Wireless Handset User Guide Note: Depending on the system or radio channel environment, the system or the wireless terminal may not recognize that the system has the subscribed wireless terminal or the wireless terminal is subscribed to the system. Once a user has performed the subscription procedure, the user should attempt to make a call. -
Page 26: Authentication
GDC-500H Wireless Handset User Guide 4) Enter the Station No. 5) Press [HOLD/SAVE] button and confirmation tone is heard. 6) Confirmation tone (or error tone) will be heard at the Station, and the corresponding Attendant Station. 2.8 Authentication Verifies the wireless terminal and/or the user with the System. The User inputs the User Personal Identification (UPI) or Authorization code/PIN (5-digits), when requested by System Attendant. -
Page 27: Using The Basic Features
Code digits are available from your System Administrator, or perhaps the Attendant. 3.1 Turning the GDC-500H ON and OFF Your new Wireless handset operates on 1 Li-ion rechargeable batteries. When not in-use, it should be turned OFF to extend the life of the batteries. Fully charged, batteries provide about 15 hours of talk-time or about 120 hours of standby time. -
Page 28: Muting Your Microphone
GDC-500H Wireless Handset User Guide 4) From this menu select External Ring or Internal Ring to set the ringer volume for external or internal calls respectively and press the. OK ( ) button. 5) Use the Left and right arrows of the Navigation (... -
Page 29: Answering A Call
3.7 Placing a Call on Hold While you are on a call using the GDC-500H, you may place the caller in a waiting state where the caller hears music on hold. This allows you to place another call or answer a call waiting. -
Page 30: Call Transfer
) button. 3.9 Do Not Disturb (DND) When the DND (Do Not Disturb) feature is active, the GDC-500H will not notify you of an incoming call. The handset will not ring or vibrate allowing you to work without interruption from an incoming call. The host Ericsson-LG system determines routing of the incoming call while your phone is in DND. -
Page 31: System Last Number Redial
Last Number Redial. 3.12 Handset Speed Dial The GDC-500H incorporates a Phonebook that can contain up to 60 records. Each record contains a name, number and a record number. Numbers from the Phonebook can be automatically dialed by entering the Phonebook record number (1-60). Refer to the Phonebook section later in this guide for details on the Phonebook. -
Page 32: Using Advance System Features
GDC-500H Wireless Handset User Guide 4 Using Advance System Features 4.1 Program a System User Name You can store a name in the host system for use as your id when you are called or call another station. The User name is also employed with Dial-by-Name. -
Page 33: Leaving A Return Call Message
GDC-500H Wireless Handset User Guide 4.3 Leaving a Return Call Message When a station user does not answer your call or is in DND, you may request the user callback when available. The station receives a Message Wait indication and responds using the procedure in Responding to a Message Wait section discussed later in this guide. -
Page 34: Answering A Call Ringing At Another Station
GDC-500H Wireless Handset User Guide 4.6 Answering a Call Ringing at Another Station When another station rings and you may be allowed to answer (pick up) the call. There are two (2) types of pick-up; directed call pick up answers a call to a specific phone, and group pick-up answers a call to a group of phones. -
Page 35: Using System Speed Numbers
GDC-500H Wireless Handset User Guide To delete a Station Speed Dial number: 1. Press the Talk ( ) button, you receive dial tone. 2. Press and hold, 1 second, the Speed/Program ( ) button. 3. Press the Speed/Program ( ) button. -
Page 36: Pre-Defined & Custom Text Messaging
GDC-500H Wireless Handset User Guide 4 – Busy or No answer forward 5-9 – Off-net forward, check with your System Administrator # - Cancel call forward 4. Dial the internal destination station, group, etc. 5. Press the End ( ) button. -
Page 37: Responding To A Message Wait Indication
GDC-500H Wireless Handset User Guide 3. Dial the Text Message code, default 52. 4. Dial the message content using the 2 digits for each character method, see chart below. 5. Press and hold, 1 second, the Speed/Program ( ) button. -
Page 38: Blocking Outgoing Calls W/Temporary Cos
GDC-500H Wireless Handset User Guide 1 digits; to delete all station messages without a call back, press the # and 1. For CL (missed call with CLI messages), dial 2 and press the right arrow on the Navigation ( ) button to return the call. To delete the current CLI message, press... -
Page 39: Paging
GDC-500H Wireless Handset User Guide 4.13 Paging The host system incorporates voice broadcasts to other stations and external speakers. During a page, voice is broadcast to the speaker of idle stations assigned to receive the page. Each station is assigned to a page group, known as a zone, and individual zones are paged. -
Page 40: Conference Room
GDC-500H Wireless Handset User Guide 4.15 Conference Room GDC-500H cannot initiate a conference. It can, however, create, join, and delete a conference room. To activate (create) a conference room: 1. Press the Talk ( ) button, you receive dial tone. -
Page 41: Using The System Alarm Clock
GDC-500H Wireless Handset User Guide 4.17 Using the System Alarm Clock In addition to the handset Appointment feature, the host system incorporates a wake-up or alarm clock feature. When the alarm time is reached, the system alerts you with ring signal and displays “WAKEUP RING.”... -
Page 42: Responding To An Authorization (Pin) Request
GDC-500H Wireless Handset User Guide 4.19 Responding to an Authorization (PIN) Request In order to manage wireless terminals, the Attendant may request you to enter your PIN. When the display message “PIN” appears, you must respond by entering your PIN (Authorization code). - Page 43 GDC-500H Wireless Handset User Guide To access a User Program: 1. Press the Talk ( ) button, you receive dial tone. 2. Press and hold, 2 second, the Speed/Program ( ) button. 3. Dial the User Pgm Code and any required entry. See your System Administrator for codes.
- Page 44 GDC-500H Wireless Handset User Guide User PGM Code Description Display Remark [09] AT HOME [10] AT BRANCH OFFICE [11-20] UN-REGISTER MSG Create a Station User MESSAGE : 00 Message 53 & Rm & Auth Start a Conf Room DIAL NO (1-9) AND PASSWD Code 54 &...
-
Page 45: Gdc-500H User Menu Features
GDC-500H Wireless Handset User Guide 5 GDC-500H User Menu Features GDC-500H incorporates a menu you employ to control various features and attributes of the handset. The Appendix GDC-500H User Menu displays the Menu tree. The main sub- menus are: Call Register (Call Log) ... -
Page 46: Display
GDC-500H Wireless Handset User Guide Delete: deletes record. Call: calls number. 5. Press the OK ( ) left soft button to access the sub-menu. 6. Press the End ( ) button. Options under the delete selection allow you to delete all records in a specific call log or all records in all the logs. -
Page 47: Sound
GDC-500H Wireless Handset User Guide • Always Off, back light is always OFF. • Sleep Mode, back light turns OFF 20 seconds after last button press backlight and handset turns OFF after 1 minute. 7. Press the OK ( ) left soft button to store the setting. -
Page 48: Phonebook
/Silent Alert button ( 5.4 Phonebook The GDC-500H incorporates a Phonebook that stores up to 60 contact records and each record has a name and phone number. The name can be up to 14 digits in length (characters and numbers). From the Phonebook, menu records can be searched, called, added, modified or deleted. -
Page 49: Dialing From Phonebook
GDC-500H Wireless Handset User Guide 5.4.1 Dialing from Phonebook Records in the Phonebook can be searched and a number can be dialed. To dial a number form the Phonebook: 1. Access the Phonebook menu as described above. 2. Use the Navigation (... -
Page 50: Modifying Records In The Phonebook
GDC-500H Wireless Handset User Guide 5.4.3 Modifying Records in the Phonebook To modify a Phonebook record: 1. Access the Phonebook menu as described above. 2. Use the Navigation ( ) to highlight the Modify selection and press the OK ( left soft button. -
Page 51: Searching The Phonebook With Find
Phonebook” or “Deleting Records from the Phonebook sections. 5.5 Bluetooth GDC-500H supports a Bluetooth allowing you to use a wireless headset. So you can move freely around the Handset and maintain a conversation. Before using the headset, the headset must be “paired” with the Handset, and then the headset must be enabled for use. -
Page 52: Phone Settings
6. After finishing the above option, press the End ( ) button. Note: GDC-500H supports Bluetooth version 2.1 EDR. Depending on the wireless environment or property of paired headset, the paired headset may not be connected automatically. In this case, please try to manually connect. -
Page 53: Clock, Date And Time Display
The Clock Display must be enabled to display the handset time. 5.6.2 Alarm Clock The GDC-500H incorporates an Alarm Clock feature. When the handset clock reaches the alarm time, you are notified by the alarm. To set the Alarm Clock: 1. -
Page 54: Keypad Tones
6. Press the End ( ) button. 5.6.4 Language The GDC-500H supports multiple languages; you can select one of 7 languages for use in the display of handset messages. To select a language: 1. Select the Phone Settings menu from the User Menu. -
Page 55: Keypad Lock
) button. 5.6.8 Edit CO Code The GDC-500H can subscribe to four (4) DECT zones simultaneously. Each zone may have access to a different set of external lines with different codes. The code is used to place calls from the handset Phonebook as well as for incoming call look-up in the Phonebook. If desired, you can assign a CO access code the handset will send and receive in front of a Phonebook number for each separate zone. -
Page 56: Missed Call Mode
GDC-500H Wireless Handset User Guide To assign a CO Code: 1. Select the Phone Settings menu from the User Menu. 2. Use the Navigation ( ) button to highlight the CO Code selection. 3. Press the OK ( ) left soft button to access the sub-menu. -
Page 57: Clock Display
GDC-500H Wireless Handset User Guide 5.6.11 Clock Display When a host system does not provide the handset with the date and time, the handset clock display can be enabled and the date and time set. The display can be enabled as outlined below and the time and date are set as outline in the Clock, Date and Time Display section earlier in this guide. -
Page 58: Emergency Call
Received Signal Strength Indicator (RSSI) indicator is steady, showing at least 2 bars. To subscribe to a system, from the GDC-500H: 1. Verify that press the Menu ( ) button to display the menu. -
Page 59: Base Choice
GDC-500H Wireless Handset User Guide 4. Select “Subscription” using the up and down arrows of the Navigation ( ) button and press the OK ( ) button. 5. Select an available BASE number (up to 4) and press the OK ( ) button;... -
Page 60: Base Id
) button. 5.8 Appointment Your GDC-500H Wireless handset has an Appointment Reminder feature. When set, the handset will remind you of an Appointment with a display of the appointment text and an appointment alert (alarm sound) or vibration alert (if in silent mode). In addition to the time, you can enter the appointment text and set the appointment as daily, monthly or annual. -
Page 61: Direct Call
) button. 5.9 Direct Call The GDC-500H can be configured to dial a specific number when any button on the handset is pushed. The Direct Call or Hotline number can be enabled and the number to call specified. The direct call (emergency) number is transmitted on input from any key. This feature may be used in cases where the User is not able to effectively dial a phone number, and would need direct access for assistance from the Attendant or another party. -
Page 62: Troubleshooting
Section. adjusting “UNREGISTERED” No active Subscribe the handset, refer to subscribing displayed subscription GDC-500H to a System. in the LCD Low battery icon ( ) is flashing on LCD with Battery level is low Recharge the battery. warning tone Battery level is... -
Page 63: Specifications
7 Specifications Standard DECT/GAP Frequency band 1880~1900MHz RF Modulation GSFK Range from Base Station to Handset Maximum=200 meters, Typical=70 meters GDC-500H Wireless DECT Handset Item Specification Size: 157mm x52.6mm x 19mm (HxWxD) Weight: 136 grams Color:... -
Page 64: Dial Pad Character Charts
User Guide 8 Dial pad Character Charts The integrated GDC-500H Phonebook permits names to be associated with a Phonebook record. The following charts provide the correlation between the dial pad digits and characters. Charts are available for English, Italian, Spanish and Russian. To insert a character, each dial pad button is pressed one or more times to select the desired character. - Page 65 GDC-500H Wireless Handset User Guide Spanish Language Character Chart Button depressions Dial Pad button < > á à é è í ì Ç ñ ó ò ú ù € & Russian Language Character Chart Button depressions Dial Pad button <...
-
Page 66: Gdc-500H User Menu
GDC-500H Wireless Handset User Guide 9 GDC-500H User Menu Paired Device... - Page 67 GDC-500H Wireless Handset User Guide...
Need help?
Do you have a question about the iPecs GDC-500H and is the answer not in the manual?
Questions and answers