Advertisement
Table of Contents
- 1 Table of Contents
- 2 About Your Thermostat
- 3 Getting to Know Your Thermostat's Controls
- 4 Getting to Know Your Thermostat's Display (Advanced Display)
- 5 Getting to Know Your Thermostat's Display (Simplified Display)
- 6 Changing the Desired Temperature Settings
- 7 Changing the Thermostat Mode
- 8 About the Fan and Hold Settings
- 9 About the Hold Settings
- 10 Setting the Time and Date
- 11 Modifying the Program Schedule
- 12 Changing the Desired Humidity Setting (RC-2000)
- 13 Display the Runtime Graph of Air Conditioning and Heating Usage
- Download this manual
Advertisement
Table of Contents

Related Manuals for HAI Omistat 2


Summary of Contents for HAI Omistat 2
- Page 1 RC-1000 and RC-2000 Programmable Communicating Thermostat User’s Guide...
-
Page 2: Table Of Contents
Contents About your thermostat ..........................1 Features: ..................................1 Getting to know your thermostat’s controls ....................2 Getting to know your thermostat’s display (Advanced Display) .............. 4 Filter Reminder ................................4 Getting to know your thermostat’s display (Simplified Display) .............. 6 Changing the desired temperature settings .................... -
Page 3: About Your Thermostat
About your thermostat About your thermostat Thank you for purchasing your new Omnistat2 electronic communicating thermostat. Your thermostat will provide you with comfort, convenience, and energy savings for years to come. The Omnistat2 is a precision digital thermostat. It has the capability of being controlled both locally and remotely. It offers stand alone operation, programmability, and communications with automation systems, utility control systems, and personal computers. -
Page 4: Getting To Know Your Thermostat's Controls
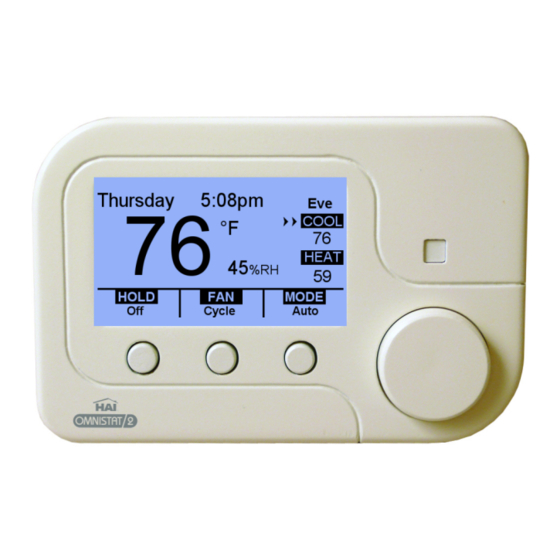
Getting to know your thermostat’s controls Getting to know your thermostat’s controls To take advantage of all the benefits and features offered by your new thermostat, we recommend that you start by becoming familiar with its controls. Large Graphical Display Customizable multicolor backlit display shows everything necessary to operate your system and monitor temperature... - Page 5 Getting to know your thermostat’s controls The following icons are used throughout this guide: Adjusting the contrast of the thermostat display: Turn the Scroll Wheel to the right or to the left. To adjust the contrast of the thermostat display press and hold [FAN] while turning the Scroll Wheel: Press the Scroll Wheel.
-
Page 6: Getting To Know Your Thermostat's Display (Advanced Display)
Getting to know your thermostat’s display (Advanced Display) Getting to know your thermostat’s display (Advanced Display) The following graphics will be displayed on the Home Page when using the Advanced Display: Message Bar (6) Period Indicator (10) Status Indicators (5) Current Indoor Cool Setting Temperature... - Page 7 Getting to know your thermostat’s display (Advanced Display) (1) Temperature: Displays the current indoor temperature. (2) Cool Setting: Displays the desired cool setting. (3) Heat Setting: Displays the desired heat setting. (4) Thermostat Mode: Displays the current system mode: Off, Heat, Cool, Auto, or EM Heat (Emergency Heat for heat pump systems) (5) Status Indicators: ►Cool 1 stage of air conditioning system is running...
-
Page 8: Getting To Know Your Thermostat's Display (Simplified Display)
Getting to know your thermostat’s display (Simplified Display) Getting to know your thermostat’s display (Simplified Display) The following graphics will be displayed on the Home Page when using the Simplified Display: Status Indicators (4) Time (5) Current Indoor Thermostat Mode (2) Temperature Temperature Setting for Current Mode... -
Page 9: Changing The Desired Temperature Settings
Changing the desired temperature settings Changing the desired temperature settings To change the desired temperature setting, simply turn the Scroll Wheel. With the first turn of the Scroll Wheel, the Temperature Settings Page is displayed: On the Temperature Settings Page, you will initially be adjusting the temperature setting for the current thermostat mode. -
Page 10: Changing The Thermostat Mode
Changing the thermostat mode MODE To change the thermostat mode, press [MODE]. When first pressed, the Mode Setting Page is displayed: Changing the thermostat mode Turn the Scroll Wheel to scroll through the list of modes. Press the Scroll Wheel or [Select] to select the highlighted mode. Press [Cancel] to discard changes and return to the Home Page. -
Page 11: About The Fan And Hold Settings
About the fan and hold settings To change the fan setting, press [FAN]. When first pressed, the Fan Setting Page is displayed: About the fan and hold settings Turn the Scroll Wheel to scroll through the list of fan settings. Press the Scroll Wheel or [Select] to select the highlighted setting. -
Page 12: About The Hold Settings
About the hold settings About the hold settings In Hold mode, the thermostat will not change the desired temperature settings by program schedule or remote system. In Hold Off mode, the thermostat responds to program schedule and remote system temperature setting changes. ... -
Page 13: Setting The Time And Date
Setting the time and date Setting the time and date To set or change the current time and date, press and hold [MODE] for 5 seconds: Press and hold for 5 seconds. 1) Set the current hour 2) Set the current minutes 3) Set AM or PM 4) Set the month 5) Set the day... -
Page 14: Modifying The Program Schedule
Modifying the program schedule Modifying the program schedule Your new thermostat has been preprogrammed with energy saving settings. You may modify the times and temperature settings to maximize energy savings and comfort based on your lifestyle. Your thermostat may be programmed to adjust the heating and cooling temperature settings up to 4 times per day, with different times and temperature settings for every day of the week (Monday –... - Page 15 Modifying the program schedule Turn the Scroll Wheel to adjust the time for the selected period on the respective day. This is the time in which the selected period starts and the previous period ends. The time is increased and decreased in 15 minute increments. ...
- Page 16 Modifying the program schedule Turn the Scroll Wheel to adjust the desired Heat Settings that the thermostat will maintain for the selected period on the respective day. When the desired Heat Setting is displayed for the selected period, press the Scroll Wheel to highlight the Cool temperature setting. Turn the Scroll Wheel to adjust the desired Cool Settings.
- Page 17 Modifying the program schedule Notes: At any time, you can undo changes made to the current schedule on the respective day by pressing [Cancel]. Select a day from the list of days and modify the program schedule for that day, OR Press [Back] twice, to return to the Home Page When all of the modifications are complete, you can save the schedule for the respective day by pressing [Ok].
-
Page 18: Changing The Desired Humidity Setting (Rc-2000)
Changing the desired humidity settings (RC-2000) Changing the desired humidity setting (RC-2000) Main Menu To change the desired humidity settings, press the Scroll Wheel once to display the Main Menu. Turn the Scroll Wheel to highlight Humidity. Press the Scroll Wheel or [Select] to view the humidity settings. -
Page 19: Display The Runtime Graph Of Air Conditioning And Heating Usage
Display the runtime graph of air conditioning and heating usage Display the runtime graph of air conditioning and heating usage Main Menu To view a System Runtime graph of air conditioning and heating usage over the past 4 weeks, press the Scroll Wheel once to display the Main Menu. - Page 20 TV communications. If it is suspected of doing so, the user is encouraged to try to correct the problem by reorienting the receiver's antenna, moving the receiver away from the product, or consulting an experienced radio/TV technician for help. Covered by U.S. Patent No.: US 8,091,795 B1 HAI ⋅ New Orleans, LA ⋅ USA...
Need help?
Do you have a question about the Omistat 2 and is the answer not in the manual?
Questions and answers
My display no longer lights up. Is there a 9 volt battery required?