Table of Contents
Advertisement
Quick Links
Advertisement
Table of Contents

Subscribe to Our Youtube Channel
Related Manuals for LevelOne WBR-6805


Summary of Contents for LevelOne WBR-6805
-
Page 1: User Manual
LevelOne User Manual WBR-6805 300Mbps Wireless Travel Router Ver. 1.0... - Page 2 FCC Certifications Federal Communication Commission Interference Statement This equipment has been tested and found to comply with the limits for a Class B digital device, pursuant to Part 15 of the FCC Rules. These limits are designed to provide reasonable protection against harmful interference in a residential installation.
-
Page 3: Ce Mark Warning
CE Mark Warning This equipment complies with the requirements relating to electromagnetic compatibility, EN 55022 class B for ITE, the essential protection requirement of Council Directive 2004/108/EC on the approximation of the laws of the Member States relating to electromagnetic compatibility and R&TTE Directive 1999/5/EC... -
Page 4: Table Of Contents
Contents Unpacking Information ························································································ 5 Chapter 1 Introduction to the Wireless Router ····················································· 6 General Description ········································································· 6 Key Features ·················································································· 6 The Front Panel ·············································································· 7 The Rear Panel ··············································································· 8 Chapter 2 Installation and Basic Configuration ····················································· 9 Operation Mode ··············································································... -
Page 5: Unpacking Information
Unpacking Information Thank you for purchasing the product. Before you start, please check all the contents of this package. The product package should include the following: WBR-6805 300Mbps Wireless Travel Router Power Adapter USB Cable CD-ROM with Manual and QIG... -
Page 6: Chapter 1 Introduction To The Wireless Router
Chapter 1 Introduction to the Wireless Router 1.1 General Description This is a wireless router with 2T2R MIMO technology, providing an excellent network solution for home, SOHO and hotspot users. It complies with standards IEEE 802.11n with data rate up to 300 Mbps, and IEEE 802.11b/g with maximum data rate of 54 Mbps. -
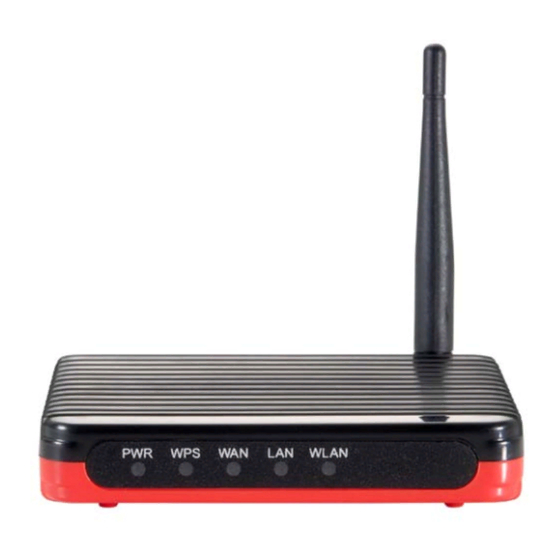
Page 7: The Front Panel
1.3 The Front Panel The front panel of the Wireless Router: Name Status Indication Green Power on Dark Power off Blink green one time System reboot Blink green WPS connecting Dark System stability The wireless function is disabled. WLAN Flashing The wireless function is enabled. -
Page 8: The Rear Panel
1.4 The Rear Panel The rear panel of the Wireless Router is shown below. LAN: Through this port, you can connect the router to your PCs and the other Ethernet network devices. WAN: This WAN port is where you will connect the cable/DSL Modem, or Ethernet. ... -
Page 9: Chapter 2 Installation And Basic Configuration
Chapter 2 Installation and Basic Configuration This chapter will guide you steps by steps to install and configure the Wireless Router. We suggest you go over the whole chapter first and then do more advanced operation. Operation Mode In this device, there are three modes for your selection: ... -
Page 10: Configure The Ip Address Of Your Computer
Configure the IP Address of Your Computer In order to communicate with this Wireless Router, you have to configure the IP address of your computer to make it compatible with the device. Note: The router supports DHCP server and it is enabled as default. Users who configure his IP address as “Obtain an IP address automatically”... - Page 11 2. Right-click Local Area Connection item and click Properties. 3. Choose Internet Protocol (TCP/IP) and click Properties.
- Page 12 You may choose Obtain an IP address automatically (recommend) to get an IP address automatically. Or you can choose Use the following IP address to specify an IP address manually. Please click the OK button after your configuration.
-
Page 13: Chapter 3 Web-Based Management
Chapter 3 Web-Based Management Start the Web-Based Management Interface The device uses Web as the management interface. You can use a browser to access the management interface easily. Please follow the steps listed below. 1. Open the Internet Web browser. 2. -
Page 14: The Graphic User Interface
The Graphic User Interface After the password authorization, the information page shows up as the home page of the graphic user interface. You may click the menu link on left column of the window to get access to each configuration page. Router Mode:... - Page 15 AP Mode:...
- Page 16 Client Mode:...
-
Page 17: Setup Wizard
Setup Wizard If you are using the router for the first time, please follow the procedures of the setup wizard to do a step-by-step configuration. Note: The configurations in AP, Router and Client modes are almost the same. The following guide mainly introduces this device under the Router mode environment. - Page 18 3. Click “Next” button, the “WAN Interface Setup” pops out. Or you can click “Back/Cancel” for any changing. You may get those parameters from your ISP. WAN Access Type: Static IP, DHCP Client and PPPoE. 4. Click “Next” button, the “Wireless Network Basic Settings” pops out.
- Page 19 5. Click “Next” button, the “Wireless Security Setup” pops out. Having finished these steps, you can use the router to surf the Internet. If you need more detailed information, please refer to the following instruction.
-
Page 20: Wireless
Wireless In Client mode, the Wireless interface default support universal repeater (one wlan interface used as AP and client concurrently) function; you can set wireless client mode connect Access Point, and then the Virtual AP mode can sharing IP to Wireless Clients. 3.4.1 Basic Settings You can set up the configuration of your Wireless basic settings and monitor the Wireless Clients associate with your router. - Page 21 Note: This function only support in Router & AP mode, not support in Client mode. In the drop list, there are two types of wireless mode: “AP” and “Client”. You may select one type for your configuration. Wireless Mode Note: This fuction only support in AP mode. Service set identifier (SSID) for the name of the wireless network.
- Page 22 Click “Enable” to activate this AP, and then click the button “Show”, “Active Wireless Client Table – AP1” window pops up as the following: 2. Active Wireless Client Table This is the window that pops up after clicking the button.
-
Page 23: Advanced Settings
3.4.2 Advanced Settings You can set advanced wireless LAN parameters for this router. We recommend not changing these parameters unless you know what changes will be on this router. Items Information This value should remain at its default setting of 2346. If you experience a Fragment high packet error rate, you may slightly increase your fragmentation Threshold... -
Page 24: Security
3.4.3 Security The Security function protects your wireless network from invasion. We provide WEP and WPA encryption to secure your wireless network. Please select “Disable”, “WEP”, “WPA-PSK”, “WPA2-PSK”, or “WPA2-Mixed” in the drop list. If you select “Disable”, any data will be transmitted without encryption and any station can access the router. - Page 25 2. Security Mode -- WEP Items Information Please choose a SSID you have set for this router in the Wireless > Select SSID Basic Settings from the drop-down list. The SSID will be shown on the wireless network for recognizing. Encryption Select a security encryption mode for this router.
- Page 26 3. Security Mode – WPA / WPA 2-PSK Items Information Please choose a SSID you have set for this router by clicking Select SSID “Wireless > Basic Settings” from the drop-down list. The SSID will be shown on the wireless network for your recognition. Encryption Select a security encryption mode for this router.
- Page 27 Pre-Shared Key To decide the format, select “Passphrase” or “Hex” in the drop list. Format Enter the “Pre-shared Key” according to the pre-shared key format Pre-Shared Key you select. This is the shared secret between AP and STA. This field must be filled with character longer than 8 and less than 64 lengths.
-
Page 28: Access Control
3.4.4 Access Control To restrict the station access authentication of the clients, you can set up the control list in this page. Items Information Click the drop list to choose the access control mode. You may select Wireless Access “Allow listed” to give those MAC addresses access to this device or Control Mode select “Deny Listed”... -
Page 29: Wireless Site Survey
3.4.5 Wireless Site Survey (only in AP mode and Client mode) If you are under the Wireless Client mode, click Wireless > Wireless Site Survey in the menu links to display the screen as shown below. 1. The following page which provides tool to scan the wireless network pops out. 2. - Page 30 3. Select one of the networks existing in the list of the site survey table and then click “Next” button, then the following page pops out. 4. In this page, you can input the selected AP’s password, then click “connect ” button to start connection with wireless network.
- Page 31 5. In connection process, the following page pops out. Please waiting for the connection result. 6. When connection is successful, the following page pops up.
- Page 32 7. You can go back to the Management > Status page and confirm the connection’s states.
-
Page 33: Wps Settings
3.4.6 WPS Settings The primary goal of Wi-Fi Protected Setup (Wi-Fi Simple Configuration) is to simplify the security setup and management of Wi-Fi networks. This router supports the configuration setup using PIN configuration method or PBC configuration method through an internal or external registrar. - Page 34 the case of the router. After click on the button, please run the client’s WPS and push the PBC button within 2 minutes. Current Key Info This field displays the current key information you configured. Personal Identification Number (PIN) method. Users have to fill in the PIN code of enrollee device and click the button to make Client PIN...
-
Page 35: Tcp/Ip Settings
TCP/IP Settings 3.5.1 LAN Interface Setup To set up the configuration of LAN interface, private IP of your router LAN port and subnet mask for your LAN segment. Items Information Router IP Address The IP of your Router LAN port (default 192.168.1.1). Subnet Mask of you LAN (default 255.255.255.0). -
Page 36: Wan Interface Setup
Active DHCP Client List This is the window that pops up after clicking the button. It shows the information of IP address, MAC address and expire time of the DHCP clients that have connected with this device. 3.5.2 WAN Interface Setup (Router mode and Client mode Display) This page allows users to configure those parameters for connecting to Internet. - Page 37 Items Information Select the mode to access the WAN as Static, DHCP Client or WAN Access Type PPPoE. The IP address that provided by your Internet Service Provider Internet IP Address (ISP). The Subnet Mask provided by your Internet Service Provider Subnet Mask (ISP).
- Page 38 To Enable the Maximum Transmission Unit of router setup. Any packet over this number will be chopped up into suitable size MTU Size before sending. Larger number will enhance the transmission performance. Enter the MTU number in the blank to set the limitation. There are two ways to clone MAC address.
- Page 39 To specify the Domain Name System (DNS). The DNS DNS 1~2 server translates domain names into IP addresses. Enter the DNS provided by your ISP in DNS 1 and DNS 2. 2. DHCP (Automatic Configuration) Items Information To Enable the Maximum Transmission Unit of Router setup. Any packet over this number will be chopped up into suitable size before sending.
- Page 40 3. PPPoE (ADSL) Items Information User Name&Password Fill in the User Name and password that provided by your ISP. To Enable the Maximum Transmission Unit of router setup. Any packet over this number will be chopped up into suitable size before sending. Larger number will enhance the MTU Size transmission performance.
-
Page 41: Firewall Settings
Firewall Settings (Router mode and Client mode Display) MAC Filtering The Wireless Router could filter the outgoing packets for security or management consideration. Items Information Enable MAC Filtering Mark to enable the configuration, and clear to disable. Fill in the MAC address of wireless stations you want to MAC Address forbid to access the Internet through the Gateway. -
Page 42: Management
Management 3.7.1 Status This information page shows the current status and basic settings of this device. You could check if the parameters match your configuration. -
Page 43: Statistics
3.7.2 Statistics This page shows users the information of data transfer, and monitors the status of this router including receiving and sending packets. To see the latest report, click button. 3.7.3 Log This System Log page shows the information of the current activities on the router. To enable system log function: Mark the “Enable Log”... -
Page 44: Upgrade Firmware
3.7.4 Upgrade Firmware Sometimes a new firmware may be issued to upgrade the system of this device. You could upgrade the firmware you got in this page. To upgrade the firmware, please click the button, locate the firmware in your computer and then click the button to execute. -
Page 45: Save/Reload Setting
3.7.5 Save/Reload Setting The Save/Reload Setting page allows users to save and upload the configuration settings of the device or restore the factory default configuration. Items Information Click the button to save the currently configure Save Settings to File settings. Click to select the file that you save, and then Load Settings from File... -
Page 46: Logout
the password on the text box. Don’t forget to click the to save the configuration. 3.7.7 Logout Click Apply Change then you will save the settings and log off the management interface. -
Page 47: Appendix A: Product Specifications
Appendix A: Product Specifications IEEE 802.11n, IEEE 802.11g, IEEE 802.11b, IEEE 802.3, IEEE Standard 802.3u LAN: One 10/100Mbps RJ-45 port WAN: One 10/100Mbps RJ-45 port Interface One WPS/RESET button One slide switch to control AP/Router/Client mode One USB DC JACK Antenna type: Dipole Antenna Antenna connector type: Fixed... -
Page 48: Appendix B: Glossary
Appendix B: Glossary 802.11b - The 802.11b standard specifies a wireless networking at 11 Mbps using direct-sequence spread-spectrum (DSSS) technology and operating in the unlicensed radio spectrum at 2.4GHz, and WEP encryption for security. 802.11b networks are also referred to as Wi-Fi networks. - Page 49 promoting interoperability among 802.11b devices. WLAN (Wireless Local Area Network) - A group of computers and associated devices communicate with each other wirelessly, which network serving users are limited in a local area.
Need help?
Do you have a question about the WBR-6805 and is the answer not in the manual?
Questions and answers