Axis 5500 User Manual
Network print servers
Hide thumbs
Also See for 5500:
- User manual (152 pages) ,
- Installation manual (34 pages) ,
- User manual (170 pages)

Related Manuals for Axis 5500


Summary of Contents for Axis 5500
-
Page 1: Network Print Servers
AXIS 5500 / AXIS 5550 Network Print Servers User’s Manual AXIS 5500 / AXIS 5550 User’s Manual... -
Page 2: Regulatory Information
Every care has been taken in the preparation of this manual; if you detect any inaccuracies or omissions, please inform your local Axis office, which can be found on the cover of this document. Axis Communications AB cannot be held responsible for any technical or typographical errors and reserves the right to make changes to the product and manuals without prior notice. -
Page 3: Table Of Contents
Monitor ................ 29 Adding NetBIOS/NetBEUI Printers in Windows NT 4 using AXIS Print Monitor ............... 31 Adding Printers in Windows 98 and Me over TCP/IP using AXIS Print Monitor ............... 32 Adding Printers in Windows 98 and Me over NetBIOS/NetBEUI using AXIS Print Monitor .......... - Page 4 Section 7 Adding Printers in NetWare ........... 51 Setup using NDPS .............. 52 Installing the AXIS 5500/AXIS 5550 in an NDPS environment Setup using Queue-based Printing over IP/IPX in PSERVER Mode Setup for Queue-based Printing over IPX/SPX (Remote Printer Mode) ................55 Overview: Queue-based Printing Methods ......
-
Page 5: Introduction
Introduction Section 1 Introduction Thank you for purchasing the AXIS 5500/AXIS 5550. This product has been developed to connect your printers anywhere in your network, allowing all network users access to shared printer resources. About this Manual This manual is applicable for an AXIS 5500/AXIS 5550 with firmware version 6.40 or later, providing introductory information as well as detailed instructions... -
Page 6: Supported Environments
Introduction Supported Environments Network Printing • Windows • NetWare • UNIX/Linux • Macintosh AXIS 5500 / AXIS 5550 User’s Manual... -
Page 7: Product Overview
Section 2 Product Overview Package Contents Verify that nothing is missing from the AXIS 5500/AXIS 5550 package by using the check list below. Please contact your dealer if anything is missing or damaged. All packing materials are recyclable. AXIS 5500 & AXIS 5550... -
Page 8: Axis Network Product Cd
Axis software, firmware and user documentation. It also contains free Adobe Acrobat Reader software. Start-up Procedures If your computer is configured to autostart CDs, the AXIS Network Product CD for Windows will start automatically when inserted into a local CD drive on Windows 98, Me, NT, 2000 and XP platforms. -
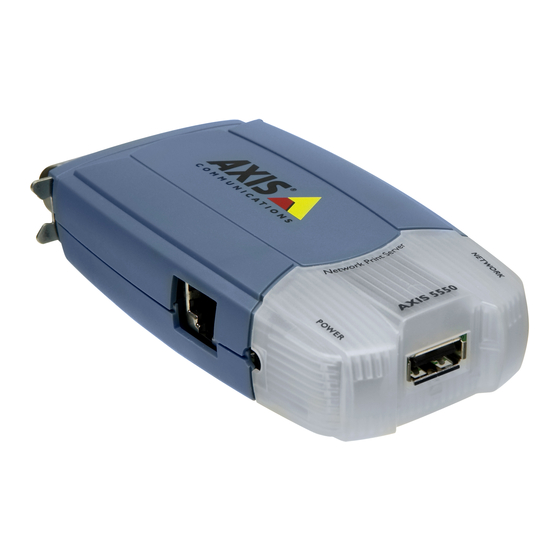
Page 9: Physical Description
AXIS 5550 Network Print Server Network Connector Axis Network Print Servers are designed for 10 Mbps or 100 Mbps Ethernet networks and connect to the network via a twisted pair category 5 cable (10baseT and 100baseTX) or better. AXIS 5500 / AXIS 5550 User’s Manual... -
Page 10: Mounting The Print Server
Product Overview Printer Ports AXIS 5500 is USB 1.1 low and full speed compliant . Successfully tested with USB 2.0 printers. AXIS 5550 is equipped with a high-speed IEEE 1284 compatible parallel port and is USB 1.1 low and full speed compliant . Successfully tested with USB 2.0 printers. -
Page 11: Installation Methods
Product Overview Installation Methods Installation and Refer to the table below to select the appropriate installation method. All Axis Integration client software is available on the AXIS Network Product CD or from Axis’ Web site. Method/ Environment Description Client Software... -
Page 12: Features And Benefits
The internal print server Web pages, AXIS NetPilot (2.70 and up) and AXIS ThinWizard (3.0 and up) allow you to continuously monitor printer status. The Web pages are used to monitor single Axis units while AXIS NetPilot and AXIS ThinWizard can be used to monitor multiple Axis units. -
Page 13: Basic Installation
Test button Network Indicator USB printer port (USB1) Ethernet Power Power Adapter connector connector indicator Underside of AXIS 5500 MAC address (Ethernet address) example “S/N” can also appear as “Ser. No.” or “Serial no.” AXIS 5500 / AXIS 5550 User’s Manual... - Page 14 7. Wait 1 minute. Press the test button on the print server once to print a test page. The test page includes a list of the most important parameters. AXIS 5550 has two printer ports. If each port is connected to a printer, the default setting will send the test page to the parallel printer.
-
Page 15: Assigning An Ip Address To The Print Server
ARP table with the command 'arp -s' Ethernet Address You need to know the Ethernet address of your AXIS 5500/AXIS 5550 in order to assign an IP address to it. The Ethernet address is based upon the serial number of your print server. -
Page 16: The Ip Address
Basic Installation Methods for Setting You can set the IP address of your AXIS 5500/AXIS 5550 using one of the the IP Address following methods, depending on your network operating environment: Automatic IP Address Assignment Method Server required Comment Dynamic assignment of IP addresses. See... - Page 17 Notes: • The default host name of the AXIS 5500/AXIS 5550 is ’AXIS’ followed by the last 6 digits in the serial number. e.g. AXIS181636. The host name (Print server name) can be changed in the PS_NAME.
- Page 18 ARP (see “Set the IP Address using ARP in UNIX/Linux and Mac OS X” on page 20) or BOOTP (see “Set the IP Address using BOOTP in UNIX/Linux” on page 19). • You have to restart the print server to download the IP address. AXIS 5500 / AXIS 5550 User’s Manual...
- Page 19 Open a Command Prompt and enter the following commands: using ARP in Syntax Example arp -s <IP address> <Ethernet address> arp -s 192.168.3.191 00-40-8c-10-00-86 Windows 98/NT/ ping <IP address> ping 192.168.3.191 Me/2000/XP arp -d <IP address> arp -d 192.168.3.191 AXIS 5500 / AXIS 5550 User’s Manual...
- Page 20 • When you execute the ping command for the first time, you may experience a significantly longer response time than is usual • The ability to set the IP address with ARP and PING will only be enabled the first 4 minutes after restarting the print server AXIS 5500 / AXIS 5550 User’s Manual...
- Page 21 8. You have now finished the procedure of setting the IP address. Continue to “Adding a Network Printer to your Computer” on page 22. Note: If your print server does not appear in the serial number list, refer to the AXIS IP JumpStarter online help files. AXIS 5500 / AXIS 5550 User’s Manual...
-
Page 22: Adding A Network Printer To Your Computer
Note: For Windows 98, Me and NT, it is only necessary to install AXIS Print Monitor on a server for client/server printing. AXIS 5500 / AXIS 5550 User’s Manual... - Page 23 The network printer appears as a Local Printer (in Windows’ Add Printer Wizard and in AXIS Print Monitor), and needs to be added to each client computer that wants to print. Each client computer must install the appropriate printer drivers in order to print properly.
-
Page 24: Adding Printers In Windows
NetBIOS/NetBEUI using AXIS Print Monitor” on page 34 If you intend to use the print server in a multi-protocol environment, refer to the chapters pertaining to the respective operating systems in this manual. AXIS 5500 / AXIS 5550 User’s Manual... -
Page 25: Adding Printers In Windows 2000 And Xp Over Tcp/Ip
Enter the name of the printer (Example: \\aladdin\apple) and click Next (or leave the field empty and browse the network for which printer to install; click Next and select the printer to use. Click Next.) AXIS 5500 / AXIS 5550 User’s Manual... -
Page 26: Windows 2000
Printers (and Faxes). Select Properties from the Printer menu and click Ports then Configure Port. Click the LPR radio button and enter the queue name under LPR Settings: The available queues are: AXIS 5550: pr1, pr3, pr5, pr7= LPT1. Pr2, pr4, pr6, pr8=USB1 AXIS 5500: pr1-pr8= USB1 Click OK to finish. -
Page 27: Using The Microsoft Lpr Monitor With Windows 2000 And Xp
Enter the name of the server (or its IP address) in the field Name and address of server providing lpr (Example: AXIS100086) and enter the port you want to use in the field Name of printer or print queue on that server (Example: USB1). Click OK. AXIS 5500 / AXIS 5550 User’s Manual... -
Page 28: Adding Netbios/Netbeui Printers In Windows 2000 Using Axis Print Monitor
Adding NetBIOS/NetBEUI Printers in Windows 2000 using AXIS Print Monitor See to it that the NetBEUI protocol is installed on your client. Follow the procedure below to install Axis Printer Ports from a Windows 2000 workstation: AXIS 5500 / AXIS 5550 User’s Manual... -
Page 29: Adding Printers In Windows Nt 4 Using The Microsoft Lpr Monitor
Next. 4. Select NetBIOS/NetBEUI as your choice of network protocol and click OK. 5. Select the AXIS Port you want to add from the list of available ports. The port appears as <name>.<port> (Example: AX100086.LP1). The <port> is taken from the table below. Click OK. - Page 30 — AXIS 5550 USB1 LPT1 6. The added print server will now appear in the Available Ports list. 7. Click Next, choose an appropriate driver and finish the installation in the normal manner. AXIS 5500 / AXIS 5550 User’s Manual...
-
Page 31: Adding Netbios/Netbeui Printers In Windows Nt 4 Using Axis Print Monitor
Port... 4. Select NetBIOS/NetBEUI as your choice of network protocol and click OK. 5. Select the AXIS Port you want to add from the list of available ports. The port appears as <name>.<port> (Example: AX100086.LP1). The <port> is taken from the table below. Click OK. -
Page 32: Adding Printers In Windows 98 And Me Over Tcp/Ip Using Axis Print Monitor
Windows 98 and Me environments. AXIS Print Monitor is available on the AXIS Network Product CD and from the Axis Web site. AXIS Print Monitor AXIS Print Monitor allows an AXIS 5500/AXIS 5550 to be connected in the Overview same simple fashion as connecting a local printer. Once installed, it is automatically initialized upon system startup. - Page 33 Click Next. 8. In the next window, do not order a Test Page to be written, just click Finish. 9. AXIS Print Monitor now informs you that the printer has to be connected to another port. Click OK.
-
Page 34: Adding Printers In Windows 98 And Me Over Netbios/Netbeui Using Axis Print Monitor
5. Select the printer driver you want to install and click Next. 6. Select the AXIS Printer Port from the Available Ports list. The port names appears as <name>.<port>. Here, <name> is AX followed by the last six digits of the print server’s serial number (e.g. -
Page 35: Adding Printers In Unix/Linux
(or use the command su to temporarily change to the root user), and type the command /usr/sbin/printconf-tui from a shell prompt. Solaris 9 The printing tool is called Printer Administrator. This operating environment has an integrated printer driver list, but does not have printer detection functionality. AXIS 5500 / AXIS 5550 User’s Manual... -
Page 36: Typical Invokation Via A Windows Manager
• Local Printer • Printer on remote lpd server • Network printer (TCP/Socket) • Printer on SMB/Windows 95/98/NT server • A printer device URl Select the Network printer radio button and click Next. AXIS 5500 / AXIS 5550 User’s Manual... -
Page 37: Typical Invokation From A Terminal Window
(as described above). If you do not have the X Window System installed, the command will start a text based version. The same information as was described above will be needed. AXIS 5500 / AXIS 5550 User’s Manual... -
Page 38: Debian 3.0
Remote Queue and input filter — The remote printer queue and input filter. Click Next to continue. Click Select to choose a printer driver and to set it up. Click OK. Finally, click Test and print a test page. AXIS 5500 / AXIS 5550 User’s Manual... -
Page 39: Red Hat 7.3
• If a printer appears in the main printer list with the Queue Type set to INVALID, the printer configuration is missing options that are required for the printer to function properly. To remove this printer from the list, select it from the list and click the Delete button. AXIS 5500 / AXIS 5550 User’s Manual... -
Page 40: Suse 8.0
Then finish the wizard in the usual manner. SuSE 8.0 The printing system on SuSE Linux is based on an apsfilter, with some enhancements; SuSE's apsfilter will recognize all common file formats (including HTML, if html2ps is installed). AXIS 5500 / AXIS 5550 User’s Manual... - Page 41 • LPD protocol network printing (Forward queue to a remote LPD and Prefiltered queue for an LPD forwarding queue) • Other network printing (Samba/Windows, Novell) The SuSE installation manual explains the setup procedures in detail. AXIS 5500 / AXIS 5550 User’s Manual...
-
Page 42: Axis Axinstall Script
PROS, LPR, FTP or Reverse Telnet protocols. However, if you want to integrate the AXIS 5500/AXIS 5550 with your host spooler, you can use the Axis automatic installation script axinstall. This utility software is resident in the print server and can be downloaded to your host using FTP, so no disks are required. -
Page 43: Print Methods On Tcp/Ip Networks
Systems supported by axinstall Print Methods on TCP/IP Networks The AXIS 5500/AXIS 5550 supports several different print methods in the TCP/IP environment. axinstall will suggest a print method suitable for your particular UNIX/Linux system, but you might want to use another method depending on your printing requirements (banner pages, status logging, etc). - Page 44 This is the recommended method for UNIX/Linux systems, but some System V versions do not support LPD. Advantages: Easy to set up — install the AXIS 5500/AXIS 5550 as a remote queue in System V, or add a remote printer to using the /etc/printcap fields (BSD).
- Page 45 A sample JCL script, , is available in the directory of the print server. jclex It gives an example of how to print a file from an MVS mainframe to an AXIS 5500/AXIS 5550 using FTP. AXIS 5500 / AXIS 5550 User’s Manual...
-
Page 46: Adding Printers In Macintosh
2. Select Printers | Add Printer... 3. From the Printer List dialog, select AppleTalk. 4. Now, the port of your AXIS 5500 will appear in the list of available printers. The port is shown as <host name>_<port>. Example: AXIS100086_USB1. On an AXIS 5550 you will also have access to an LPT port, which will appear as LPT1 in the list. -
Page 47: Installation On An Older Mac, Using Appletalk
2. Click the LaserWriter icon. 3. If your network has more than one zone, click on the zone you want. (If your network does not have any zones, this box will not appear.) AXIS 5500 / AXIS 5550 User’s Manual... - Page 48 4. Click the name of the printer you want — the ports are shown as <host name>_<port>. Example: AXIS100086_USB1. On an AXIS 5550 you will also have access to an LPT port, which will appear as LPT1 in the list. Example: AXIS100086_LPT1.
- Page 49 Auto Detect Printer Type | Yes). • Some printers, e.g. Epson InkJet printers, can not be used when TBCP is enabled. Setting Parameters In AppleTalk, you can change a limited number of the parameters of the AXIS 5500/AXIS 5550. You can: •...
- Page 50 9. Close the Chooser. Note: The _CFG port disappears 60 minutes after the AXIS 5500/AXIS 5550 has been powered on. If you want it to reappear, you must restart your print server. AXIS 5500 / AXIS 5550 User’s Manual...
-
Page 51: Adding Printers In Netware
Mode)” on page 55 and then mode “Overview: Queue-based Printing Methods” on page 56 If you wish to print using iPrint, the following Axis snap-in tools are available from www.axis.com (Support | Select Software): • AXIS LPR Gateway Comfiguration Snap-in for i-Print in NetWare 5.x/NetWare 6.x... -
Page 52: Setup Using Ndps
NDPS: Notes: • The NDPS parameter of the AXIS 5500/AXIS 5550 must be enabled in order to permit communication between the print server and the NDPS gateway. Set this parameter in the print server’s internal Web pages: Admin | Network Settings | Detailed View | NetWare | NDPS Printing Protocol (default value=TCP_AND_SPX). -
Page 53: Setup Using Queue-Based Printing Over Ip/Ipx In Pserver Mode
• The Axis Gateway Configuration Utility is an installation and configuration tool for NDPS printers in the NetWare environment. The Axis Gateway will appear in NetWare 5.1 and later releases. To use the Axis Gateway with earlier versions of NetWare, you can download the Axis Gateway Configuration Utility from the Axis Web site. - Page 54 Adding Printers in NetWare mode. This method is only supported by Axis print servers with firmware version 6.0 and later and only in NDS environments. Pure IP is only supported by NetWare 5 or higher. In a Pure IP NetWare environment, the NetWare Administrator should be used to create the printer, print server and queue objects.
-
Page 55: Setup For Queue-Based Printing Over Ipx/Spx (Remote Printer Mode)
• If the status reads Not Connected, log in to the print server’s Web interface, choose Admin and click the Restart button. The print server status in RCONSOLE will then change from Not Connected to Waiting for job. AXIS 5500 / AXIS 5550 User’s Manual... -
Page 56: Overview: Queue-Based Printing Methods
Print Server Mode The AXIS 5500/AXIS 5550 logs in to a file server(s) and repeatedly polls the print queues for print jobs. In this fashion, the print server emulates a NetWare print server, which is a workstation running PSERVER. It provides high printing speed with low network load and is the recommended mode for medium to large sized networks. -
Page 57: Print Server Management Methods
Older versions of AppleTalk Chooser - page 47 Note: BOOTP and TFTP are powerful tools for configuring the AXIS 5500/AXIS 5550. Refer to the documentation for the BOOTP/TFTP server on your system for specific information. AXIS 5500 / AXIS 5550 User’s Manual... -
Page 58: Using A Web Browser For Print Server Management
Note: If the ROOT_PWD. parameter is set to pass (which is the default value), you have access to the User mode as well as the Admin mode. AXIS 5500 / AXIS 5550 User’s Manual... - Page 59 Print Server Management Methods Accessing the Follow the steps below to access the internal home page of the AXIS 5500/AXIS Web Pages 5550. 1. Start your Web browser. 2. In the Location/Address field, type the host name or the IP address of your print server.
- Page 60 A log that displays accumulated usage of the connected printers allows you to control the usage of the connected printers. The Help page presents you with basic information about the AXIS 5500/AXIS Help 5550 and the Web user interface. A short description of the Axis installation tools you should use when installing a printer on your computer is also included.
- Page 61 This Print Server The This Print Server page contains a section that allows you to view and modify the general parameter settings of the AXIS 5500/AXIS 5550, including print server name, node address, password and base URL. You can also configure any of the eight available logical printers of the print server.
- Page 62 Will reset all print server parameters and settings to their factory default values except • Node Address (NODE_ADDR.) • IP Address (INT_ADDR.) • DHCP enabled or disabled (DHCP_ENB.) • Installed certificate • Private key Firmware Upgrade Upgrades the print server’s internal software. AXIS 5500 / AXIS 5550 User’s Manual...
-
Page 63: Using Axis Thinwizard For Print Server Management
AXIS Thin Wizard 3.0 is Windows 2000 and Windows XP compatible. Installing AXIS AXIS ThinWizard is available on the AXIS Network Product CD and can also be ThinWizard downloaded from the Axis Web site. You should only install AXIS ThinWizard on a designated computer on your network. - Page 64 3. The Create Network Group page opens. Type the name of the network group, enter the IP address ranges and Axis server types that should be included. If you are only interested in managing print servers, deselect all options but the print server option.
- Page 65 3. Click the link of the AXIS 5500/AXIS 5550 to access its internal Web page. 4. The ‘Srv’ and ‘Dev’ columns show the status of your print servers and printers.
-
Page 66: Using Axis Netpilot For Print Server Management
Installing a Network When started, AXIS NetPilot scans the network for Network Print Servers. All Print Server found will be placed in the folder New AXIS Units. Highlight the one you want to install and click Install. Print Server Select one of the two options: Installation Options with Installation Wizard. - Page 67 To Create a Print Click on the Axis Units folder. Select New Print Server Group from the File Server Group menu, or click the New Group Button on the toolbar. Enter the name for the print server group in the dialog box and click OK.
- Page 68 Additional For additional information, please refer to the AXIS NetPilot on-line help. Information AXIS 5500 / AXIS 5550 User’s Manual...
-
Page 69: Using Ftp For Print Server Management
• It is important that the destination file is specified in capital letters. Otherwise the edits are temporary and will be lost once the AXIS 5500/AXIS 5550 has been powered down. • To edit the config file on older MacOS versions, you will need FTP support such as MacTCP, Fetch or Anarchie. - Page 70 The status command shows which printer port the logical printers are assigned the Status File to, and their current status. Follow the instructions below to view the status file using FTP: 1. Log in to the AXIS 5500/AXIS 5550 by typing: in a Command window ftp <host name> ftp <IP address>...
-
Page 71: Using Telnet For Print Server Management
FTP instruction sets above, a list of all print server specific commands will be displayed. Using Telnet for Print Server Management Having assigned an IP address to your AXIS 5500/AXIS 5550, as described in earlier in this manual, you can manage your print server using the telnet protocol. - Page 72 > telnet npserver Trying 192.36.253.96... Connected to npserver. Escape character is ‘^]’. Axis Network Print Server TELNET Print Server vx.xx March 19 2003 Axis Network Print Server network login: root (not visible) Password: pass Axis Network Print Server TELNET Print Server vx.xx March 19 2003 Root>...
-
Page 73: Using Novell Utilities For Print Server Management
Print Server Management Methods Using Novell Utilities for Print Server Management After installing the AXIS 5500/AXIS 5550 into the NetWare environment, you can manage your print server, using either Novell’s NetWare Administrator, or PCONSOLE (not available in NetWare version 5.x or higher). - Page 74 Print Server Management Methods Print Layout You can view installed AXIS 5500/AXIS 5550s and their relative print queues for any NetWare Organizational Unit. You can also display summary information by right-clicking on the printer object you want to examine. NetWare Print Layout with corresponding information summary...
-
Page 75: Configuration Possibilities
Configuration Possibilities Section 9 Configuration Possibilities This section describes some special features offered by the AXIS 5500/AXIS 5550: Autodetect Printer Type, on page 75 AutoIP, on page 75 Flash Loading of Firmware over the Web, on page 92 IPP (Internet Printing Protocol), on page 76... -
Page 76: Ipp (Internet Printing Protocol)
1.1 standard, which uses an ipp:// address scheme Example using a If “axisps” is the host name of the AXIS 5500/AXIS 5550, "631" is the port Host Name number and "USB1" is the local printer port name, then the syntax of the in the 1.0 Standard:... - Page 77 • Printing System Web site at www.cups.org). If you wish to print using iPrint over IPP, the following Axis snap-in tool is available from www.axis.com (Support | Select Software): • AXIS IPP Gateway Comfiguration Snap-in for i-Print in NetWare 5.x.
- Page 78 1. Select the IPP printer to which you want to send your document. Choose the destination printer from the Printer name field (in File | Print). 2. When you press Print, the print job is sent over the Internet to the AXIS 5500/AXIS 5550, which then forwards the print job to the destination printer.
- Page 79 Network print server. Choose My Computer and click Next. 5. In the Available Ports window, click Add Port: 6. The Printer Ports dialog will appear, showing a list of Available Printer Ports. AXIS 5500 / AXIS 5550 User’s Manual...
- Page 80 8. The HP Internet Printer Connection will start. Click Next. 9. In the IP Address, Host Name or URL field, type the http:// address of the AXIS 5500/AXIS 5550 to which the destination printer is connected. The URL will automatically appear in the Port Name field as well: (Example: http://171.16.5.218:631/LPT1 if you have an AXIS 5500 and want...
- Page 81 Adding an IPP printer to your printer list is described below. 2. When you press Print, the print job is sent over the Internet to the AXIS 5500/AXIS 5550, which then forwards the print job to the destination printer.
- Page 82 Configuration Possibilities 4. Enter the printer http:// address in the URL field. (Example: http://171.16.5.218:631/LPT1 if you have an AXIS 5500 and want to address the parallel port or http://171.16.5.218:631/USB1 to address the USB port.) Click Next. 5. If you do not have a driver corresponding to the destination printer installed on your computer, the Wizard will prompt you to install one.
- Page 83 Configuration Possibilities 8. The new printer is added to your Select Printer window: 9. You are now ready to print using IPP: specify your new destination printer from the printer list and click Print. AXIS 5500 / AXIS 5550 User’s Manual...
-
Page 84: Logical Printers For Customized Printing
• The examples should only be viewed as suggestions how to configure the logical printers. You should, of course, configure them according to the needs of your network. • In the Parameter List chapter of this manual, you can find a complete list of the AXIS 5500/AXIS 5550 parameters. - Page 85 Your network contains a host using the character set ISO 8859-2 and a host using the character set DEC. In order to direct print jobs to the printer connected to the AXIS 5500/AXIS 5550, you should assign the host to a separate logical printer, and install a character set conversion filter.
- Page 86 ) for logical printer PR1. 0D 0A Follow the instructions below to substitute command strings: 1. From the print server’s internal Web page, select Admin | Logical Printers. 2. Select the PR1 Web page. AXIS 5500 / AXIS 5550 User’s Manual...
- Page 87 Extensive use of string substitutions will naturally decrease the throughput rate of the AXIS 5500/AXIS 5550. ASCII to Postscript The AXIS 5500/AXIS 5550 AXIS 5500/AXIS 5550 logical printers can translate Conversion ASCII print data into PostScript format. This makes it possible to print on a PostScript printer from a host that does not support PostScript.
- Page 88 Printers. 2. Select the PR2 tab. 3. Set the Printer Language Translation parameter to POSTSCR. 4. Set the PostScript Page Size parameter to LETTER. 5. Set the PostScript Page Orientation parameter to LANDS. AXIS 5500 / AXIS 5550 User’s Manual...
- Page 89 If print data is received for a printer that is already busy, the host normally when a Printer is Busy must wait. However, if you have an AXIS 5500 it is possible to use a logical printer to redirect the print data to another logical printer when the target printer is busy.
-
Page 90: Network Speed
Configuration Possibilities Read Back of The AXIS 5500/AXIS 5550 supports bi-directional printing. The information information from the printer is read back on the parallel port when the parameter Read Back Port (PRx_IN.) has the default setting of AUTO. However, it is required that the printer also supports bi-directional printing. -
Page 91: Netware Packet Signature Level 1,2,3
The person responsible for changing the toner in the printer PRINTER OFFLINE The person responsible for the overall maintenance of printer 2. Enter the respective e-mail addresses of the trouble-report recipients in the blank fields. Example: name@company.com 3. Click OK when done. AXIS 5500 / AXIS 5550 User’s Manual... -
Page 92: Flash Loading Of Firmware Over The Web
The firmware can easily be upgraded, since flash loading over the Web is possible from the print server’s internal Web pages. Client software is not needed to upgrade the firmware. See Upgrading from the Print Server’s Internal Web Pages, on page 100. AXIS 5500 / AXIS 5550 User’s Manual... -
Page 93: Enabling Secure Web Services - Ssl/Tls
Configuration Possibilities Enabling Secure Web Services — SSL/TLS In a new and unconfigured AXIS 5500/AXIS 5550, SSL/TLS is disabled. Certificates To use SSL/TLS you have to create or obtain a digital certificate. There are two kinds of certificates: self-signed certificates and third party certificates. - Page 94 Web interface in the secure way, i.e. via https://. Disabling Protocols To further increase security, you must disable protocols that are considered insecure; • FTP (used by AXIS ThinWizard. If FTP is disabled, AXIS ThinWizard can not function properly.) • Telnet • Auto-IP •...
- Page 95 Security Settings and click View next to the Certificate. To Delete a Certificate To delete a Certificate, open the print server’s Web interface, select Admin | Security Settings and click Delete next to the Certificate. AXIS 5500 / AXIS 5550 User’s Manual...
-
Page 96: Troubleshooting
Support question. General The USB port in an AXIS 5500 / AXIS 5550 only supports USB printers. If any other USB device has been connected to this port, the print server must be restarted before it can function properly again. - Page 97 By sending a data packet to a specific IP address and waiting for a reply, Ping Ping can determine whether that IP address is accessible. Ping can also help you to determine IP address conflicts with your AXIS 5500/AXIS 5550 and troubleshoot TCP/IP problems on the network. Follow the instructions below to diagnose your problem.
- Page 98 Raw Settings - Port Number as follows: 5500: 9100 5550: USB = 9101, LPT1 = 9100 Click OK and close the window. Print a test page to verify your installation. AXIS 5500 / AXIS 5550 User’s Manual...
- Page 99 3. Save the Server report as an HTML file (with an .html file extension) and go to the Axis Web site. 4. Choose Support and report your case, attaching the Server Report. Please visit the Axis Web site for more support and additional help through the FAQ database. AXIS 5500 / AXIS 5550 User’s Manual...
-
Page 100: Updating The Firmware
Updating the Firmware Section 11 Updating the Firmware Upgrading the Firmware You can upgrade the AXIS 5500/AXIS 5550 firmware using one of the following methods: • AXIS ThinWizard (TCP/IP) • From the print server’s internal Web pages (TCP/IP) • FTP (TCP/IP) Note: Updating instructions are supplied with the firmware release notes. -
Page 101: Obtaining The Software
You can use any of the previously mentioned methods to obtain the new file. You must assign an IP address to the AXIS 5500/AXIS 5550 before you can use this upgrading method. Follow the procedures below to upgrade the print server: Caution! Be careful not to interrupt the file transfer. -
Page 102: The Test Button
The Test Button Section 12 The Test Button The test button is located on the front right hand side of the AXIS 5500/AXIS 5550 and is used for: • Printing a test page to check the connection to the printer. - Page 103 • DHCP enabled or disabled (DHCP_ENB.) • Installed certificate • Private key If you want to change these parameters, use any standard Web browser. Please refer to Section 8 Print Server Management Methods, on page 57. AXIS 5500 / AXIS 5550 User’s Manual...
-
Page 104: Technical Specification
Netscape Communicator 4.7 and above, Internet Explorer 4.0 and above, Mozilla 1.0 and above. Supported Protocols Windows and OS/2: NetBIOS/NetBEUI or TCP/IP, WINS. NetWare: IPX, IP, iPrint, SAP, RIP, SPX and NCP (extended with NDS), NDPS, NLSP, DIAG, AXIS 5500 / AXIS 5550 User’s Manual... - Page 105 Printer Ports AXIS 5500: One USB printer port. AXIS 5550: One parallel port with a CN36 (male) connector and one USB port. AXIS 5500 / AXIS 5550 User’s Manual...
- Page 106 55022:1998 (CISPR 22:1997) Class B. Safety EN 60950, approved power supplies for all countries. Hardware 32-bit 100 MHz AXIS ETRAX 100LX RISC Controller, 2 MB Flash memory, 8 MB RAM. Front Panel 2 LED indicators for Power and Network. Test button for information printouts.
-
Page 107: The Parameter List
The Parameter List Section 14 The Parameter List This section provides an overview of the AXIS 5500 and AXIS 5550 print server parameters. See the Axis Web site for latest technical information. config File See Using FTP for Print Server Management, on page 69 for information on how to fetch the print server’s config file. - Page 108 The Parameter List AXIS 5500 has one printer port: a USB port, which means that LPT1 is not among the Possible values. In this print server, USB1 is the default port. Below, all parameters are listed in the same order as they appear in the config...
- Page 109 Primary DNS server address DNS_ADDR2. x x x x Secondary DNS server address Domain name, defining the domain to which this AXIS DOMAIN_NAME. 5500/AXIS 5550 belongs Defines the SLP scope to which this print server be- SLP_SCOPE_LIST.
- Page 110 NCP Burst Mode Enabled (Requires Restart) PSERVER_NDS_TREE. The PSERVER_NDS parameters specify which NDS PSERVER_NDS_FILESERVER. tree or file server the AXIS 5500/AXIS 5550 will log in to. It also specifies the path to the print server object PSERVER_NDS_DISTINGUIS in the tree.
- Page 111 FR_AUTO (FR_AUTO, FR_802_2, FR_DIX) NetBIOS Frame Type (Requires Restart) Name Printer 1 LPRINT_1. AXxxxxxx.LP1 In AXIS 5500, LPRINT_1. has AXxxxxxx.US1 as default PR1 (PR1, PR2, PR3, PR4, PR5, PR6, PR7, PR8, LPT1, LLOGIC_1. Logical Printer for Printer 1 USB1) LPRINT_2.
- Page 112 NO (YES, NO) Autodetect Printer Enabled Name of Printer 1, where xxxxxx are the last six digits APRINT_1. AXISxxxxxx_LPT1 of the serial number. In AXIS 5500, APRINT_1. has AXISxxxxxx_USB1 as default ATYPE_1. LaserWriter Type Printer 1 PR1 (PR1, PR2, PR3, PR4, PR5, PR6, PR7, PR8, LPT1, ALOGIC_1.
- Page 113 In the print server’s Web interface, select Admin | Logical Printers | PR1. Parameter Default value (Possible values) Comments Physical Port PR1_OUT. LPT1 (NONE, LPT1, USB1) In AXIS 5500, PR1_OUT. points to USB1 as default PR1_NAME. PR1_SCND. PR1 (PR1, PR2, PR3, PR4, PR5, PR6, PR7, PR8) Secondary Printer PR1_WAIT. YES (YES, NO) Wait on Busy PR1_IN.
- Page 114 In the print server’s Web interface, select Admin | Logical Printers | PR3. Parameter Default value (Possible values) Comments Physical Port PR3_OUT. LPT1 (NONE, LPT1, USB1) In AXIS 5500, PR3_OUT. points to USB1 as default PR3_NAME. PR3_SCND. PR3 (PR1, PR2, PR3, PR4, PR5, PR6, PR7, PR8) Secondary Printer PR3_WAIT. YES (YES, NO) Wait on Busy PR3_IN.
- Page 115 In the print server’s Web interface, select Admin | Logical Printers | PR5. Parameter Default value (Possible values) Comments Physical Port PR5_OUT. LPT1 (NONE, LPT1, USB1) In AXIS 5500, PR5_OUT. points to USB1 as default PR5_NAME. PR5_SCND. PR5 (PR1, PR2, PR3, PR4, PR5, PR6, PR7, PR8) Secondary Printer PR5_WAIT. YES (YES, NO) Wait on Busy PR5_IN.
- Page 116 In the print server’s Web interface, select Admin | Logical Printers | PR7. Parameter Default value (Possible values) Comments Physical Port PR7_OUT. LPT1 (NONE, LPT1, USB1) In AXIS 5500, PR7_OUT. points to USB1 as default PR7_NAME. PR7_SCND. PR7 (PR1, PR2, PR3, PR4, PR5, PR6, PR7, PR8) Secondary Printer PR7_WAIT. YES (YES, NO) Wait on Busy PR7_IN.
- Page 117 Network Administrator e-mail address PAPER_JAM_ADDRESS. e-mail address of Paper-jam Administrator OUT_OF_PAPER_ADDRESS. e-mail address of Out-Of-Paper Administrator TONER_LOW_ADDRESS. e-mail address of Toner-Low Administrator NO_TONER_ADDRESS. e-mail address of No-Toner Administrator PRINTER_OFFLINE_ADDRESS e-mail address of Printer-Offline Administrator AXIS 5500 / AXIS 5550 User’s Manual...
-
Page 118: Netware Parameter Combinations
7. Looking for SAP NetwWare fileservers on the net (see Note c). Notes: (a) TCP printing must be enabled (TCP_ENB. = YES). (b) Some other SAP service must be present on the network. (c) At least one frametype must be enabled for NetWare. AXIS 5500 / AXIS 5550 User’s Manual... -
Page 119: Tcp Ports Opened For Raw Printing
9900 LPT1 — AXIS_PRINT_SYSTEM. Enabled 9902 USB1 — 9100 LPT1 — NDPS. Enabled 9101 USB1 — Note: The TCP port numbers entered in RTEL_PRx. will override the settings in the two tables above. AXIS 5500 / AXIS 5550 User’s Manual... -
Page 120: Glossary
Dynamic Host Configuration Protocol. Enables e.g. a print server to automatically obtain an unused IP address from the DHCP server. To fully benefit from this method, the AXIS 5500/AXIS 5550 also supports DDNS, which is available in Windows 2000 networks. - Page 121 A logical printer acts as a filter between the network and the physical printer. It appears to the user as a normal printer with additional characteristics. For example a UNIX/Linux workstation may only send a line feed (LF) to a shared AXIS 5500 / AXIS 5550 User’s Manual...
- Page 122 SNMP Simple Network Management Protocol. Standard management protocol for network attached devices. Secure Sockets Layer, a protocol designed to provide secure communications on the Internet. AXIS 5500 / AXIS 5550 User’s Manual...
- Page 123 A special form of user assistance that automates a task through a dialog with the user. Wizards help the user to accomplish tasks that are complex and require experience, and even for the experienced user can help to speed up an operation. AXIS 5500 / AXIS 5550 User’s Manual...
- Page 124 Character Set Conversion 84 Hex Dump Mode 90 Checking SSL/TLS Status 95 Host Name 17 Client/Server Printing 120 HTML 121 Config File 57, 107, 120 HTTP 121 Configuration HTTPS 94, 121 Overview 57 AXIS 5500 / AXIS 5550 User’s Manual...
- Page 125 Test Page 102 NetWare Packet Signature 91 Protocols NetWare Parameter Combinations 118 Disable 94 NetWare Printing Modes Enable 94 Print Server Mode 56 PSERVER Mode 53 Remote Printer Mode 56 Pure IP 53, 55 AXIS 5500 / AXIS 5550 User’s Manual...
- Page 126 Test Button 10, 102 Test Page 102 TFTP 19, 57, 123 TLS 93, 123 Troubleshooting 96 UNIX 123 UNIX/Linux Printing Methods FTP 44 LPD 44 PROS A 44 PROS B 45 Reverse Telnet 45 AXIS 5500 / AXIS 5550 User’s Manual...
Need help?
Do you have a question about the 5500 and is the answer not in the manual?
Questions and answers