Table of Contents
Advertisement
Quick Links
Advertisement
Table of Contents

Related Manuals for Kramer 905


Summary of Contents for Kramer 905
-
Page 1: User Manual
Kramer Electronics, Ltd. USER MANUAL Model: Power Amplifier... -
Page 2: Table Of Contents
Contents Introduction Getting Started Quick Start Overview Your 905 Power Amplifier Installing the 905 in a Rack Connecting the 905 Power Amplifier Connecting the 905 via RS-232 Operating the 905 Power Amplifier Using the Front Panel Buttons 7.1.1 Adjusting the Volume 7.1.2... - Page 3 Contents Figures Figure 1: 905 Power Amplifier Figure 2: Connecting the 905 Power Amplifier Figure 3: Audio Control Window Tables Table 1: 905 Power Amplifier Functions Table 2: 905 Technical Specifications Table 3: Communication Parameters KRAMER: SIMPLE CREATIVE TECHNOLOGY...
-
Page 4: Introduction
Our 1,000-plus different models now appear in 11 groups that are clearly defined by function. Thank you for purchasing the Kramer 905 Power Amplifier, which is ideal for: • Presentation rooms and multimedia applications for quick, local audio amplification •... -
Page 5: Quick Start
Contents Quick Start This quick start chart summarizes the basic setup and operation steps. KRAMER: SIMPLE CREATIVE TECHNOLOGY... -
Page 6: Overview
• Directly, via the front panel push buttons • By RS-232 serial commands transmitted by a touch screen system, PC, or other serial controller The 905 is housed in a 19” 1U enclosure and is powered by a universal AC power supply. To achieve the best performance: •... -
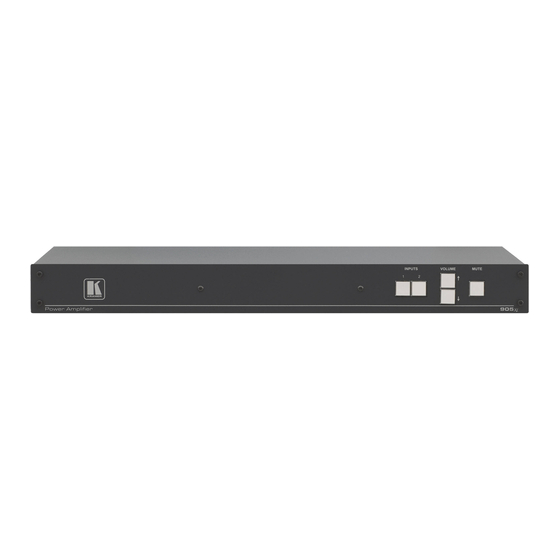
Page 7: Figure 1: 905 Power Amplifier
Your 905 Power Amplifier Figure 1: 905 Power Amplifier KRAMER: SIMPLE CREATIVE TECHNOLOGY... -
Page 8: Table 1: 905 Power Amplifier Functions
Your 905 Power Amplifier Table 1: 905 Power Amplifier Functions Feature Function INPUT SELECTOR 1,2 Buttons Press to select the input audio source 1 (unbalanced) or 2 (balanced) Volume ↑↓ Buttons Press to increase or decrease the output volume MUTE Button Press to turn off or turn on the audio output. -
Page 9: Installing The 905 In A Rack
Installing the 905 in a Rack Installing the 905 in a Rack This section provides instructions for rack mounting the 1U unit. KRAMER: SIMPLE CREATIVE TECHNOLOGY... -
Page 10: Connecting The 905 Power Amplifier
Connecting the 905 Power Amplifier Connecting the 905 Power Amplifier To connect the 905, as illustrated in the example in Figure 2, do the following: 1. Connect an unbalanced stereo audio source (for example, the unbalanced output of the DVD 1 player) to the L and R INPUT 1 RCA connectors. -
Page 11: Connecting The 905 Via Rs-232
Operating the 905 Power Amplifier Connecting the 905 via RS-232 You can connect to the 905 via an RS-232 connection using, for example, a PC. Note that a null-modem adapter/connection is not required. To connect to the 905 via RS-232: •... -
Page 12: Mixing The Input Signals
To exit the mixing mode, press the selected input. Using the Audio Control Program The 905 Audio Control Program allows you to adjust the volume and to operate equalization controls for treble, mid-level and bass that cannot be adjusted from the front panel. -
Page 13: Using Serial Commands
Operating the 905 Power Amplifier Figure 3: Audio Control Window Using Serial Commands To operate your device using serial commands, you need to install Kramer's control software that can be downloaded from the Kramer Electronics Web site For an explanation of all control commands, see section 1 Download control software from our Web site at http://www.kramerelectronics.com... -
Page 14: Technical Specifications
Technical Specifications Technical Specifications 905 technical specifications are shown in Table Table 2: 905 Technical Specifications INPUTS: 1 unbalanced stereo audio input on RCA connectors 1 balanced stereo audio input on a 5-pin terminal block connector OUTPUTS: 1 speaker stereo audio output on a 4-pin terminal block connector INPUT SENSITIVITY: 8Ω: 320mVpp (unbalanced), 690mVpp (balanced) -
Page 15: 905 Commands In Protocol 3000
905 Commands in Protocol 3000 905 Commands in Protocol 3000 This section describes all commands sent to the 905. For an explanation of the syntax and use of Protocol 3000, see section O perating Commands 1 4 B Following are the specific commands that the room controller (RC device) sends to the 905 to operate the external devices. -
Page 16: Audio Parameters Commands
For example: ‘0’ for input level, ‘1’ for pre-amplifier, ‘2’ for amplifier (OUT) etc. CHANNEL = Input or Output # VOLUME / BASS / TREBLE / MID_RANGE = Audio parameter in Kramer units, minus sign precedes negative values. ++ increase current value, -- decrease current value. -
Page 17: Protocol 3000 Syntax
905 Commands in Protocol 3000 Protocol 3000 Syntax Protocol 3000 is used to control the 905 via an RS-232 connection using a PC, touch screen, other serial controller or RC type controller. 9.7.1 Host Message Format Start Address (optional) Body... -
Page 18: Entering Commands
9.7.3 Entering Commands You can directly enter all commands using a terminal with ASCII communications software, such as HyperTerminal, Hercules, etc. Connect the terminal to the serial, Ethernet, or USB port on the Kramer device. To enter , press the Enter key. -
Page 19: Maximum String Length
905 Commands in Protocol 3000 Commands in the string do not execute until the closing character is entered. A separate response is sent for every command in the chain. 9.7.6 Maximum String Length 64 characters KRAMER: SIMPLE CREATIVE TECHNOLOGY... - Page 20 EXCLUSION OF DAMAGES The liability of Kramer for any effective products is limited to the repair or replacement of the product at our option. Kramer shall not be liable for: 1. Damage to other property caused by defects in this product, damages based upon inconvenience, loss of use of the product, loss of time, commercial loss;...
- Page 21 For the latest information on our products and a list of Kramer distributors, visit our Web site: www.kramerelectronics.com where updates to this user manual may be found. We welcome your questions, comments and feedback. Safety Warning: Disconnect the unit from the power supply before opening/servicing.
Need help?
Do you have a question about the 905 and is the answer not in the manual?
Questions and answers