Table of Contents
Advertisement
Tools required for assembly (Not Included): Pliers, Philips & Flathead Screwdrivers,
This instruction manual contains important information necessary for the proper assembly
and safe use of the appliance.
Read and follow all warnings and instructions before assembling and using the appliance.
Follow all warnings and instructions when using the appliance.
Keep this manual for future reference.
OUTDOOR USE ONLY.
Never use grill indoors. Carbon Monoxide poisoning can lead to death. Do not operate
grill indoors or in an enclosed space.
Dual Zone Charcoal Grill
Owner's Manual
Model # GR1031-014903
Adjustable Wrench.
WARNING
P. 1
Advertisement
Table of Contents

Related Manuals for Kingsford GR1031-014903


Summary of Contents for Kingsford GR1031-014903
- Page 1 Dual Zone Charcoal Grill Owner’s Manual Model # GR1031-014903 Tools required for assembly (Not Included): Pliers, Philips & Flathead Screwdrivers, Adjustable Wrench. This instruction manual contains important information necessary for the proper assembly and safe use of the appliance. Read and follow all warnings and instructions before assembling and using the appliance.
- Page 2 WARNING Only use this grill on a hard, level, non-combustible, stable surface (concrete, ground, etc.) capable of supporting the weight of the grill. Never use on wooden or other surfaces that could burn. DO NOT use grill without charcoal ash tray in place. DO NOT attempt to remove charcoal ash tray while coals are hot.
-
Page 3: Assembly Instructions
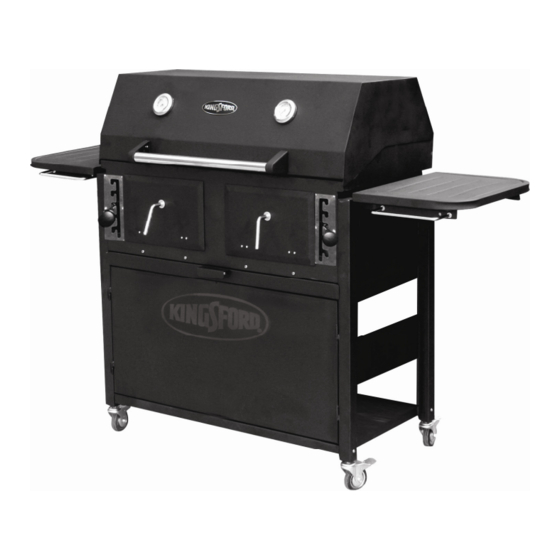
WARNING When grilling, grease from meat may drip into the charcoal and cause a grease fire. If this should happen close lid to suffocate the flame. Do not use water to extinguish grease fires. Use caution when opening the lid. Keep hands, face and body a safe distance away. Flash flare ups may occur when air comes into contact with fire or hot coals. - Page 4 Product diagram P. 4...
- Page 5 STOP! DO NOT RETURN TO RETAILER. For assembly assistance, missing or damaged parts, please contact Rankam customer service at customerservice@rankam.com or call 1-888-837-1380, Monday thru Friday 9AM to 5PM Eastern Standard Time. Component List P. 5...
-
Page 6: Assembly Procedures
Hardware List Bolt M6X35 Bolt M6X15 Bolt M6X10 Flange Nut M6 Lock Nut M10 Hinge Pin Cotter Pin Washer Nut M6 Insulating Washer ASSEMBLY PROCEDURES Symbol: The following symbols will be shown in each procedure for indication of tightening the bolt and nut if necessary. Hand Tighten only at this time Tighten with tools at this time Some steps may require the assistance of another adult. - Page 7 Step 1. Step 2. P. 7...
- Page 8 Step 3. Step 4 P. 8...
- Page 9 Step 5 Step 6 P. 9...
- Page 10 Step 7. Step 8. Place lifter parallel to the bottom of the grill and put into the middle notch. This is the best position to assemble the adjuster. P. 10...
- Page 11 Step 9. Step 10. P. 11...
- Page 12 Step 11 Tighten Bracket by screw(C) through lid – bracket – nut (J) Step 12 P. 12...
- Page 13 Step 13. Step 14 In this step, please tighten all the bolts. Step 15 P. 13...
- Page 14 Step 16 P. 14...
-
Page 15: Preparation For Use & Lighting Instructions
WARNING DO NOT use grill without charcoal ash pan in place. DO NOT attempt to remove charcoal ash pan while pan contains hot coals. WARNING Place the grill outdoors on a hard, level, non-combustible surface away from roof overhang or any combustible material. - Page 16 NOTE: To extend the life of your grill, make sure that hot coals and wood do not touch the walls of grill. IF USING CHARCOAL CHIMNEY STARTER, PROCEED TO STEP 5. If you choose to use charcoal lighting fluid, ONLY use charcoal lighting fluid approved for lighting charcoal. Do not use gasoline, kerosene, alcohol or other flammable material for lighting charcoal.
-
Page 17: Operating Instructions
OPERATING INSTRUCTIONS SMOKING Step 1 Remove center divider, and then follow instructions below carefully to build a fire. You may use charcoal and/or wood as fuel in the grill (see “Adding Charcoal/Wood During Cooking” section of this manual). WARNING DO NOT use grill without charcoal ash tray in place. DO NOT attempt to remove charcoal ash tray while tray contains hot coals. -
Page 18: Smoke Cooking Tips
WARNING Always wear oven mitts/gloves when adjusting cooking levels to protect your hands from burns. Step 7 Place food on right side cooking grill and close lid and doors. Step 8 The ideal smoking temperature is between 175° F (79°C) and 250° F (121° C). For large cuts of meat, allow approximately one hour of cooking time per pound of meat. - Page 19 If using a Charcoal Chimney Starter, follow “Operating Instruction Step 4” or follow all manufacturer’s warnings and instructions regarding the use of their product. Start with 5 to 6 pounds (2.3 to 2.7 kg) of charcoal. When charcoal is burning strong, carefully place hot coals in center of each charcoal grate.
-
Page 20: Flavoring Wood
Flavoring Wood To obtain your favorite smoke flavor, experiment by using chunks, sticks or chips of flavor producing wood such as hickory, pecan, apple, cherry, or mesquite. Most fruit or nut tree wood may be used for smoke flavoring. Do not use resinous wood such as pine as it will produce an unpleasant taste. - Page 21 Step 3 Stand back at a safe distance and use long cooking tongs to lightly brush aside ashes on hot coals. Use cooking tongs to add charcoal and/or wood to charcoal grates, being careful not to stir-up ashes and sparks. If necessary, use your Charcoal Chimney Starter to light additional charcoal and/or wood and add to existing fire.
-
Page 22: After-Use Safety
AFTER-USE SAFETY WARNING Always allow grill and all components to cool completely before handling. Never leave coals and ashes in grill unattended. Make sure coals and ashes are completely extinguished before removing. Before grill can be left unattended, remaining coals and ashes must be removed from grill. Use caution to protect yourself and property. -
Page 23: Limited Warranty
LIMITED WARRANTY 1. Manufacturer warrants this Product to be free from defects in workmanship and materials for a period of 1 year from the date of purchase, provided claims are submitted, in writing, with proof of purchase. 2. If any part of this item fails because of a manufacturing defect within the Limited Warranty Period, Manufacturer offers to replace such part(s) provide that such parts have not been improperly repaired, altered, or tampered with or subject to misuse, abuse or exposed to corrosive conditions. - Page 24 Mon to Fri, 9:00 a.m. – 5:00 p.m. Eastern Standard Time. or by email customerservice@rankam.com KINGSFORD® AND THE KINGSFORD LOGOARE REGISTERED TRADEMARKS OF THE KINDSFORD PRODUCTS COMPANY, LLC AND ARE USED UNDER LICENSE BY RANKAM METAL PRODUCTS MANUFACTORY LTD. ALL RIGHTS RESERVED P. 24...
Need help?
Do you have a question about the GR1031-014903 and is the answer not in the manual?
Questions and answers