Table of Contents
Advertisement
Advertisement
Table of Contents

Related Manuals for LENCO L-175


Summary of Contents for LENCO L-175
-
Page 1: User Manual
L-175 Direct drive glass turntable User Manual www.lenco.com... -
Page 2: Table Of Contents
Table of content Table of content ---------------------------------------------------------------------- 2 Description ---------------------------------------------------------------------------4-5 Initial starting-up ---------------------------------------------------------------------- 6 Mount and adjust --------------------------------------------------------------------- 6 Mains connection --------------------------------------------------------------------- 7 Amplifier connection ----------------------------------------------------------------- 7 Playing a record ---------------------------------------------------------------------- 8 Record to PC -------------------------------------------------------------------------- 8 Maintenance --------------------------------------------------------------------------- 9 To replace the stylus ---------------------------------------------------------------- 9 To disassemble the cartridge ----------------------------------------------------- 9 Important recommendations ------------------------------------------------------- 9... - Page 3 Dear customer, Thank you for buying this Lenco product. Quality and usability is our top priority. In order to let you fully enjoy this turntable, we have manufactured this product using high quality standards, materials, components, and care. Please read all safety instructions and national restrictions, before you use this turntable.
-
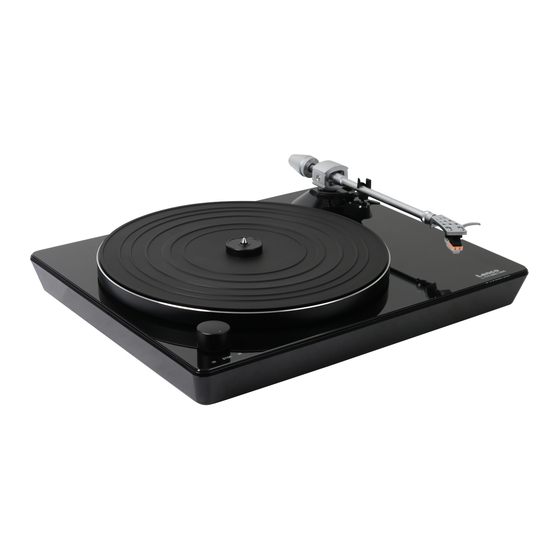
Page 4: Description
Description 1. Counterweight The counterweight is used for precise adjustment of the stylus pressure on the vinyl, to properly balance the tone arm. 2. Anti-Skating Control Use this to set the anti-skating function of the tone arm. 3. Tone arm Lever Use this lever to lower and raise the tone arm. - Page 5 During PAUSE mode (33/STOP/45 switch is on “STOP” position), the motor is still activated, switch off the player after use to save energy. When installing the L-175 please make sure not to place it directly on top of your Amplifier. (Amplifiers are known to cause hum noise on turntables.)
-
Page 6: Initial Starting-Up
Initial starting-up Mount and adjust Place the aluminum turntable platter. Insert the counterweight on the end of the tone arm, lock it into place. Adjusting the stylus pressure Turn the anti-skating knob counter-clockwise to “0”. Pull down the protective cover of the stylus. Place the lever for the tone arm lift in the front position. -
Page 7: Mains Connection
Mains Connection An external switching power adaptor (DC24V/1A) is supplied with this turntable. Your unit is ready to be connected to a main voltage of 110V/60Hz or 230V/50Hz. Amplifier Connection There is a Phono/Line selector next to the RCA jack on the rear panel of the turntable. -
Page 8: Playing A Record
Playing a record Place the record on the turntable. If it is a 45 rpm, you need to place the adaptor on the record spindle. Choose the playing speed, record Release the pick-up arm clip. Place the cartridge vertically over the first track of the record the turntable. -
Page 9: Maintenance
Maintenance TO REPLACE THE STYLUS (FIG.A) Put the rest (11) clip on the pick-up arm. Remove the protective cap from the stylus. Pull the stylus in the direction of arrow (A) and remove it. Put in the new stylus following the reverse procedure. Replace the protective cap on the stylus. -
Page 10: Audacity Quick Guide
AUDACITY QUICK GUIDE (PC editing program) Before Starting the Software Make sure that your USB turntable is plugged into the computer and both the computer and the turntable are plugged in and switched on. To Install Software (PC) Plug in your turntable to an AC outlet and connect the USB port on the Turntable to the USB port of your computer. - Page 11 Select the USB audio device under the “Recording” selection as shown. Select “Software Playthrough” to hear the audio while recording. Note: The USB Turntable may show up with a different name in Windows system.. This may depend on your computer model and operating system. 99% of the time it will contain “USB”...
-
Page 12: Audio Control Buttons
Toolbars Selection tool - for selecting the range of audio you want to edit or listen to. Envelope tool - for changing the volume over time. Draw tool - for modifying individual samples. Zoom tool - for zooming in and out. Time shift tool - for sliding tracks left or right. - Page 13 Skip to End - moves the cursor to the end of the last track. Edit Toolbar All of the buttons on this toolbar perform actions - and with a couple of exceptions, they're all just shortcuts of existing menu items to save you time.
- Page 14 Track Pop-Down Menu The Track Pop-Down Menu appears when you click in a track's title. This lets you access a few special commands that apply to individual tracks. Name... - lets you change the name of the track. Move Track Up - exchange places with the track above this one.
- Page 15 Split Stereo Track - if the selected track is a stereo track (a pair of left and right tracks joined together as a single track), this operation splits them into two separate tracks that you can modify and edit independently. Set Sample Format - this determines the quality of the audio data and the amount of space it takes up.
- Page 16 Export As WAV... - exports all of the audio in your project as a WAV file, an industry-standard format for uncompressed audio. You can change the standard file format used for exporting from Audacity by opening the File Format Preferences . Note that exporting will automatically mix and resample if you have more than one track, or varying sample rates.
- Page 17 Print - Print out the main window view from audacity showing the tracks and waveforms. Exit (Quit) - closes all windows and exits Audacity, prompting you to save any unsaved changes first. Edit Menu Undo - This will undo the last editing operation you performed to your project.
- Page 18 Duplicate - Makes a copy of all or a part of a track or set of tracks into new tracks. See the figure below: Select ... > All - Selects all of the audio in all of the tracks in the project. Select ...
- Page 19 seconds, exactly. You can change the units that are snapped to using the "Set Selection Format" option in the View Menu . Snap-To ... > Snap Off - Turns Snap-To mode off letting you select arbitrary ranges of time Preferences... - Opens the preferences dialog.
- Page 20 menu item changes to Dock Control Toolbar, which you can use to put the toolbar back into the main window. Float Edit Toolbar - moves the Edit Toolbar out of the window and into its own floating window, so you can position it wherever you want. The menu item changes to Dock Edit Toolbar, which you can use to put the toolbar back into the main window.
- Page 21 Quick Mix - This command mixes all of the selected tracks together. If you are mixing stereo tracks, or mixing tracks that are marked as Left or Right channel, the result will be a stereo track (two channels), otherwise the result will be mono.
- Page 22 Add Label at Selection - This menu item lets you create a new label at the current selection. You can title the label by typing with the keyboard and then hitting "Enter" when you're done. Add Label at Playback Position - This menu item lets you create a new label at the current location where you are playing or recording.
- Page 23 Repeat Last Effect - Selecting this command is a shortcut to applying the most recent effect with the same settings. This is a convenient way to quickly apply the same effect to many different parts of a file. Amplify - Changes the volume of the selected audio. If you click the "Allow clipping"...
- Page 24 FFT Filter - Similar to Equalization, lets you enhance or reduce arbitrary frequencies. The curve here uses a linear scale for frequency. Invert - Flips the waveform vertically, the same as a phase inversion in the analogue domain. Noise Removal - This effect lets you clean up noise from a recording.
- Page 25 Plugins 1 to 15 ... etc. These submenus contain any VST, Ladspa, or Nyquist plug-ins loaded by audacity. It is possible for a poorly written plug- in to crash Audacity, so always save your work before using a plug-in effect. Analyze Menu Plot Spectrum - To use this feature, first select a region of audio from a...
- Page 26 Safety instructions IMPORTANT SAFETY INSTRUCTIONS - READ CAREFULLY BEFORE USE. CAUTION RISK OF ELECTRICAL SHOCK DO NOT OPEN CAUTION: TO PREVENT AN ELECTRICAL SHOCK, DO NOT REMOVE ANY COVER SCREWS. THERE ARE NO USER SERVICEABLE PARTS INSIDE. REQUEST A QUALIFIED SERVICE PERSON TO PERFORM SERVICING.
- Page 27 Safety instructions - continued WARNING! NEVER INSERT AN OBJECT INTO THE PRODUCT THROUGH THE VENTS OR OPENINGS. HIGH VOLTAGE FLOWS THRU THE PRODUCT AND INSERTING AN OBJECT CAN CAUSE ELECTRIC SHOCK AND/OR SHORT CIRCUIT INTERNAL PARTS. FOR THE SAME REASON, DO NOT SPILL WATER OR LIQUID ON THE PRODUCT.
- Page 28 The helpdesk is accessible from Monday till Friday from 9 AM till 6 PM. When contacting Lenco, you will always be asked for the model and serial number of your product. The serial number can be found on the back of the device.
- Page 29 (Waste Electrical and Electronic Equipment Directive). Products with the CE marking comply with the EMC Directive (2004/108/EC) and the Low Voltage Directive (2006/95/EC) issued by the Commission of the European Community. The declaration of conformity may be consulted at: http://www.lenco.eu/supportfiles/CE/gu67rfuxvie866gt.pdf ®All rights reserved...
Need help?
Do you have a question about the L-175 and is the answer not in the manual?
Questions and answers