Table of Contents
Advertisement
Advertisement
Table of Contents

Related Manuals for BandLuxe R300 Series


Summary of Contents for BandLuxe R300 Series
- Page 1 User Manual BandLuxe R300 Series HSPA+ WLAN Router R200 Series HSPA WLAN Router...
-
Page 2: Table Of Contents
Table of Contents Table of Contents Table of Contents ..............1 Package Contents ..............3 Package Contents.................3 Features ....................3 Hardware Overview................4 Installation ................6 Wizard Setup................9 Internet Setup ................. 11 Basic Setting ..................11 DDNS ....................15 Optional....................16 Router Setup................18 Network Setting...................18 Advanced Routing................20 WiFi Setup................22 Basic WiFi Network ................22 WiFi Security ..................23 Advanced WiFi Setting................27... - Page 3 Table of Contents Admin Setup................42 Management ..................42 Diagnosis.................... 44 Recover & Renewal................45 Status ..................47 3.5G HSPA & Internet................. 47 Router....................48 Appendix A: FAQ ..............50 Appendix B: Specification ............ 57 Appendix C: Important Safety Information and Glossary.. 60 Europe –...
-
Page 4: Package Contents
User Manual CD Features - HSPA+/HSPA WLAN Router - Uplink up to 5.7 Mbps Downlink up to -- R300 Series: 21/ 28.8 Mbps R200 Series: 7.2 Mbps - Support WiFi 802.11 b/g/Pre-n - R300 -- UMTS: 850/900/1900/2100 MHz GSM: 850/900/1800/1900 MHz... -
Page 5: Hardware Overview
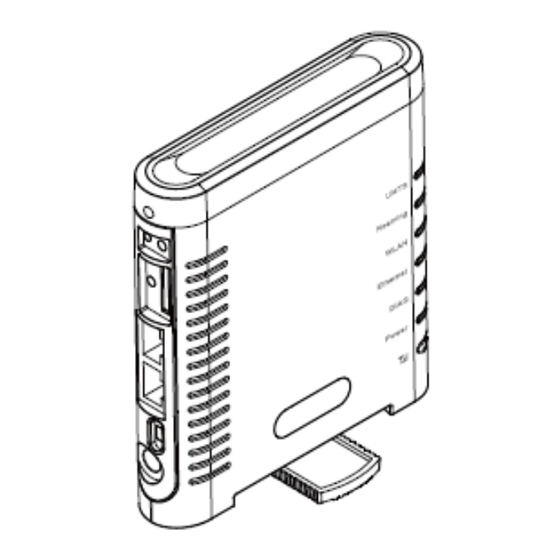
Package Contents - R250 -- UMTS: 850/1900/2100 MHz GSM: 850/900/1800/1900 MHz - Support WAN/LAN Ethernet Port - Optional External 3G Antenna Port Ready - Sleek Design and Easy to Use Hardware Overview Reset Button To reset the Router, press the reset button briefly. - Page 6 Package Contents Power Receptor Receptor for the Power Adaptor. UMTS LED Reference below table. Roaming LED Solid light shows the Router is connecting to Roaming network. WLAN LED Solid light indicates that the wireless segment is ready. Flashing light shows that data is being transmitted via WLAN.
-
Page 7: Installation
Installation Installation 1. Connect the power adaptor to the Router and connect it to an outlet. 2. Insert your SIM card into the slot on the Router, making sure the SIM card orientation matches the SIM card slot, as shown in the picture. 3. - Page 8 Installation 4. One of the following two methods can be chosen to link your Router with PC. A. To link the Router with your PC via WiFi, in Microsoft Windows, go to Control Panel > Network Connections, right-click on Wireless Network Connection, and choose View Available Wireless Networks.
- Page 9 Installation (http://R300.ROUTER) for the Router in your browser’s address bar. Enter the Router User name (admin) and Password (hsparouter).
-
Page 10: Wizard Setup
Wizard Setup Wizard Setup User can set preferred settings step by step via Wizard. If the router is in Factory default settings, the GUI will always open Wizard. User can set the Wizard via Basic Setting> Network Setting > Basic WiFi Network > WiFi Security. - Page 11 Wizard Setup...
-
Page 12: Internet Setup
Internet Setup Internet Setup Basic Setting Connection Type The Router can link to the internet via 3.5G HSPA or Ethernet. Select the connection type you prefer. 3.5G HSPA Setting Get Latest APN Database Get the latest Profile Name, Number, User Name, Password, and APN from the web site automatically. -
Page 13: Ethernet Setting
Internet Setup Note: Charges for roaming connection may be high. Contact your mobile network operator for more information. APN Setting The APN (Access Point Name) is provided by your mobile network operator. You can choose to set the APN automatically or manually. In most cases, the Router works properly when the APN is set to Auto. - Page 14 Internet Setup Static IP Select Static IP if all WAN IP information is provided to you by your ISP. You will need to enter the IP address, subnet mask, gateway address, and DNS address(es) provided to you by your ISP. PPPoE Choose PPPoE (Point to Point Protocol over Ethernet) if your ISP uses a PPPoE connection.
- Page 15 Internet Setup PPTP Choose PPTP (Point-to-Point-Tunneling Protocol) if your ISP uses a PPTP connection. Your ISP will provide you with a username and password. Internet IP Address: Enter the IP address Subnet Mask: This is the Router’s Subnet Mask, as seen by users on the Internet (including your ISP).
-
Page 16: Ddns
Internet Setup DDNS DDNS (Dynamic DNS Service) is a system which allows the domain name data held in a name server to be updated in real time. It allows an Internet domain name to be assigned to a computer with a varying (dynamic) IP address. -
Page 17: Optional
Internet Setup Optional Host Setting Host Name and Domain Name These fields allow you to assign a host and domain name for the Router. Some ISPs require these names as identification. In most cases, leaving the fields blank will work. MTU (Maximum Transmission Unit) specifics the largest packet size permitted for Internet transmission. -
Page 18: Time Setting
Internet Setup Time Setting Select the Time Zone from the drop-down menu according to your current location. Automatically adjust clock for daylight saving changes: Select the checkbox to enable Daylight Saving time. -
Page 19: Router Setup
Router Setup Router Setup Network Setting Router IP This is the Router’s IP address and subnet mask which is seen in your local network. The default IP address is 192.168.1.1, and the default Subnet Mask is 255.255.255.0. Keeping the default values will work. DHCP Service DHCP stands for Dynamic Host Control Protocol. - Page 20 Router Setup DHCP Reservation To assign the same IP address to a PC every time it reboots, click the DHCP Reservation button. A list of DHCP clients is displayed with the following information: Client Name, Interface, IP Address, and MAC Address. Select a checkbox to reserve a client’s IP address.
-
Page 21: Advanced Routing
Router Setup Advanced Routing NAT Setup The Network Address Translation (NAT) service is a standard that allows multiple computers on a private network to share a single IP address. The Routing Information Protocol (RIP) helps the Router dynamically adapt to changes of network connections by communicating information about which networks each Router can reach and how far away those networks are. -
Page 22: Vpn Passthrough
Router Setup Enter Route Name: Enter a name for the route here. Destination LAN IP: Enter the Destination IP address that will be assigned to a specific network or host. Subnet Mask: Enter the subnet mask associated with the Destination IP. Gateway: This is the IP address of the gateway device that allows for contact between the Router and the remote network or host. -
Page 23: Wifi Setup
WiFi Setup WiFi Setup Basic WiFi Network Basic WiFi Setting Network Mode: From this drop-down menu, you can select the wireless standards running on your network. If you have 802.11g, 802.11b, 802.11n devices in your network, keep the default setting, Mixed. If you have only 802.11g devices, select Wireless-G Only. -
Page 24: Wifi Security
WiFi Setup WiFi Security WiFi Security Setting Router provides several different levels of security to protect your WiFi network. Select a level in the Security Mode drop-down menu. The Router supports two WEP (Wired Equivalent Privacy) standards: 64-bit and 128-bit. Select a standard from the drop-down list. The 64-bits encryption requires 10 hexadecimal digits (letters a-f and numbers 0-9 are valid). - Page 25 WiFi Setup WPA-Personal Encryption: Choose TKIP or AES from the drop down list. (AES is a stronger encryption method than TKIP.) Passphrase: Enter a passphrase between 8-63 characters. Key Renewal: Enter a key renewal value to tell the Router how often it should change the encryption keys.
- Page 26 WiFi Setup WPA-Enterprise This option features WPA used in coordination with a RADIUS server. (This should only be used when a RADIUS server is connected to the Router.) Encryption: Choose TKIP or AES from the drop down list. (AES is a stronger encryption method than TKIP.) RADIUS Server: Enter the IP Address of the RADIUS server.
- Page 27 WiFi Setup RADIUS Server: Enter the IP Address of the RADIUS server. RADIUS Port: Enter the port number of the RADIUS server. The default value is 1812. Shared Key: Enter the key shared between the Router and the server. Key Renewal: Enter a key renewal value to tell the Router how often it should change the encryption keys.
-
Page 28: Advanced Wifi Setting
WiFi Setup Disabled If you do not want to use any security method for your wireless network, choose Disabled. Advanced WiFi Setting AP Isolation: This isolates all wireless clients and wireless devices on your network from each other. Wireless devices will be able to communicate with the Router but not with each other. - Page 29 WiFi Setup Transmission Rate: The rate of data transmission should be set depending on the speed of your wireless network. You can select from a range of transmission speeds. CTS Protection Mode: CTS (Clear To Send) is a function used to minimize collisions among wireless devices on a wireless local area network (LAN).
-
Page 30: Wifi Clients Filter
WiFi Setup WiFi Clients Filter WiFi Clients Filter You can allow or deny specific users to access your wireless network by using the WiFi Clients Filter. Service: To use the WiFi Clients Filter, select Enabled. To disable it, select Disabled Filtering By: Prevent You can filter users by two methods:... -
Page 31: 3.5G Hspa Setup
3.5G HSPA Setup 3.5G HSPA Setup PIN Verification If your SIM card PIN protection is enabled, you must enter the PIN code for verification. Enter the code in the PIN Code field, and click Verify. PIN Management U/SIM's PIN Management After your SIM card is verified, you can enable or disable the PIN protection on your SIM card. -
Page 32: Preferred Network
3.5G HSPA Setup U/SIM's Change PIN You can change the PIN code on the SIM card. Enter your original PIN code in the Old PIN Code field, enter the new PIN code in the New PIN Code field and the New PIN Confirm field, and click Change. Preferred Network Preferred Network Network Type: In the drop-down menu, select the network type your SIM... -
Page 33: Security Setup
Security Setup Security Setup Firewall Firewall This tab is used to configure a firewall that filters out various types of unwanted traffic on the Router’s local network. SPI Firewall Protection The SPI (stateful packet inspection) firewall is programmed to recognize legitimate packets for different types of connections. - Page 34 Security Setup IP multicast packets to be forwarded to the appropriate computers.
- Page 35 Security Setup Filter Internet NAT Redirection: To use port forwarding to block access to local servers from local networked computers, select Filter Internet NAT Redirection. Filter IDENT (Port 113): This feature keeps port 113 from being scanned by devices outside of your local network. Web filter services Using the Web Filters feature, you may enable up to four specific filtering methods.
-
Page 36: Internet Access Policy
Security Setup Internet Access Policy Access can be managed by a policy. Use the settings on this screen to establish and access policies. To display a policy’s settings, select the policy from the drop-down menu. To delete a policy, select the policy’s number and click Delete This Policy. - Page 37 Security Setup To create an Internet access policy: 1. Select a number from the Access Policy dropdown menu. 2. Enter a policy name in the field provided. 3. To enable the policy, select Enabled. 4. To select which PCs are affected by the policy, click Edit List. The List of PCs screen appears.
-
Page 38: Single Port Forward
Security Setup and Protocol fileds, and click Add. Single Port Forward Single Port Forwarding Port Forwarding allows you to set up public services on your network, such as web servers, ftp servers, e-mail servers, and other specialized Internet applications. To forward a port, enter the information in each field. Application Name: You can select an application from the 10 preset applications in the drop-down menu. -
Page 39: Port Range Forward
Security Setup Port Range Forward Port Range Forwarding Port Range Forwarding allows you to set up public services on your network, such as web servers, ftp servers, e-mail servers, and other specialized Internet applications. Application Name: Enter the name of your application. Start - End Port: Enter the number that starts the port range in the left field and the number that ends the range in the right field. -
Page 40: Port Range Trigger
Security Setup Port Range Trigger Port Range Triggering This feature allows the Router to watch outgoing data for specific port numbers. The Router remembers the IP address of the computer that sends the matching data, so that when the requested data returns through the Router, the data is pulled back to the proper computer by way of IP address and port mapping rules. -
Page 41: Qos
Security Setup QoS Control Quality of service is the ability to provide different priorities to different applications, users, or data flows, or to guarantee a certain level of performance to a data flow. Wireless WMM Support: If no devices on your network support WMM, select Disabled. - Page 42 Security Setup To add an online games or applications: 1. Select the appropriate online games or applications. 2. Select the appropriate priority: High, Medium, Normal, or Low. 3. Click Add to save your changes. To add a new online games or applications: Add a New Game/Application 1.
-
Page 43: Admin Setup
Admin Setup Admin Setup Management Router Access You can change the Router’s password here. Enter the password you want to set in Router Password Re-Enter to confirm field, and re-enter it in the field. Save Settings Then click Web Access Web Utility Access: HTTP (HyperText Transport Protocol) is the communications protocol used to connect to servers on the World Wide Web. -
Page 44: Remote Access
Admin Setup access to the Router web-based utility can be disabled. If you disable the setting, you are only able to access the web-based utility via a wired connection. Remote Access Remote Management: To access the Router remotely, from outside the network, select Enabled. -
Page 45: Diagnosis
Admin Setup Diagnosis The Router can keep logs of all traffic for your Internet connection. To monitor the network, select Enabled. You can view logs by clicking View Log. If you want to view logs in a browser, enter an IP address in the Logviewer IP Address field. You can enter this IP in a browser to view logs. -
Page 46: Recover & Renewal
Admin Setup Recover & Renewal Backup and Restore Backup Configurations Click Backup Configurations to back up your Router's current configuration. In the file dialog box, select a location and file name for the configuration file. Restore Configurations Click the Restore Configurations. In the file dialog box, click Browse to locate the configuration file, and click Restore. -
Page 47: Router Upgrade
Admin Setup dialog box, click Start. Router Upgrade To upgrade the Router's firmware, click Browse and locate the latest firmware upgrade file. After the file is located, click Start Upgrade. The upgrade progress is displayed. Warning: Upgrading firmware may take a few minutes; do not turn off the power or press the Reset button during upgrade. -
Page 48: Status
Status Status 3.5G HSPA & Internet Signal Quality When you access the Internet via 2G or 3G, click Refresh to show the signal strength. U/SIM Status Your SIM card verification status is shown in this area. Clicking Pin unlock displays the PIN Verification tab. Register Network Network Name: This shows the name of your network operator. -
Page 49: Router
Status currently using. Home/Roaming: This indicates whether the Router is in Home or Roaming status. Internet Connection Connection Type: This indicates the type of Internet connection you are using. Internet IP Address: This is the Router's IP Address, as seen on your local network. -
Page 50: Firmware Information
Status Firmware Information Firmware Version: This is the Router’s current firmware. Modem Version: This is the 3G Module’s current firmware. APN Version: This is the APN’s current version. Current Time: This shows the time, as you set on the Optional tab. Local Network Local MAC Address: This is the Router’s MAC Address, as seen by your Router IP Address: The Router’s IP Address that appears on your local... -
Page 51: Appendix A: Faq
Appendix A: FAQ Appendix A: FAQ Q: What should I know and how long does it take when I upgrade the firmware of router or modem? A: 1. While upgrade the firmware, it must take some time to do the job. During that, you ARE NOT ALLOWED to turn off the power or... - Page 52 Appendix A: FAQ If you want to connect to the network while roaming: 1. Ask the operator of SIM to turn on the roaming service allowed to connect to the network. 2. Set the Internet on GUI with Roaming Connection Enabled. Q: Why can't I link on the GUI? A: If you have changed your WiFi security, SSID, Local IP address, you have to repair your network to get a new IP that you can link the GUI.
- Page 53 Appendix A: FAQ Vista: 1. If you are a WiFi user, please click Network and Sharing Center > Manage network connections > Wireless Network Connection > Diagnose 2. Please click Reset the network adapter “Wireless Network Connection” and it will began to repair.
- Page 54 Appendix A: FAQ 3. If you use Local Area Connection to connect the Router, please click Network and Sharing Center > Manage network connections > Local Area Connection > Diagnose, do the step 1 and following the message to repair it. Q: How to setup my WiFi settings from GUI? A: Entering the GUI first then click WiFi >...
- Page 55 Appendix A: FAQ 2. You can go to the GUI WiFi > Basic WiFi Network, change the Standard Channel to others then save. Q: Why can’t I use VPN via Router? A: You may check your office IP settings, the IP settings must not conflict with each other.
- Page 56 Appendix A: FAQ Q: My PIN code is enabled and where can I input the PIN code to use my Router? A: Enter GUI > 3.5G HSPA > PIN Verification and input your PIN Code. Q: Why does my SIM status display “No Device” or “SIM Error”, what can I do? A: You can check the SIM card is inserted correctly in your router.
- Page 57 Appendix A: FAQ Q: If I remove the SIM when 3G is connected, why can’t I see the SIM status change? A: You have to restart the router to see the status.
-
Page 58: Appendix B: Specification
Yes, Push-push type Connectivity and Data Speed UMTS Band By built-in module Uplink up to 5.7 Mbps HSPA/WCDMA Data Downlink up to R300 Series: 21/ 28.8 Mbps Rate R200 Series: 7.2 Mbps WCDMA power class Power Class 3 WLAN 802.11b/g with Pre-n 2.4 GHz band... - Page 59 Appendix B: Specification Protocol Default connection "3.5G HSPA First" or "Ethernet First" customizable Automatic WAN Supported connection fail-over WME Traffic Prioritization / Traffic Supported Shaping Fixed WAN DHCP, Static IP, PPPoE, PPTP, L2TP connection UMTS/HSPA Connection On Demand, Keep Alive, Auto APN matching connection with USIM Multiple VPN passthrough (IPsec, PPTP, L2TP), Internet...
- Page 60 Appendix B: Specification LED location from top to bottom: UMTS, Roaming, WLAN, Ethernet, DIAG and Power. UMTS, Roaming, WLAN, Ethernet, DIAG LED will be multiplexed for signal strength when 3G button short pushed Accessories Supported, Input 100~240V AC, 50~60GHz Power adaptor Output 12V DC, 1A (targeted) Power Consumption Voltage...
-
Page 61: Appendix C: Important Safety Information And Glossary
Appendix C: Important Safety Information and Glossary Appendix C: Important Safety Information and Glossary Europe – EU Declaration of Conformity European Union Notice Products with CE marking comply with the R&TTE Directive (99/5/EC), the EMC Directive (2004/108/EC), and the Low Voltage Directive (2006/95/EC) issued by the Commission of the European Community. -
Page 62: Federal Communication Commission Interference Statement
Appendix C: Important Safety Information and Glossary ETSI EN 301 489-17 Electromagnetic compatibility and Radio spectrum Matters (ERM); Electromagnetic Compatibility (EMC) standard for radio equipment and services; Part 17: Specific conditions for 2.4 GHz wideband transmission systems. ETSI EN 301 908-1 & -2 Electromagnetic compatibility and Radio spectrum Matters (ERM);... - Page 63 Appendix C: Important Safety Information and Glossary This device complies with Part 15 of the FCC Rules. Operation is subject to the following two conditions: 1) This device may not cause harmful interference and 2) This device must accept any interference received, including interference that may cause undesired operation of the device.
-
Page 64: Glossary
Appendix C: Important Safety Information and Glossary Glossary 2G: Second-generation mobile networking technology. Represents a switchover from analog to digital; most 2G networks use GSM. 3G: Third-generation mobile networking technology that enables simultaneous transfer of voice and non-voice data; most 3G networks use WCDMA. 3.5G: A more recent standard of mobile networking technology;... - Page 65 Appendix C: Important Safety Information and Glossary to 42Mbps in the downlink and 11Mbps in the uplink. IMEI (International Mobile Equipment Identity): A number unique to each GSM/UMTS device that can be used block network access by a stolen mobile device.
Need help?
Do you have a question about the R300 Series and is the answer not in the manual?
Questions and answers