
Related Manuals for Horizon Fitness EX-59


Summary of Contents for Horizon Fitness EX-59
- Page 1 ELLIPTICAL OWNER’S MANUAL Read the ELLIPTICAL gUIdE before using this OWNER’S MANUAL.
- Page 3 Before proceeding, find your elliptical’s serial number located on the front stabilizer tube and enter it in the space provided below. ENTER YOUR SERIAL NUMBER IN THE BOX BELOW: SERIAL NUMBER: Horizon EX-59 Elliptical MOdEL NAME: » Refer to the SERIAL NUMBER and MOdEL NAME when calling for service.
-
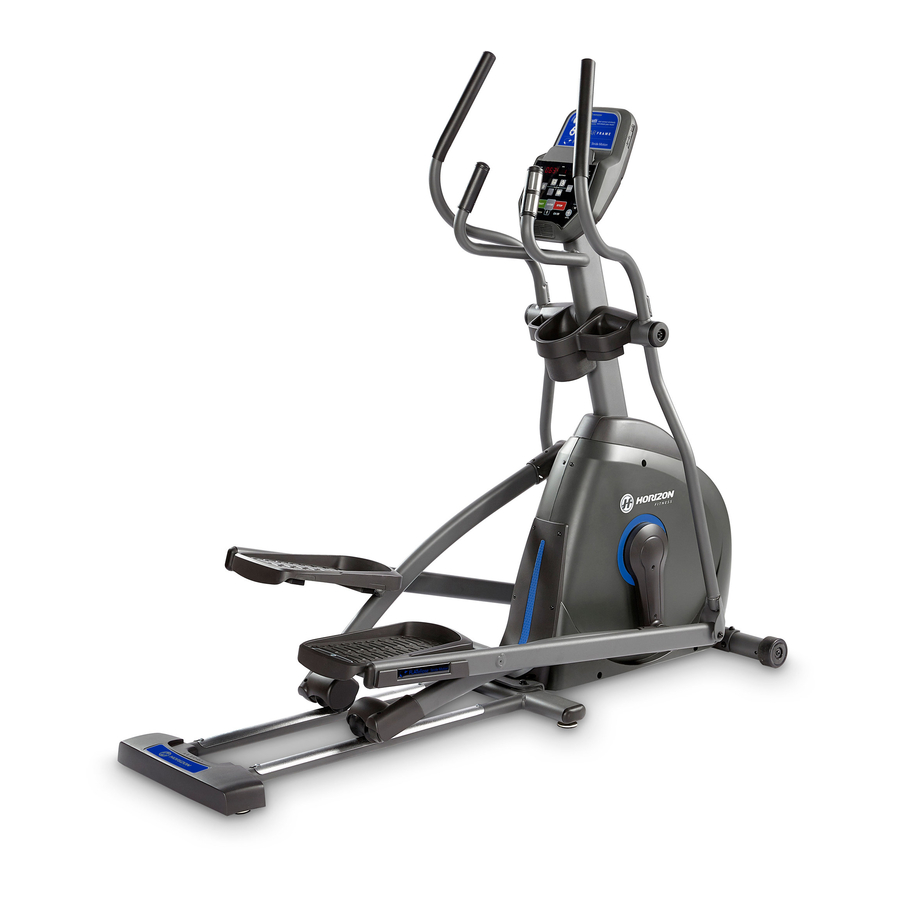
Page 4: Product View
SPEAKERS CONSOLE TOUCH PAD PANEL AND DISPLAY WINDOWS UPPER HANDLEBAR PULSE GRIPS WATER BOTTLE HOLDER LOWER HANDLEBAR TOP CAP POWER CORD SOCKET CRANK STABILIZER TUBE PIVOTING FOOT PADS MAIN FRAME GUIDE RAIL SET LOWER LINK ARM PEDAL ARM REAR COVER... -
Page 5: Pre-Assembly
prE ASSEMBLY toolS inclUDED: F Screwdriver UnpacKinG F 8 mm L-Wrench F 6 mm L-Wrench Unpack the product where you will be using it. Place the elliptical carton on a level flat F 5 mm L-Wrench surface. It is recommended that you place a protective covering on your floor. Never F 13/15 mm Flat Wrench open box when it is on its side. -
Page 6: Assembly Step
ASSEMBLY StEp 1 HarDWarE BaG 1 CONTENTS : EX-58 SHoWn BOLT (A) SPRING WASHER (B) ARC WASHER (C) 30 mm 15 mm 17 mm STABILIZER TUBE Qty: 4 Qty: 4 Qty: 4 Open hardware bag 1. Attach the stabilizer tube to the main frame using 4 bolts (a), 4 spring ARC WASHERS (C) washers (b) and 4 arc washers (c). - Page 7 ASSEMBLY StEp 2 HarDWarE BaG 2 CONTENTS : BOLT (D) FLAT WASHER (E) TOOTH WASHER (G) 55 mm 17 mm 15 mm Qty: 4 Qty: 4 Qty: 4 Open hardware bag 2. Align guide rail set with main frame as shown.
- Page 8 ASSEMBLY StEp 3 HarDWarE BaG 3 CONTENTS : WAVY WASHER (L) BOLT (M) SPRING WASHER (B) FLAT WASHER (K) 22.5 mm 20 mm 15 mm 20 mm Qty: 2 Qty: 2 Qty: 2 Qty: 2 Open hardware bag 3. Carefully pull the console cable through CONSOLE MAST CONSOLE CABLE the console mast using the twist tie located...
-
Page 9: Console Mast
ASSEMBLY StEp 4 HarDWarE BaG 4 CONTENTS : WAVY WASHER (L) BOLT (M) SPRING WASHER (B) 22.5 mm 20 mm 15 mm CONSOLE MAST FLAT WASHERS (N) Qty: 2 Qty: 2 Qty: 2 FLAT WASHER (N) FLAT WASHER (K) 25 mm 20 mm FLAT WASHERS (K) Qty: 6... - Page 10 ASSEMBLY StEp 5 Open hardware bag 5. HarDWarE BaG 5 CONTENTS : Slide lower link arm onto pedal arm FLAT WASHER (K) BOLT (M) SPRING WASHER (B) 20 mm 15 mm 20 mm bracket. TEFLON Qty: 2 Qty: 2 Qty: 4 WASHER (P) 28.4 mm Qty: 4...
- Page 11 ASSEMBLY StEp 6 HarDWarE BaG 7 CONTENTS : SCREW (S) 12 mm SCREWS (S) Qty: 3 TOP CAP CONSOLE MAST WATER Open hardware bag 7. BOTTLE HOLDER Silde top cap over console mast and snap into place. CONSOLE MAST BOOT SCREW (S) Insert console mast boot over top cap and snap into place.
- Page 12 ASSEMBLY StEp 8 HarDWarE BaG 8 CONTENTS : BOLT (T) 10 mm Qty: 4 CONSOLE CONSOLE CABLES Open hardware bag 8. UPPER HANDLEBAR Attach the conSolE caBlES to the BOLTS (T) CONSOLE MAST conSolE. Carefully tuck the conSolE caBlES into NOTCH PRE-INSTALLED SET SCREWS...
-
Page 13: Elliptical Operation
ELLIPTICAL OPERATION This section explains how to use your elliptical’s console and programming. The BASIC OPERATION section in the ELLIPTICAL gUIdE has instructions for the following: • location oF tHE Elliptical • poWEr/GroUnDinG inSrUctionS • Foot poSitioninG • moVinG tHE Elliptical •... - Page 14 T I ME DISTAN CE CALOR IES H EA RT RATE SPEE D TIM E RO LL I NG DISTANCE W E I GH T LOSS CALO RIES I NT E RVA L S L E VE L TARGETS WOR KOU TS ENTER...
-
Page 15: Console Operation
conSolE opEration Note: There is a thin protective sheet of clear plastic on the overlay of the console that should be removed before use. a) lED DiSplay WinDoWS: time, distance, calories, heart rate, speed and resistance level. B) tarGEt lED inDicatorS: indicate what target (if any) is set for the current program. c) WorKoUt lED inDicatorS: indicate what workout (if any) is set for the current program. -
Page 16: Display Windows
DiSplayS T I M E DISTANCE CA LO R I ES H EART RATE S P E E D TIM E ROLLI NG DI STA N CE WEIGHT LOSS CA LOR IES IN TERVALS LE VE L TA RGE TS WO RKOUTS DiSplay WinDoWS •... -
Page 17: Getting Started
GEttinG StartED 1) Check to make sure no objects are nearby that will hinder the movement of the elliptical. 2) Plug in the power cord and turn the elliptical ON. (Switch is located at the bottom-front of the elliptical.) NOTE: Some ellipticals may not have a power switch and will turn on when power is sypplied. a) qUicK Start Up Simply press the START key to begin working out. -
Page 18: Program Information
proGram inFormation tarGEt 1 – timE: Allows user to set a target based on how long they would like to workout. Time targets can range from 15:00 – 99:00(EX-68, EX-78, e1100gS) or 5:00 – 99:00(EX-58, CE5.1). TIME will count down. dISTANCE and CALORIES will count up from zero. -
Page 19: To Reset The Console
to rESEt tHE conSolE Hold STOP key for 3 seconds. FiniSHinG yoUr WorKoUt When your workout is complete, the monitor display will flash “FINISHEd” and beep. Your workout information will stay displayed on the console for 30-45 seconds and then reset. clEar cUrrEnt SElEction To clear the current program selection or screen, hold the STOP button for 3-5 seconds. -
Page 21: Limited Home-Use Warranty
LIMITEd HOME-USE WARRANTY... -
Page 22: Exclusions And Limitations
• 1 yEar the covered unit, or modifications that are unauthorized Horizon Fitness shall cover the labor cost for the repair of the or not recommended by Horizon Fitness. device for a period of one year from the date of the original purchase, so long as the device remains in the possession of the original owner. - Page 23 • Any attempt to repair this equipment creates a risk of reconditioned to as-new condition by Horizon Fitness injury. Horizon Fitness is not responsible or liable for any or its vendors may sometimes be supplied as warranty damage, loss or liability arising from any personal injury replacement and constitute fulfillment of warranty terms.
- Page 24 ELLIPTICAL gUIdE before contacting Customer Tech Support. 1-800-244-4192 Horizon Fitness comments@horizonfitness.com 1600 landmark Drive, www.horizonfitness.com cottage Grove Wi, 53527 EX-59 Rev. 1.6 | © 2010 johnson Health Tech North America, Inc. | designed & Engineered in the U.S.A. | Made in China...
Need help?
Do you have a question about the EX-59 and is the answer not in the manual?
Questions and answers