Table of Contents
Advertisement
Quick Links
IMPORTANT INFORMATION REQUIRED BY THE FCC
This device complies with Part 15 of the FCC Rules. Operation is subject to the following two
conditions: (1)this device may not cause harmful interference; and (2) this device must accept
any interference received, including interference that may cause undesirable operation.
NOTE: This equipment has been tested and found to comply with the limits for a Class B digital
device, pursuant to Part 15 of the FCC Rules. These limits are designed to provide reasonable
protection against harmful interference in a residential installation .
This equipment generates.uses and can radiate radio frequency energy and, if not installed and
used in accordance with the instructions, may cause harmful interference to radio elevation
reception, which can be determined by turning the equipment off and on. The user is encouraged
to try to correct the interference by one or more of the following measures:
* Reorient or relocate the receiving antenna.
* Increase the separation between the equipment and receiver.
* Connect the equipment into an outlet on a circuit different from that to which the receiver is
connected.
* Consult the dealer or an experienced radio/TV technician for help.
MODEL:
INSTRUCTION MANUAL
VOL
+
MODE
POWER/MU
-
VOL
CLK
SD/MMC
1
2
INT
3
RPT
Detachable PLL Electronic Tuning Stereo,
AM/FM Radio MP3/CD Player with ID3 Text Function,
USB Input, SD/MMC Card Slot And Aux-in Jack
NCA-696
BAND
SEL
AS/PS
6 +10
4
5 -10
RDM
AUX
Advertisement
Table of Contents

Related Manuals for Naxa NCA-696


Summary of Contents for Naxa NCA-696
-
Page 1: Instruction Manual
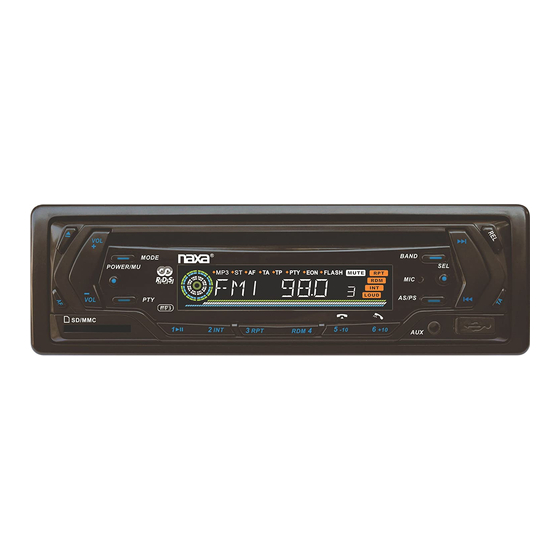
MODEL: NCA-696 INSTRUCTION MANUAL MODE BAND POWER/MU AS/PS SD/MMC 6 +10 5 -10 IMPORTANT INFORMATION REQUIRED BY THE FCC This device complies with Part 15 of the FCC Rules. Operation is subject to the following two conditions: (1)this device may not cause harmful interference; and (2) this device must accept any interference received, including interference that may cause undesirable operation. - Page 2 Preface Thank you for purchasing this car audio product. Please read this manual carefully before operating this car audio product. Please keep this manual for future use. It will be helpful to you if you are encounter any operational problem. Selecting fine audio equipment is only the start of your musical enjoyment.
-
Page 3: Specification
LOCATION AND FUNCTION OF CONTROLS SPECIFICATION GENERAL Supply Voltage DC 12 V. Negative Ground Current Consumption Max.7A MODE BAND Power Output 7Watts X 4ch POWER/MU Number of channels 2 STEREO channels. Unit Dimensions 178[W] X 165[D] X 50[H] mm. AS/PS SD/MMC 6 +10 5 -10... -
Page 4: Troubleshooting
VOL LAST/VOL DEFA TROUBLE SHOOTING VOL LAST: The radio switches on at the actual volume it had when it was last switched off. Before using the check list please make all the connections first. VOL DEFA: After pressing SEL button, AVOL will be displayed. Then you can If you still have questions after going through the checklist, please consult pre-select a constant switch-on volume by using the VOL knob. -
Page 5: Band Button
3) Press the RPT button once to play the current track repeatedly, and the RPT Ò É Ä Ñ ½ â ³ ý ONE will be visible on the LCD display. CARE FOR USING CD'S: During MP3/WMA disc, MMC/SD or USB mode, press the RPT button twice continuously to play the current folder repeatedly, and the RPT ABM will be About CD-R/CD-R/W discs: visible on the LCD display. - Page 6 During MP3/WMA file in disc, MMC/SD or USB mode: 1) In TRACK SEARCH mode, the LCD will display TRK T 000 and flash the biggest digit 0 that the SD/MMC card or USBstick contain. (if the number of tracks is less than 100 and more than 9, it will be TRK 00) Then press the VOL+ or VOL- button to select the number of the flashing digit from 0 ~ 9.
-
Page 7: Wires Connection
WIRES CONNECTION 25. FLASHING LED When the front control panel is removed this indicator flashes. RED R RCA LINE OUT WHITE L 26. RESET BUTTON Before operating the unit for the first time, or after replacing the car battery or changing the connections. -
Page 8: Operation Of Remote Control
OPERATION OF REMOTE CONTROL MAINTENANCE OF REMOTE CONTROL 1. Power On/Off. An insulation tag was installed in your remote by the manufacturer to prevent the 2. Mute Button battery from draining. Removing the tag from the remote before using. Loudness Button Audio Level &...
Need help?
Do you have a question about the NCA-696 and is the answer not in the manual?
Questions and answers