
Related Manuals for Naxa NCA-615


Summary of Contents for Naxa NCA-615
- Page 1 In-Dash MP3 Player and Receiver with Bluetooth ® and Flip-Down Faceplate NCA-615 Instruction Manual Please read carefully before use and keep for future reference.
-
Page 2: Important Safety Information
THIS UNIT. KEEP THIS MANUAL FOR FUTURE REF- ERENCE. • ALWAYS LOWER THE VOLUME BEFORE TURNING OFF THE UNIT OR SWITCHING THE IGNITION OFF. Precautions & Warnings • To reduce the risk of fire, electric shock, and interfer- ence, do not attempt to repair this unit yourself. Refer all service to a qualified technician. • Some MP3/WMA files may not be playable. • Keep the volume at a reasonable level to avoid distract- ed driving. High volume levels may make it difficult to concentrate on traffic and road conditions while driving. • If the car has been in direct sunlight for an extended period, you may need to reduce the temperature inside the car before turning on and using the unit. • If the battery is disconnected, discharged, or changed, the preset memory of the unit will be lost and require reprogramming. • The unit is designed to be installed in a level, horizontal position. For optimal performance, avoid installing the unit at an angle. • Never use excessive force when removing or attaching Page 2 Naxa Electronics... -
Page 3: Table Of Contents
Warnings and Precautions ......14 Electrical Connections ........7 Specifications ..........16 Installation Guide ........... 8 Support ............16 Installation Procedures............. 8 Installation Opening ........... 8 Attaching the Faceplate to the Chassis ......9 To detach the faceplate: ..........10 Remote Control ..........11 Pairing a Bluetooth Device ......12 ® Troubleshooting ..........13 Thank You ............4 www.naxa.com Page 3... -
Page 4: Thank You
Thank You In the Box We know you have many choices when it comes to Please take a moment to make sure that you have ev- technology; thank you for choosing us here at Naxa erything in the list below. Although we make every ef- Electronics. Established in 2001 in Los Angeles, Califor- fort to ensure that each Naxa device is securely packed nia, we are dedicated to delivering products that en- and sealed, we know a lot can happen in between us tertain and delight. and you. If anything is missing, check back with your local retailer to get immediate assistance. If they can- We trust that you will be happy with your purchase. -
Page 5: At A Glance
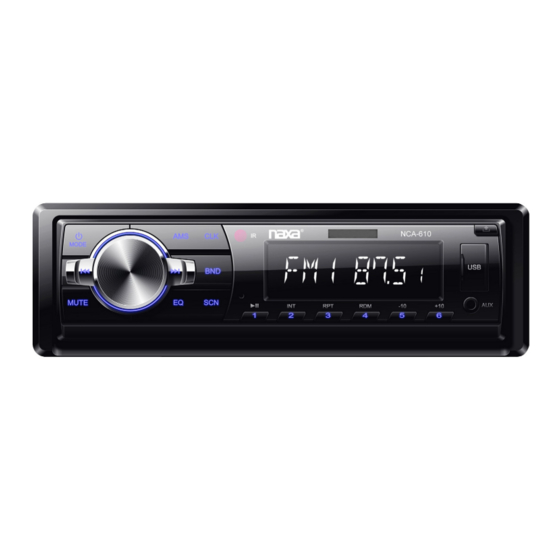
At a Glance USB/CARD/BT: Press to skip to the previous track. NCA-615 RADIO: Press to auto scan down to the next MODE station. Press and hold to tune to a lower frequency. MUTE USB/CARD/BT: Press to skip to the next track. RADIO: Press to auto scan up to the next station. Press and hold to tune to a higher frequency. USB/CARD/BT: Press to start/pause/resume play. Power. Press to turn the unit on and to change RADIO: Preset station 1. the active source mode: Radio, USB, CARD, AUX MODE INT/2 USB/CARD: Press to change the intro mode. IN, BT. (USB & CARD modes are only available RADIO: Preset station 2. when media is detected by the player.) RPT/3 USB/CARD: Press to change the repeat mode. Press and hold to turn the unit off. RADIO: Preset station 3. Volume/ Rotate to adjust the volume level. Options RDM/4 USB/CARD: Press to change the random mode. Press to cycle through the options menu and rotate the dial to adjust the options: Bass, RADIO: Preset station 4. Treble, Balance, Fader, Loud Off, EQ Off, Loc/DX, –10/5 USB/CARD: Press to skip back 10 tracks. Stereo, Vol. - Page 6 15 AMS USB/CARD: Press to enter track search mode, then rotate the volume dial to scan through the track. NCA-615 MODE Radio: Automatic Memory Save. Press to scan for the strongest radio station signals and automatically save them to MUTE preset memory. The radio can save up to 6 stations. 12 13 16 CLK / [END] CLOCK: Press once to display the time. Press and hold to set the time. MUTE Press to temporarily disable/restore the BT: Reject an incoming phone call or end sound. a call when connected to a smartphone 12 EQ Press to change the audio equalizer. with Bluetooth. 13 SCN Press to scan for radio stations. The radio 17 IR Remote sensor. will play each station for 5 seconds before 18 AUX AUX mode. 3.5mm stereo connection for automatically moving to the next one. connector devices with 3.5mm line-out or head-...
-
Page 7: Electrical Connections
Electrical Connections 21 SD card slot SD mode. Load an SD memory card here. 22 RESET Press to reset the system. All options will return to their factory default settings. Press RESET if the display is frozen or the system is otherwise unresponsive. www.naxa.com Page 7... -
Page 8: Installation Guide
First complete the electrical connections, and then check to make sure everything is secure and correct. Installation Opening This unit can be installed in any dashboard having an opening as shown below. Insert the mounting sleeve into the dashboard and bend the mounting tabs out with a screwdriver. Make sure that the lock lever is flush with the mounting collar and is not projecting beyond. The dashboard must be 4.75–5.56mm thick in order to be able to support the unit. Page 8 Naxa Electronics... -
Page 9: Attaching The Faceplate To The Chassis
Attaching the Faceplate to the Chassis 1. Align the indentation on the right of the faceplate with the right “bulge” of the chassis. 2. Slide the faceplate in and hold it to the left; at the same time, bring the other end of the faceplate to- wards the chassis, making sure to align the inden- tation with the “bulge.” www.naxa.com Page 9... -
Page 10: To Detach The Faceplate
3. Flip the faceplate up until it clicks into place and To detach the faceplate: attaches to the chassis. 1. Press the RELEASE button to flip the faceplate down. 2. Gently push the faceplate to the left to release it from the chassis, then pull it away from the chassis. Page 10 Naxa Electronics... -
Page 11: Remote Control
Note: When operating the remote Rock), Keypad 0 control for the first time, you must 9. Local, Keypad # pull out the protective plastic tab from the batery compartment 10. Loudness, Keypad 8 found on the back of the remote 11. AMS, Keypad 9 control. 12. Previous 10 Tracks, Preset/ Keypad 5 13. Next 10 Tracks, Preset/ Keypad 6 14. Intro Play, Preset/Keypad 2 www.naxa.com Page 11... -
Page 12: Pairing A Bluetooth ® Device
The speaker cannot be paired with more than one de- the receiver. Use your device to unpair with the receiver vice at a time. before attempting to pair another device. Press MODE until the display reads BT. 1. Make sure Bluetooth® is enabled on your device. Enable it if it hasn’t. 2. Press MODE on the receiver until the display reads 3. Use your device to search for available Bluetooth devices (i.e., your receiver). This function is usually in the Bluetooth settings menu; refer to your de- vice’s instruction manual to learn more 4. The receiver will announce itself as “NAXA NCA- 615.” Select the receiver. Notes: Page 12 Naxa Electronics... -
Page 13: Troubleshooting
There is a lot The station signal is too weak. Select an- ing abnormal behavior (for example, no sound, or if it of static in the other station with a stronger signal level. is smoking and emitting a foul smell). Continuing to broadcast. use the unit in this state could lead to a fire or electric My saved preset The battery/power cable may not be se- shock. Discontinue use immediately and contact Naxa stations have curely connected. Connect the battery cable Technical Support (www.naxa.com/naxa_support/).. been lost. to the terminal that is always live. ѥ Never attempt to repair the unit by your- ѥ USB / SD self. There are dangerous, high-voltage components inside. -
Page 14: Warnings And Precautions
If this equipment does cause vicing instructions in the literature accompanying the appliance. harmful interference to radio or television reception, which can be de- termined by turning the equipment off and on, the user is encouraged to CAUTION try to correct the interference by one or more of the following measures: • Do not block the ventilation openings or holes. • Reorient or relocate the receiving antenna. • Do not place any naked flames (such as lighted candles) on the ap- • Increase the separation between the equipment and receiver. paratus. • Connect the equipment into an outlet on a circuit different from that • When discarding batteries, follow all local rules and laws governing the to which the receiver is connected. disposal of batteries. Consider the environmental impact of your actions! • Consult the dealer or an experienced radio/TV technician for help. • To prevent fire or shock hazard, do not expose this appliance to rain or moisture. Page 14 Naxa Electronics... - Page 15 CAUTION ON MODIFICATIONS Any changes or modifications not expressly approved by the grantee of this device may void the authority granted by the FCC to operate the equipment. www.naxa.com Page 15...
-
Page 16: Specifications
In-dash, single DIN the instructions in this manual. Please also visit us Faceplate Detachable, Flip-down on the web at www.naxa.com to get up to the minute Display Type news, alerts, and documentation for your device. For Disc Support additional assistance, please contact Naxa Technical Support. Bluetooth Version ???????? ® USB, SD, SDHC Removable Memory Support... - Page 17 Page 17...
Need help?
Do you have a question about the NCA-615 and is the answer not in the manual?
Questions and answers