LaCie THUNDERBOLT SERIES User Manual
Thunderbolt series
Hide thumbs
Also See for THUNDERBOLT SERIES:
- User manual (10 pages) ,
- User manual (30 pages) ,
- User manual (39 pages)
Table of Contents
Advertisement
Quick Links
Advertisement
Table of Contents

Related Manuals for LaCie THUNDERBOLT SERIES


Summary of Contents for LaCie THUNDERBOLT SERIES
- Page 1 THUNDERBOLT SERIES USER MANUAL CLICK HERE TO ACCESS AN UP-TO-DATE ONLINE VERSION of this document for the most recent content as well as for features such as expandable illustrations, easier navigation, and search capability. Thunderbolt Series User Manual...
-
Page 2: Box Content
MINIMUM SYSTEM REQUIREMENTS Your system must meet certain requirements in order for your LaCie product to function properly. For a list of these requirements, please refer to the product packaging or consult the product support web page at www.lacie.com/support/. - Page 3 * Thunderbolt and the Thunderbolt logo are trademarks of Intel Corporation in the U.S. and/or other countries. Thunderbolt Series User Manual...
-
Page 4: Views Of The Drive
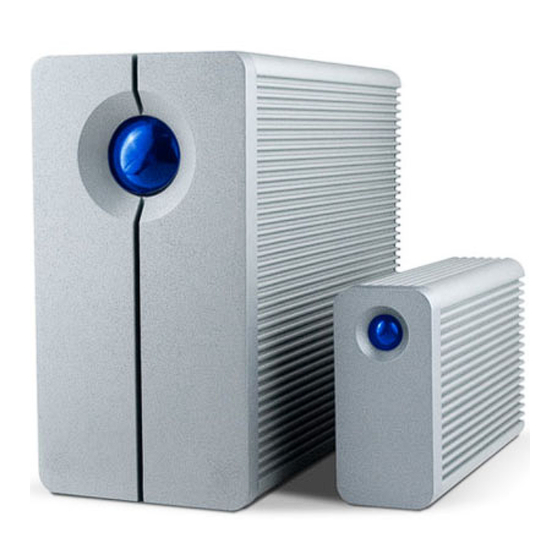
VIEWS OF THE DRIVE Front View 2big Thunderbolt Series Activity LED and power button Thunderbolt Series User Manual... - Page 5 Little Big Disk Thunderbolt Series Activity LED and power button Removable stand Thunderbolt Series User Manual...
-
Page 6: Rear View
Rear View 2big Thunderbolt Series Disk tray Disk lock Power supply connection (12V 4A) Thunderbolt technology ports Thunderbolt Series User Manual... - Page 7 Little Big Disk Thunderbolt Series Thunderbolt technology ports Power supply connection (12V 3A) Chain lock option Thunderbolt Series User Manual...
-
Page 8: Hard Disk Heat Management
HARD DISK HEAT MANAGEMENT Heat Dissipation Design The Thunderbolt Series enclosures feature metal bodies that dissipate drive heat. The large surface area of the heat sink casing absorbs all internal heat, keeping the drives safe and prolonging their life. Since LaCie's unique design draws heat away from the internal drives, the external casing will be warm to the touch after extended use. - Page 9 Users interested in placing two 2big enclosures in a specially designed rack may visit LaCie for further information. When placing the enclosures in a rack, LaCie recommends that you allow for adequate airflow so that the units do not overheat. Thunderbolt Series User Manual...
- Page 10 Important info: Do not stack more than two 2big enclosures. Doing so will void the warranty. Little Big Disk Thunderbolt Series Heat dissipation is maximized when the Little Big Disk enclosure rests on its stand in a vertical position. Please make certain that it has ample space on all sides of the casing for proper airflow.
- Page 11 Do not stack the unit with other Little Big Disks or similar items. Stacking your Little Big Disk(s) will void the warranty. Thunderbolt Series User Manual...
-
Page 12: Receiving Power/Led Power Button
RECEIVING POWER/LED POWER BUTTON RECEIVING POWER To receive power, Thunderbolt Series enclosures must be: Connected directly to a Macintosh computer that is compatible with Thunderbolt technology Connected to a power source via the included power supply MULTI-FUNCTIONAL LED/POWER BUTTON LED States - 2big Thunderbolt Series LED Behavior State The product is in active mode. -
Page 13: Power Button
The enclosure will stop sending power to the disks. Please note that the enclosure will maintain the daisy chain with other Thunderbolt devices even when the drives have been powered down. To power on the drives, press the LED button. The partition(s) will appear on the desktop. Thunderbolt Series User Manual... -
Page 14: Thunderbolt Technology And Daisy Chain
While maximum theoretical transfer rates are rarely sustained, it is no less impressive to imagine the amount of high-end data that can be passed to and from your LaCie Thunderbolt Series storage. To take advantage of the throughput offered by Thunderbolt technology, the two internal drives in your LaCie enclosure have been preconfigured as a Striped RAID Set (RAID 0). -
Page 15: Daisy Chain
Daisy chaining Thunderbolt compatible devices and displays Connect the cable to one of the interface ports on the back of your LaCie Thunderbolt Series enclosure and to your Macintosh computer. The additional port may be used to daisy chain compatible computer peripherals, such as hard drives, monitors, and much more. -
Page 16: Getting Connected
GETTING CONNECTED Please follow the setup steps in the order they are given to ensure that the Thunderbolt Series volume mounts correctly on your computer. CONNECT THE INTERFACE CABLE Connect a cable that supports Thunderbolt technology to one of the enclosure's Thunderbolt ports. Plug the other end of the cable to a compatible Thunderbolt technology port on your Macintosh computer. - Page 17 Connect the included external power supply to an outlet and to the enclosure power port. 2big Little Big Disk The device will turn on automatically when it receives power and the volume will mount on the desktop. Thunderbolt Series User Manual...
- Page 18 2big Little Big Disk Technical note: A single Thunderbolt technology daisy chain can have seven devices, including the computer. Thunderbolt Series User Manual...
-
Page 19: Unmounting The Thunderbolt Series Volume
UNMOUNTING THE THUNDERBOLT SERIES VOLUME In order to avoid file system corruption, it is important to unmount the volume(s) before turning off the enclosure or disconnecting the interface cable. See Unmounting Your Drive for details. Thunderbolt Series User Manual... -
Page 20: Install Drivers (Windows Only)
This is often the case when using Chinese, Korean, and Japanese fonts. To configure RAID, use a name that contains only single-byte characters. To download the installer for the LaCie Thunderbolt driver, please select your product below: LaCie Little Big Disk Thunderbolt Series... - Page 21 Move on to Part 2. PART 2 Since this LaCie product is originally configured in the HFS+ file format (for use on Mac) and RAID 0, all partitions must be erased, including the EFI partition. Windows Disk Management cannot erase the EFI partition so you'll need to run Diskpart, a separate Windows utility.
- Page 22 Confirm that your Windows computer is compatible with Thunderbolt technology. Back up all files stored on your LaCie Thunderbolt device (if applicable). Please connect your LaCie Thunderbolt device to a Mac with a Thunderbolt port to back up your data.
- Page 23 Disk 1. The disk numbers will be different on Windows computers with more than one internal hard drive. Please make certain to locate the disk number(s) for your LaCie device then type select disk n. n is the number for the first LaCie hard drive, 1 in the screenshot below.
- Page 24 Diskpart will confirm that your hard disk has been selected. To delete all paritions on the hard disk, type clean. Diskpart will confirm that your hard disk is clean, meaning that the partitions have been deleted. Thunderbolt Series User Manual...
- Page 25 Once all the HFS+ partitions have been deleted, close Diskpart then move on to Part 3. PART 3 If you successfully completed Part 2, then your LaCie Thunderbolt storage currently has no RAID set up. In Part 3, you'll set up a RAID array using Windows Disk Management.
- Page 26 Each of your LaCie Thunderbolt device's disks will be represented with a row in the lower part of the window. They should be labelled as Unallocated. Right-click on the first disk's row and select New Striped Volume (RAID 0) or New Mirrored Volume (RAID 1).
- Page 27 Name the volume and assign a file system (usually NTFS), then click Next >. To expedite the RAID configuration, keep the box checked next to Perform a quick format. Review the summary in the next window then click Finish to format the hard disks. Thunderbolt Series User Manual...
- Page 28 The volume will mount on your computer. If you created a mirrored (RAID 1) volume, it will take some time for the OS to sync the drives. However, the volume is immediately accessible. * Thunderbolt and the Thunderbolt logo are trademarks of Intel Corporation in the U.S. and/or other countries. Thunderbolt Series User Manual...
-
Page 29: Unmounting Your Drive
Mac device icon. Your drives may be represented by different icons.) When the volume icon disappears from the desktop, the Thunderbolt Series enclosure can be disconnected from the computer or you can press the LED to conserve energy. -
Page 30: Lacie Raid Monitor And Replacing A Disk (2Big Only)
Technical note: LaCie RAID Monitor is a great utility for the 2big Thunderbolt when it is configured for a Striped RAID Set (RAID 0) or a Mirrored RAID Set (RAID 1). It will not survey the disks when the 2big Thunderbolt is configured in JBOD mode. - Page 31 Click Install. Your computer may ask you to enter the Administrator password to continue. Thunderbolt Series User Manual...
-
Page 32: Using Lacie Raid Monitor
Using LaCie RAID Monitor LaCie RAID Monitor will launch automatically following a successful installation. The utility runs in the background while you work, polling the 2big storage to verify the health of the RAID. To view the health of your 2big: Go to the menu bar to click on the RAID Monitor icon. - Page 33 Select Open LaCie RAID Monitor. The LaCie RAID Monitor gives you an easy color-coded reference to instantly know if your 2big is in good health: Green indicates that the RAID is in working order. Thunderbolt Series User Manual...
- Page 34 Red indicates a problem with one or both disks in the RAID. Thunderbolt Series User Manual...
-
Page 35: Early Warning
Early Warning You do not have to launch LaCie RAID Monitor to receive an alert regarding the health of the RAID. Should one or both disks encounter problems, the LaCie RAID Monitor icon in the menu bar will blink with an exclamation mark inside a triangle. -
Page 36: Replacing A Disk (2Big)
2big only due to the type of enclosure. In the event that an individual hard disk fails in the LaCie 2big Thunderbolt Series, please contact your LaCie reseller or LaCie Customer Support. Failed hard drives within the 2big Thunderbolt Series enclosure should only be replaced by a compatible LaCie disk with equal capacity. -
Page 37: To Insert A Disk
Remove the failed disk according to the instructions above. Please make certain that you are properly grounded to avoid electrostatic discharge. Remove the screws from the drive tray to replace the failed drive with the disk that you received from LaCie. Fasten the screws back on the drive tray. -
Page 38: Rebuilding A Raid Set
Striped RAID Set. Mirrored RAID Set (RAID 1) The 2big Thunderbolt Series RAID is configured using Mac Disk Utility. Please visit the Apple® Support page for instructions on how to recover from a hard drive failure on a mirrored array (Apple Support). -
Page 39: Striped Raid Set (Raid 0)
Therefore, LaCie highly recommends backing up data stored on a Striped RAID Set at least once a day. You can back up the data to your computer’s internal disk or another hard drive with sufficient capacity. -
Page 40: Configuring A Raid Set
CONFIGURING A RAID SET Important info: LaCie Thunderbolt Series enclosures are plug and play storage pre-configured in RAID 0. To use the disks out of the box, see Getting Connected for information on connecting your device to a Macintosh computer that supports Thunderbolt technology. - Page 41 Click on one of the LaCie drives to see the action tabs. Click the RAID tab. The RAID tab includes three important settings: RAID Set Name, Format, and RAID Type. Thunderbolt Series User Manual...
- Page 42 Clicking on the Format pulldown menu shows the file system formats available for the drives when creating the RAID. Select Mac OS Extended (Journaled). Clicking on the RAID Type pulldown shows the available RAID configurations. LaCie highly recommends that you select Striped RAID Set for enhanced performance. For data protection, choose Mirrored RAID Set.
- Page 43 Fill in a name for your Striped or Mirrored RAID Set in the field RAID Set Name. Drag one of the drives to the empty field in the middle of the RAID tab. Drag the second drive to the same field in the middle of the RAID tab. Thunderbolt Series User Manual...
- Page 44 Click Create on the bottom of the window to begin building the RAID. Click Create in the pop-up window. Please be patient while Disk Utility configures the RAID. The RAID Set will appear on the desktop as a single drive icon. Thunderbolt Series User Manual...
- Page 45 Thunderbolt Series User Manual...
-
Page 46: Getting Help
GETTING HELP If you are having problems with your LaCie product, consult the table below for a list of available resources. Order Source Description Location Concise steps to Quick follow for getting your Either a printed leaflet or accessory box and included in the... -
Page 47: Troubleshooting Topics
Q: I connected the Thunderbolt Series enclosure to my new Mac with an older Mini DisplyPort cable that I use for my monitors. Why can't I see the Thunderbolt Series volume(s) on the desktop? A: The Thunderbolt Series storage requires cables specifically constructed for Thunderbolt technology. -
Page 48: Problem: The Disk Space Does Not Seem Right
Problem: The disk space does not seem right. Q: I just threw a lot of files into the Trash from my Thunderbolt Series storage. Why don't I see more space to copy new files? A: Disk space will not be reclaimed until the file is erased. To remove the files forever: Click the Trash icon in the Dock. - Page 49 Thunderbolt Series User Manual...
-
Page 50: Health And Safety Precautions
II). Do not expose the LaCie hard drive to temperatures outside the range of 5º C to 30º C (41º F to 86º F); or to operational humidity beyond 10-80%, non-condensing, or non-operating humidity beyond 10-90%, non-condensing. - Page 51 Never use excessive force on your LaCie hard drive. If you detect a problem, consult the troubleshooting section in this manual. Protect your LaCie hard drive from excessive exposure to dust during use or storage. Dust can build up inside the device, increasing the risk of damage or malfunction.
-
Page 52: Warranty Information
LaCie (“LaCie”) warrants, to the original purchaser, that this equipment shall be free of defects in materials and workmanship for a period of one (1), two (2), three (3), or five (5) years, depending on the model, from LaCie's date of original shipment when the equipment is used normally and is properly serviced when needed. If you discover a defect covered by the warranty set forth above, your sole and exclusive remedy will be for LaCie, in its sole discretion to (i) repair or replace the product at no charge to you;... - Page 53 Any loss, corruption or destruction of data while using a LaCie drive is the sole responsibility of the user, and under no circumstances will LaCie be held liable for the recovery or restoration of this data. To help prevent the loss of your data, LaCie highly recommends that you keep TWO copies of your data;...
-
Page 54: Service Doa
Within the 15 calendar days of purchase, should you experience an issue with your new LaCie product, we ask you to return the product to the place where it was originally bought. You will be required to give a proof of purchase. -
Page 55: Legal Information
LEGAL INFORMATION COPYRIGHTS Copyright © 2014 LaCie. All rights reserved. No part of this publication may be reproduced, stored in a retrieval system, or transmitted in any form or by any means, electronic, mechanical, photocopying, recording or otherwise, without the prior written consent of LaCie. -
Page 56: Canada Compliance Statement
This is a Class B product based on the standard of the Voluntary Control Council for Interference from Information Technology Equipment (VCCI). If this is used near a radio/TV receiver, it may cause radio interference. Install the equipment according to the manual. This statement does not apply to the LaCie CloudBox.
Need help?
Do you have a question about the THUNDERBOLT SERIES and is the answer not in the manual?
Questions and answers