Table of Contents
Advertisement
Quick Links
Operating Instructions
GB
English, 1
I6 EVA/UK
I6 EVA/UK
Contents
Installation, 2-3
Technical data
Cooking advice, 6-7
COOKER AND OVEN
GB
Advertisement
Table of Contents

Related Manuals for Indesit I6 EVA/UK


Summary of Contents for Indesit I6 EVA/UK
-
Page 1: Table Of Contents
Electrical connection Technical data Description of the appliance, 4 Overall view Control panel Start-up and use, 5 I6 EVA/UK I6 EVA/UK Starting the oven Using the cooking timer Cooking advice, 6-7 Oven cooking advice table Using the electric hob, 8... -
Page 2: Warning,2
Installation WARNING WARNING: The appliance and its • ! Before operating your new appliance please read accessible parts become hot this instruction booklet carefully. It contains important during use. information concerning the safe installation and Care should be taken to avoid •... -
Page 3: Electrical Connection
Voltage Power (W) board by inserting a 240V~ 50/60 Hz 9900 screwdriver into the I6 EVA/UK side tabs of the cover. Use the screwdriver as Safety Chain a lever by pushing it down to open the cover ! In order ( see diagram ). -
Page 4: Description Of The Appliance
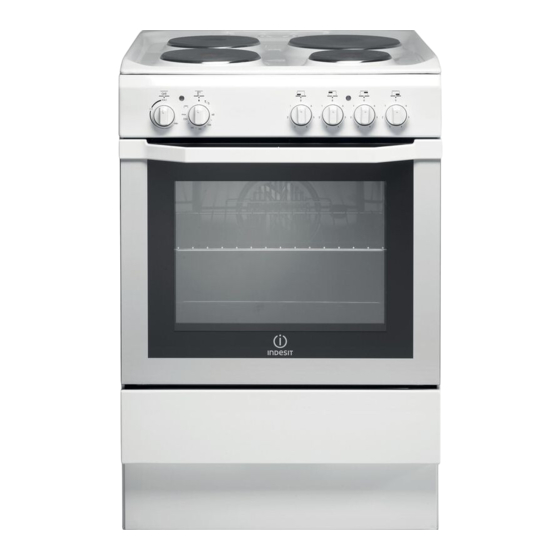
Description of the appliance Overall view Tray for Catching Overflows Electric Electric plates plates GUIDE RAILS Control panel for the sliding racks position 5 GRILL rack position 4 DRIPPING pan position 3 position 2 position 1 Adjustable foot Adjustable foot Control panel THERMOSTAT ACTIVE HOTPLATE... -
Page 5: Start-Up And Use
Start-up and use ! The first time you use your appliance, heat the Oven light This is switched on by turning the SELECTOR knob empty oven with its door closed at its maximum to any position other than “0”. It remains lit as long temperature for at least half an hour. -
Page 6: Cooking Advice
Cooking advice When using the oven, only one rack or drip pan Cooked well on the inside but sticky on the outside should be used at a time. The rack or pan should be inserted into the bottom or top guides depending on Use less liquid, lower the temperature, and increase whether the food needs more heat from the top or the cooking time. -
Page 7: Oven Cooking Advice Table
Oven cooking advice table Food to be cooked Cooking Temperature Variable Pre-heating time Cooking (wt) position of (°C) grill (min) time shelves from (min.) bottom Pasta Lasagne 75-80 Cannelloni 75-80 Oven-baked noodles 75-80 Meat Veal 85-90 Chicken 110-115 Turkey 95-100 Duck 120/125 Rabbit... -
Page 8: Using The Electric Hob
Using the electric hob Practical advice on using the electric !The position of the corresponding electric hotplate hotplates is shown on every knob. To avoid heat loss and damage to the hotplates use Electric hotplates pans with a flat base, whose diameter is no less The corresponding knob may be turned clockwise or than that of the hotplate itself. -
Page 9: Precautions And Tips
Precautions and tips ! This appliance has been designed and • If the appliance breaks down, under no manufactured in compliance with international safety circumstances should you attempt to repair the standards. appliance yourself. Repairs carried out by The following warnings are provided for safety inexperienced persons may cause injury or further reasons and must be read carefully. -
Page 10: Care And Maintenance
Care and maintenance Switching the appliance off Inspecting the oven seals Disconnect your appliance from the electricity supply Check the door seals around the oven regularly. If the before carrying out any work on it. seals are damaged, please contact your nearest After- sales Service Centre. -
Page 11: Removing And Fitting The Oven Door
Removing and fitting the oven door: Removing and fitting the oven door: 6.Replace the glass. WARNING! Oven must not be operated with inner WARNING! Oven must not be operated with inner WARNING! Oven must not be operated with inner 1.Open the door door glass removed! door glass removed! door glass removed! - Page 12 03/2013- 195109398.00 XEROX FABRIANO...
Need help?
Do you have a question about the I6 EVA/UK and is the answer not in the manual?
Questions and answers