Trane TZEMT400AB32MAA User Manual
Hide thumbs
Also See for TZEMT400AB32MAA:
- User manual (34 pages) ,
- Installation instructions (1 page) ,
- Installation instructions manual (32 pages)
Advertisement
Tools Needed
#2
1/8"
Customer Service Phone #: (877) 288-7707
Thermostat Guide
Model TZEMT400AB32MAA
Table of Contents
NOTE: This thermostat is not compatible with dual
fuel systems (heating system with both heat pump
and gas furnace), unless the system is controlled
with a dual fuel accessory relay kit. If you are
unsure whether your dual fuel system is controlled
with this accessory or if you need a dual fuel kit,
please contact a qualifi ed heating and cooling
contractor.
Pages 2-6
Pages 7-8
Page 9
TM
Pages 10-11
©2009 Schlage Lock Company
Thermostat Guide Rev. 5/09-Alpha
Advertisement

Related Manuals for Trane TZEMT400AB32MAA


Summary of Contents for Trane TZEMT400AB32MAA
-
Page 1: Table Of Contents
Thermostat Guide Model TZEMT400AB32MAA NOTE: This thermostat is not compatible with dual Tools Needed fuel systems (heating system with both heat pump and gas furnace), unless the system is controlled with a dual fuel accessory relay kit. If you are... -
Page 2: Physical Installation And Wiring
Physical Installation and Wiring WARNING Voltage hazard. Can cause electrical shock or equipment damage. Turn off all power to heating and cooling equipment before beginning installation. Remove the existing thermostat cover from the wall plate. Leave wires attached. Consult instructions that came with existing thermostat as needed. The look of your existing thermostat may vary Thermostat... - Page 3 Identify your System Type from the list below. You will need to check your wire labels to help identify the system type. Gas Furnace - Single Stage - Uses gas for heating - Has a “W” or “W1” wire, but does NOT have a “W2” Gas Furnace - Multistage - Uses gas for heating - Has a “W”...
- Page 4 Separate the face of the TZEMT400 thermostat from the wall plate. Apply pressure at two tabs on top of wall plate to release it. Tabs NOTE: It is not recommended that this Z-wave thermostat be mounted onto metal structures. Metal may affect the radio frequency (RF) communication between the thermostat and the Z-wave bridge.
- Page 5 W or W1 Payne W or W1 Y or Y1 L/W3 Rheem/Ruud W or W1 Y or Y1 Trane/American Standard (Weathertron) W or W1 Y or Y1 York W or W1 Y or Y1 Connects to New Thermostat Terminals 24COM...
- Page 6 Attach all wires securely to the new thermostat. Note: A wire must be connected to “24COM” to power the thermostat. Use the information from step 12 to match the wires to the correct terminals. Use 1/8” blade screwdriver to secure wires in terminals. CAUTION: EQUIPMENT DAMAGE HAZARD - Improper wiring can lead to equipment damage.
-
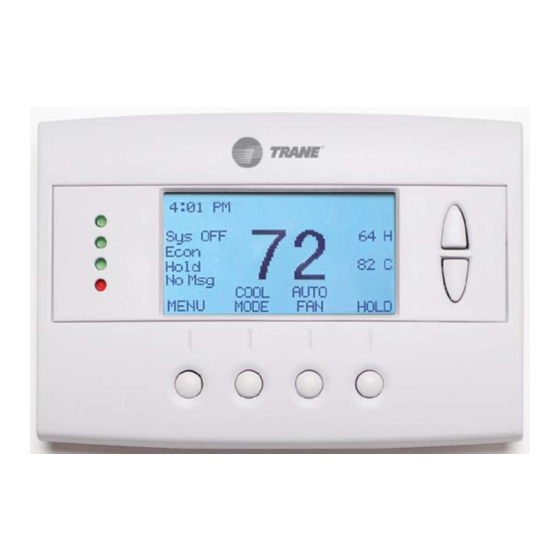
Page 7: System Settings At Thermostat
System Settings at Thermostat Set Time and Date Press the MENU button twice. Scroll up or down to Set Clock (it is the fi rst option), then press the Select button. 11:15 AM Outside 60 User Settings Scroll 76 H Set Clock Filter Service 74 C... - Page 8 Gas Furnace - Multistage Mechanical Settings Press the MENU button twice. 11:15 AM Outside 60 Press and hold the two inner buttons for 3 seconds to view 76 H Installer Settings. Scroll down to System Settings and press the Select button. 74 C Scroll to Mechanical Settings (it is the fi...
-
Page 9: Perform System Checkout
Perform System Checkout Test Fan Operation 11:15 AM Outside 60 Press the FAN button. 76 H Scroll to Sys Off Verify that the system fan starts and moves air. 74 C Press the FAN button. AUTO AUTO Scroll to AUTO. MENU MODE Press the Done button to return to the home screen. -
Page 10: Enroll Thermostat Into Schlage Link
Enroll Thermostat into Schlage LiNK System Prepare the bridge for enrollment. Unplug Ethernet and power cables from bridge. Verify that blue light is blinking. If blue light is solid, battery is dead. Install a quality 9 volt battery. Take bridge to the location where the thermostat is mounted. Enroll the thermostat into the bridge. - Page 11 Establish Online Control of the Thermostat. Schlage LiNK account must be active before continuing. See link.schlage.com for more information. Plug the Ethernet and power cord back into the bridge. Log into your account at www.schlagelink.com. Click the Climate tab and follow the onscreen instructions.
Need help?
Do you have a question about the TZEMT400AB32MAA and is the answer not in the manual?
Questions and answers