Table of Contents
Advertisement
Available languages
Available languages
USING YOUR BREWER
OWNER'S MANUAL: Getting the most from your new
®
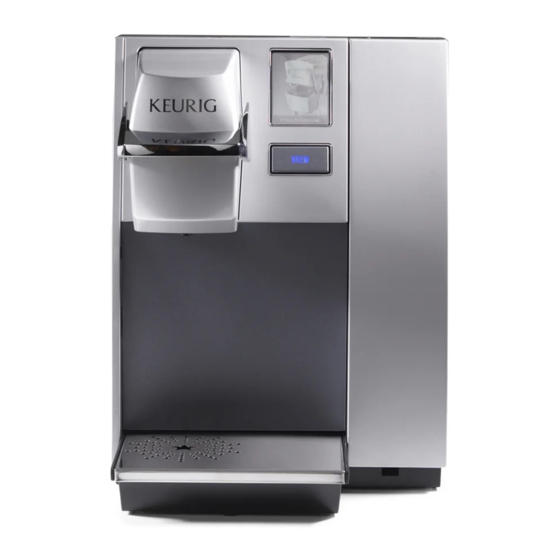
Professional Series Small Office/Home Office B155 Keurig
Brewer
COMMENT UTILISER VOTRE CAFETIÈRE
MANUEL D'UTILISATION : Tirez le meilleur de votre nouvelle cafetière
B155 pour petit bureau/bureau à domicile de Keurig
®
Série professionnelle
Advertisement
Table of Contents

Related Manuals for Keurig B155


Summary of Contents for Keurig B155
- Page 1 OWNER’S MANUAL: Getting the most from your new ® Professional Series Small Office/Home Office B155 Keurig Brewer COMMENT UTILISER VOTRE CAFETIÈRE MANUEL D’UTILISATION : Tirez le meilleur de votre nouvelle cafetière B155 pour petit bureau/bureau à domicile de Keurig ® Série professionnelle...
-
Page 2: Important Safeguards
(ground) prong instructions before it is used. ® any manner. Contact Keurig Customer from the power cord or use an adapter. Service to report any malfunction of or 4. The use of accessory attachments not 21. -
Page 3: Table Of Contents
KEURIG ® GOURMET SINGLE CUP BREWING SYSTEM Professional Series Small Office/Home Office B155 — Using Your Brewer ® CAUTION: There are two sharp needles that puncture the K-Cup portion pack, one above the K-Cup Holder and the other in the bottom of the K-Cup Holder. -
Page 4: Set-Up
2. For the best tasting gourmet coffee, tea or Record the serial number for this Brewer on hot cocoa, Keurig recommends using bottled 5. Brewing into a travel mug. page 3 of this guide. The serial number can be water or the Keurig ®... -
Page 5: Features
Features Professional Series — Model B155 Brewer Professional Series Small Office/Home Office B155 Brewer Water Reservoir Lid Handle K-Cup Assembly Drip Tray Housing Housing ® Water Reservoir K-Cup Holder Funnel Drip Tray Plate Power Switch Water Reservoir K-Cup Holder (E and F are... -
Page 6: Set-Up & First Brew
SECTION 1 Set-Up & First Brew ® Fill the Water Reservoir up to the You cannot use your Keurig Brewer IMPORTANT: fi g. fill mark with fresh, clean water. until it has been set up for its fi rst use. -
Page 7: Ready To Brew Your First Cup
K-Cup Holder (fig. 6). the brew process. CAUTION: There are two sharp needles that The end of brew is indicated by “KEURIG puncture the K-Cup, one above the K-Cup Holder BREWED ENJOY”. and the other in the bottom of the K-Cup Holder. -
Page 8: Adding Water
Set-Up & First Brew (continued) SECTION 1 IMPORTANT: Do not remove the Water Reservoir Stopping the Brew Process during the brewing process. If you need to stop the brewing after the process has started, press and Lift off the Water Reservoir Lid and pour release the Power Switch to turn the Brewer ‘OFF’. -
Page 9: Purging The Brewer
Place a large mug on the drip tray and Brewing Hot Water fig. select Large Mug (10 oz. serving) brew size Your Brewer is able to produce hot water for making hot cocoa from a from the Select Brew Size Menu (fig.10). packet, or for use in cooking, etc. -
Page 10: Menu Mode
SECTION 2 Menu Controls & Indicators Menu Mode fi g. To enter the MENU MODE the Brewer’s power must be off. Press and hold your finger on the display while pressing and releasing the power switch. Continue pressure on the display for 5 seconds (fig.11). The MENU screen will appear. - Page 11 Menu Key Navigation Language This Brewer is shipped with English as the default language. Home To change the language, follow the instructions on page 14. Press HOME at any time to return to your brewer to an idle state. Contact Clock The contact setting features allows you to program the contact Setting the clock is optional.
-
Page 12: Setting The Clock
(continued) SECTION 2 Menu Controls & Indicators Setting the Clock Programming Brew Temperature (188° – 198º F) Setting the clock is optional. When the clock is set, the time will appear in the LCD Control Center. NOTE: You must set the clock if you will be programming The Brewer brews at a preset temperature of 193°F. -
Page 13: Programming Brew Size
Programming Your Brew Size Programming On/Off Features All brew sizes are enabled in the default setting. If you want to disable any The Brewer provides three modes so that you can enjoy gourmet coffee, tea brew size, just press on the appropriate icon(s). Please follow instructions or hot cocoa on your own schedule. -
Page 14: Setting Contact Screen
“ENABLED” will appear on the screen and WWW.KEURIG.COM From the Menu Mode, press “CONTACT”. press “OK”. To disable the “AUTO OFF” feature, The LCD screen will display the Keurig press “OFF”. “DISABLED” will appear on the default contact information (fig.19). screen and press “OK”. -
Page 15: Cleaning & Maintenance
Assembly can be placed onto the top shelf of such as web/email address, contact a dishwasher. NOTE: Use low temperature WWW.KEURIG.COM name, etc (fig.22). To remove the cycles in the dishwasher. a. Enter new information using the Keypad. -
Page 16: Cleaning Water Reservoir & Lid
SECTION 3 Cleaning & Maintenance (continued) using the two front ribs as a guide, and snap Cleaning the Water Reservoir & Water Reservoir Lid fig. them into place from the top. The Water Reservoir Lid or Water Reservoir should not be put into the 2. -
Page 17: Draining Brewer
De-Scaling Instructions Service A. PREPARE Beyond these recommended cleaning and maintenance procedures this Brewer is Step 1: Make sure you have at least 90 oz. of undiluted white vinegar not user serviceable. For service, please refer to the Warranty section of this guide. on hand. -
Page 18: Troubleshooting
Consider using bottled water, filtered water On/Off. If “OFF” is not displayed, follow • taste in coffee or the Keruig ® Water Filter Starter Kit directions on pages 13-14 to reset. (available at www.keurig.com). If any problems persist, contact Customer Service at 1.866.901.BREW (2739) -
Page 19: Warranty
Brewer so that your purchase information will be stored in our system. SPECIFICALLY DISCLAIMS ALL OTHER WARRANTIES WITH RESPECT TO Keurig will, at its option, repair or replace the Brewer without charge upon its YOUR PROFESSIONAL SERIES B155 BREWER, INCLUDING ANY IMPLIED receipt of proof of the date of purchase. - Page 20 4. L’utilisation d’accessoires non recommandés ® niquer avec le Service à la clientèle de Keurig 21. Consulter un électricien qualifié si les instruc- par le fabricant de l’appareil risque de causer pour signaler tout mauvais fonctionnement de tions sur la mise à...
- Page 21 à K-Cup et l’autre au fond du support à K-Cup. Pour éviter tout risque de SYSTÈME D’INFUSION GOURMET UNE TASSE À LA FOIS DE KEURIG ® blessure, ne pas mettre les doigts dans le boîtier du support à K-Cup.
- Page 22 ® filtre à eau de Keurig (vendu au www.keurig. et à placer la tasse de voyage sur la base de la 10. Placez la cafetière debout sur une surface com).
- Page 23 Caractéristiques Cafetière B155 — Série professionnelle Cafetière B155 pour petit bureau/bureau à domicile Série professionnelle Couvercle du Poignée Boîtier de K-Cup Cuvette Bouton d’infusion (BREW) réservoir d’eau d’égouttage ® Entonnoir du support à K-Cup Couvercle Boîtier Réservoir d’eau Plateau à tasse Support à...
- Page 24 SECTION 1 Préparation et première infusion ® avec de l’eau fraîche et propre. N’utilisez par votre cafetière Keurig IMPORTANT : fi g. avant de l’avoir préparée pour une première Remplissez le réservoir jusqu’à la marque avec de l’eau fraîche et utilisation.
- Page 25 à durant le cycle d’infusion. K-Cup et l’autre au fond du support à K-Cup. Pour À la fin de l’infusion, le message « KEURIG éviter tout risque de blessure, ne pas mettre les BREWED, SAVOUREZ » s’affiche.
- Page 26 SECTION 1 Préparation et première infusion (suite) IMPORTANT : Ne pas enlever le réservoir d’eau Annulation d’une infusion pendant le processus d’infusion. Pour annuler une infusion en cours, appuyez sur l’interrupteur pour éteindre Enlevez le couvercle du réservoir d’eau et ver- la cafetière.
- Page 27 Placez une grande tasse sur le plateau à Eau chaude fig. tasse et choisissez le format de grande Votre cafetière peut vous donner de l’eau chaude pour préparer un tasse (296 ml/10 oz) dans le menu Choisir chocolat chaud en sachet, pour cuisiner, etc. Il suffit de suivre les instruc- le format (fig.
-
Page 28: Mode Menu
SECTION 2 Menu de commandes et voyants Mode MENU fi g. Pour accéder au MODE MENU, vous devez d’abord éteindre la cafetière. Appuyez sur l’écran avec votre doigt pendant que vous appuyez sur l’interrupteur puis le relâchez. Continuez à appuyer sur l’écran pendant 5 secondes (fig. - Page 29 Navigation dans les menus Langue La langue par défaut utilisée sur cette cafetière est l’anglais. Pour Accueil changer la langue d’affichage, suivez les instructions de la page 32. Appuyez sur ACCUEIL à tout moment pour remettre la cafetière en Coordonnées mode repos.
- Page 30 Menu de commandes et voyants (suite) SECTION 2 REMARQUE : Pour désactiver l’horloge, appuyez sur l’heure. Les heures de mise en marche et d’arrêt seront elles aussi désactivées. Réglage de l’horloge Réglage de la température d’infusion Le réglage de l’horloge est facultatif. Quand l’horloge est réglée, l’heure (88,7 °C/ 188°...
- Page 31 Programmation des formats d’infusion La cafetière peut être laissée 1. Cafetière laissée allumée en tout temps. allumée en tout temps de manière à ce qu’elle soit toujours prête à infuser Par défaut, tous les formats d’infusion sont activés. Si vous souhaitez une tasse de café...
- Page 32 « ON ». Le message « ACTIVÉ » NO DE TÉLÉPHONE « COORDONNÉES ». Les coordonnées par apparaît à l’écran. Appuyez sur « OK ». Pour défaut de Keurig s’affichent à l’écran (fig. 19). WWW.KEURIG.COM désactiver la fonction d’arrêt automatique, Appuyez sur l’onglet du haut (nom de appuyez sur «...
- Page 33 à K-Cup peut être placé dans le panier nom de la personne-ressource, etc.) (fig. 22). supérieur du lave-vaisselle. REMARQUE : a. Entrez les nouveaux renseignements à l’aide WWW.KEURIG.COM Utilisez les cycles à basse température du du pavé de touches. lave-vaisselle. Pour enlever l’assemblage du b.
- Page 34 SECTION 3 Nettoyage et entretien (suite) guidant sur les deux rainures à l’avant et Nettoyage du réservoir d’eau et de son couvercle fig. enclenchez-le en place. Le couvercle du réservoir d’eau et le réservoir d’eau ne vont pas au L’entonnoir peut 2.
- Page 35 Procédure de détartrage Réparation A. PRÉPARATION À l’exception des procédures de nettoyage et d’entretien recommandées, cette étape : Assurez-vous d’avoir au moins 2,6 litres (90 oz) de vinaigre blanc cafetière ne peut pas être réparée par l’utilisateur. Pour faire réparer l’appareil, non dilué.
- Page 36 Keurig ® (offert au www.keurig.com). SECTION 4 Dépannage Problème Solution Problème Solution La cafetière n’infuse L’aiguille de sortie est peut-être obstruée (voir la page 34). • pas une tasse Nettoyez l’assemblage du support à K-Cup si nécessaire • La cafetière ne Branchez la cafetière séparément.
- Page 37 à la garantie, il vous suffit d’appeler au Service à la INDIRECTS, TELS QUE LES DOMMAGES MATÉRIELS, ET NE COUVRE PAS clientèle de Keurig en composant le numéro sans frais 1 866 901-2739. Avant LES FRAIS ET LES COÛTS ENGENDRÉS PAR UNE VIOLATION DE LA de retourner votre cafetière pour la faire réparer, vous devez d’abord...
- Page 40 55 Walkers Brook Drive Reading, MA 01867 Keurig, Incorporated is a wholly-owned subsidiary of Keurig, Incorporated est une fi liale à 100 % de Green Mountain Coffee Roasters, Inc. Green Mountain Coffee Roasters, Inc. CLICK, CALL OR SHOP I www.keurig.com I 1.866.901.BREW...
Need help?
Do you have a question about the B155 and is the answer not in the manual?
Questions and answers