Table of Contents
Advertisement
Quick Links
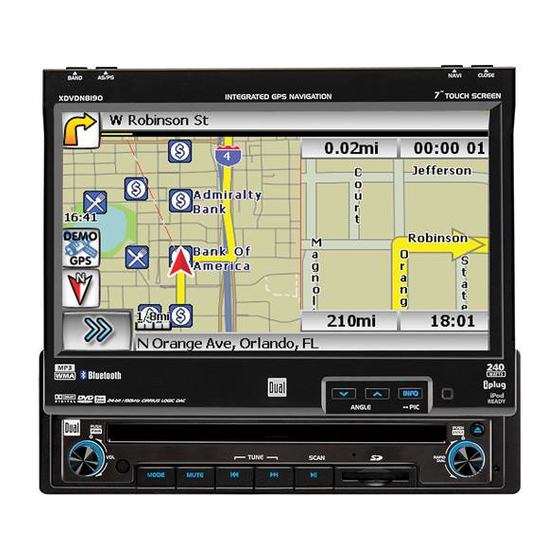
XDVDN8190
INSTALLATION/OWNER'S MANUAL
DVD Multimedia Receiver with Internal GPS Navigation
and
T
Touch Screen Display
DVD
VI DEO
rM
DD/oOLBYI
DIGITAL
disc
DIGITAL AUDID
lJplu
•
·
~.
0·
ilvRtlas,-
,
I
Bluetooth®
~
umm
Safety Notes:
The DVD video display of the in-dash unit will not operate while the vehicle is moving. This is a safety feature
to prevent driver distraction. In-dash DVD video functions will only operate when vehicle is in Park and the
parking brake is engaged. It is illegal in most states for the driver to view video while the vehicle is in motion.
Advertisement
Chapters
Table of Contents

Related Manuals for Dual XDVDN8190


Summary of Contents for Dual XDVDN8190
- Page 93 English...
- Page 94 Preface MERGE NavMate navigation software provides turn-by-turn route guidance while traveling to your destination. Before operating, take a few minutes to review the safety and operating instructions in this manual so you can quickly and safely become familiar with your NavMate software’s many features.
- Page 95 End-User License Agreement This End-User License Agreement (EULA) is a legal agreement between you (either an individual or a single entity) and HORIZON NAVIGATION, INC. for the operating software and updates thereof that run the digital map database and associated hardware (collectively the "Software").
- Page 96 Table of Contents SAFETY INFORMATION AND PRECAUTIONS ................. 6 INTRODUCTION TO YOUR NAVMATE SOFTWARE................ 7 ............................. 7 EHICLE OSITION ......................7 AP AND NFORMATION ATABASE NAVMATE SOFTWARE OPERATION ....................8 ............................. 8 UICK TART USING YOUR NAVMATE SOFTWARE ....................10 ..........................
- Page 97 EDIT MY POI ............................36 ............................36 ATEGORY ............................37 ETUP ISPLAY ............................38 ATEGORY ................................38 ..............................38 LERT ..............................39 ODIFY SET-UP MENU............................40 ........................40 AVIGATION REFERENCES ............................ 41 ISPLAY PTIONS UIF S ............................42 ETTINGS ..........................42 IGHT ETTINGS ..........................
-
Page 98: Safety Information And Precautions
Safety Information and Precautions WARNING! Please read and follow the following safety precautions. Failure to follow the instructions below may increase your risk of collision and personal injury. Please Drive Safely screen is displayed each time the NavMate software is turned ON as a reminder to make use of the system’s navigational aids in a safe manner. -
Page 99: Introduction To Your Navmate Software
Introduction to Your NavMate Software NavMate software provides turn-by-turn visual and voice assistance to direct you to your selected destination. The software quickly calculates step-by-step directions to any destination available on the included navigation map. The NavMate software uses Global Positioning System (GPS) satellites, and a digital roadway map database to calculate and display travel directions. -
Page 100: Navmate Software Operation
NavMate Software Operation Quick Start Follow these four easy steps and you are on your way. ______________________________________________________________________________ Before operating your NavMate software, please carefully read and follow the instructions provided in the "Safety Information and Precautions" section of this manual ______________________________________________________________________________ Step 1 -- Start up/Main Menu After the NavMate software starts, you will see the reminder warning to use your NavMate... - Page 101 icon (F3) to activate main menu. Start Route Guidance Point of Interest State/Province The software remembers the last State/Province, so this step NOTE: is not necessary every time. By Category Airport Sort by Distance Select one of these and the system will calculate a route to that destination using the criteria set in the Setup menu.
-
Page 102: Using Your Navmate Software
Using Your NavMate Software The best way to learn about this product is to explore it, while observing the safety precautions discussed earlier. Function Buttons The buttons on the bottom of the display are called function buttons. These buttons change labels and function depending on the screen displayed. -
Page 103: Navigation Menus
Repeat voice instruction. Navigation Menus The table below briefly describes the Main Menu options. Main Menu Options At-A-Glance Main Menu Option Select this Option to... Go to… Pick a destination for routing. Add or modify destinations in Address Book, Home Address, Office Address Edit Favorites Trail Book and Trip Book Setup... - Page 104 List Mode and Spell Mode Most Recently Used Portion of List Most Recently Used List Items Spell Mode Buttons Button Mode Press This Button to...
-
Page 105: Map Screen
Spell Select currently input characters and show list of matches. Spell Delete last entered character. Spell Switch keyboard from QWERTY layout to special character layout. Spell Switch keyboard from special character layout to QWERTY layout. Spell Quit Spell Mode and return to List Mode. Map Screen The table below explains the button functions available on the Map Screen. -
Page 106: Address/Intersection
The table below explains the button functions available on the Destination Selection Menu. Destination Selection Buttons Button Press This Button to... Return to map mode Return to main menu. Go back one step. Address/Intersection If you know the street address or cross streets of your destination, use the "Address/Intersection"... - Page 107 Address/Intersection Selection You may select either the Postcode or City Name or the Street Name first. Postcode – If you know the postcode, select this option to quickly find the city. Note: The postcode search is limited to the currently selected State/Province. Postcode searching may not be available in all areas.
- Page 108 Select Street City and local area where street is located House numbers on that road segment If you selected the "City Name" option, continue by following the prompts on the display screen to select a city first, then street, then address number or intersection. If you selected the "Street Name"...
-
Page 109: Point Of Interest (Poi)
Go back one step. Point of Interest (POI) The Point of Interest option is useful when you are going to a public place or are looking for some type of facility such as a gasoline station. After selecting the Point of Interest option, you must select the State/Province where the destination is located. - Page 110 POI Category POI Name Speller Some POI categories may not be available in some areas and not all possible POIs may be listed for all categories. For example, although the "Restaurant" category is very extensive, it is only as current as the map database information. Several categories restrict the search radius as well to minimize the search time.
-
Page 111: Home Address
POI Search Results Straight-line distance to POI and POI phone number POI address POI Name Home Address The Home Address is a convenient way to route to your saved home address directly. Office Address The office Address is a convenient way to route to your saved office address directly. -
Page 112: Favorites
Favorites There are three additional ways to set your destination under Favorites: Address Book The Address Book is a convenient place to store frequently visited destinations. To add, delete, or edit address book entries see “Address Book Editing” section of this manual. -
Page 113: Trail Book
Address Book Entries Address Book Selection Buttons Button Press This Button to... Exit menu mode and return to map mode Page up in displayed list. Return back one menu level. Page down in displayed list. Display spell mode. Go back one step. Trail Book You can route to trails you have created. -
Page 114: Latitude Longitude
Latitude Longitude You can route to a destination by directly inputting latitude and longitude values. Previous Destination Previous destinations entered into your NavMate software are automatically saved into the memory of the NavMate software. This is helpful when you want to return to a recent destination, such as a hotel where you may be staying. -
Page 115: By Using Map
Page down in displayed list. Go back one step. By using Map You may select the destination by touching the screen. The system will display the cross hairs according to the location you touch. Select Destination from Map Panning crosshairs Press current position to display location information about the current panned location. -
Page 116: Route Calculation And Guidance
Select Destination from Map Buttons Button Press This Button to... Return to map mode Return to main menu. Go back one step. Route Calculation and Guidance After selecting a destination, the system calculates a route based on the route criteria set in the Setup Menu. -
Page 117: Please Proceed
Please Proceed When route calculation is complete, the NavMate software will instruct you to “Please proceed to the highlighted route” unless you are already on the route. The highlighted route is indicated in magenta. Route Guidance Once on the highlighted route, guidance information is provided on the screen. Glance at the screen only when necessary and safe to do so. -
Page 118: Map Display
Map Display The Map Display shows roads, road names, and cartographic features like lakes and rivers. You can adjust the map scale, the map orientation, map view, status information display, and the distance units to your own preferences (See Setup section of this manual). Map display Park Clock... -
Page 119: Arrival Screen
Current Location Screen Arrival Screen The destination is shown on the Map Display screen with a circle. A voice message announces that you are approaching your destination. Arrival Screen... -
Page 120: Off-Route And Route Interruptions
Off-Route and Route Interruptions If you leave the current route, the NavMate software will automatically recalculate the route. This feature may be disabled if you prefer by turning “Auto Recalc Off” in the Setup menu. If you leave the route to make a stop, the NavMate software remembers your destination. After you re-start, the NavMate software will ask if you want to continue your route. -
Page 121: Edit Home Address
Use Edit function to rename address book entry. Edit Home Address The “Home Address” option allows adding or replacing home address. Select home address from the following places. -
Page 122: Edit Office Address
Edit Office Address The “Office Address” option allows adding or replacing office address book. Select office address from the following places. -
Page 123: Edit Trail Book
Edit Trail Book The “Trail Book” option allows adding, deleting an editing trail book entries. Add Trail... -
Page 124: Name Trail
Press current position to add a waypoint: Press Menu icon and select complete the trail: Stop Trail when you Name Trail After select the saved trail use the keyboard to rename the trail. -
Page 125: Delete Trail
Delete Trail Select Delete Trail then chooses the trail name to remove it from the system. -
Page 126: Edit Trip Book
Edit Trip Book Edit Trip Book allows adding and editing trips and destinations within a trip. Add allows adding trips and destinations within a trip. -
Page 127: Edit
Press to add additional destination or press to delete an existing destination in a selected trip. Edit Edit allows modifying destinations within a trip and or deleting an existing trip. -
Page 128: Edit My Poi
Edit My POI The user can create personalized categories of Point Of Interest. Add Category In order for My POI to work properly, a category needs to be created first before adding a destination as a POI. Use keyboard to create a new POI category name. -
Page 129: Setup Display
Setup Display By selecting the map scale, the user can hide or unhide the POI’s display on the selected map scale view. -
Page 130: Edit Category
Edit Category The user can modify or delete the selected POI category By selecting a destination, the user can add this destination as a POI to the POI category you have created. Alert By selecting sound and distance the system will alert you when you are approaching the POI destination. -
Page 131: Modify
Modify The user can modify the POI items by category, by name or by phone number. The POI names can be edited or deleted from the list. -
Page 132: Set-Up Menu
Set-up Menu You may customize the NavMate software to your own preferences. Select Set-up option to adjust navigation preferences, display options, and units (km or mi) settings. You may also reset the vehicle position and do some basic system diagnostics through the Setup Menu. Navigation Preferences Navigation Preferences allows you to set the simulation mode on, and set the route calculation and guidance options. -
Page 133: Display Options
Simulation On/Off – When On, the NavMate software will “drive” the selected route even though the vehicle is not moving. This can be used to preview a route, or show off the system to friends. Shortest time/distance – Determines if the NavMate software emphasizes finding the fastest or the shortest route. -
Page 134: Uif Settings
UIF Settings Day/Night Settings You can select Auto, Day or Night color scheme. Point of Interest This feature will allow you to select POI that will be displayed in different scales. Set Distance Units The units used when displaying and announcing the distance to turns may be set to Miles (decimal miles, e.g. -
Page 135: Set Time
Distance Units Selection Set Time Set Time Language Settings Language Settings... -
Page 136: Location Reset
Location Reset You may reset the location of the vehicle symbol using the Location Reset option. System The System Diagnostics menu allows you to diagnose the GPS reception status, adjust the current vehicle symbol position, and it also provides information on the current software and map version numbers. -
Page 137: Gps Diagnostic
The GPS diagnostic displays the number of GPS satellites currently in view and how many are currently being used. The GPS satellite time is displayed (UTC) and so is the latitude and longitude determined from GPS. GPS diagnostic GPS Diagnostic Test Result To reset the vehicle symbol based on the GPS determined longitude and latitude, select GPS VP reset. -
Page 138: Trip Computer
Trip Computer Trip Computer gives the readings of speed, trip related timing, elevation, odometer and clock. Detailed Readings Press to display detailed reading of each filed. Reset readings Scroll the Up or Down arrow button to choose the field then press to reset current reading. -
Page 139: Planned Route
Planned Route To view planned route on a highlighted route click the Yellow Maneuver Icon and the system will display the entire route list. -
Page 140: Detour
Detour Detour Distance... -
Page 141: Cancel Route
Avoid Specific Road Cancel Route Select this function to cancel the current route. Follow Trail Next time when you go off-roading, you can follow the same trail you created by selecting “Start Route Guidance” then select “Trail Book” and finally select an existing trail. - Page 142 You will see the following screen upon selecting a trail:...
- Page 143 You can select to go to any points in this trail as a starting point. Upon your selection, the system will point you with a red line to that starting location. You will follow the red line to the starting point and start your trail blazing by following the dotted line.
- Page 144 Press Menu Icon then select “Stop Trail” to cancel route.
-
Page 145: Appendix A : Navutil Manual
Appendix A : NavUtil Manual Introduction Navigation Software Utility (NavUtil) has 4 major components: 1) POI Uploader 2) Map/Voice Uploader (For installing Navigation System on memory card or HDD) 3) Backup 4) Restore. This utility helps the user to upload/download POI files, map and voices files, backup the user specific data files and also to restore user specific data files into the navigation unit. -
Page 146: Language
Language It allows you to select different languages when running NavUtil. So far it supports US English, UK English and Russian. -
Page 147: Poi Uploader
POI Uploader POI Uploader intended to edit and upload POI categories and import and upload list of POI’s. When POI Uploader is started it shows list of POI imported files. Whatever files the user needs to upload should be collected and loaded. Button “Add”... -
Page 148: Select Category Feature
Select Category feature “Select category” feature provides the user the ability to edit, add new and assign POI categories. - Page 149 Button “New” is used to create new POI category. In the New Category dialog box, name and POI icon is a must to create a new POI category. Button “Delete” removes one or more selected categories. If category is assigned to - some POIs, delete process is denied.
-
Page 150: Map/Voice Uploader
Map/Voice Uploader (For installing Navigation System on memory card or HDD) The Map/Voice uploader utility is used to upload map data into the navigation unit. It helps to copy the selected map data from the Master DVD to the memory storage device like SD card, CF card, HDD (Hard Disk Device) etc. -
Page 151: Select Database Area
Select Database Area To select the Database Area, click on the down arrow of the Database Area option and then select the area you want to download. Select Language To select the Language, click on the down arrow of the Language option and then select the voice guidance language you prefer. -
Page 152: Select The Destination
Select the Destination To select the Destination, click on the down arrow of the Destination option and then select the destination drive of the memory device. After making all the above selections click on “GO” button to start the downloading process. The Process of Copying After the downloading process starts the following windows will appear based on the memory card device. - Page 153 If HDD is connected then: This process will backup the navigation data files from your memory card to a folder called \Navmate on your PC, and then it removes the navigation folder from the memory card. Click “OK” to continue the process. If the CF/SD card is connected then: If HDD is connected then:...
-
Page 154: Remove The Memory Device
After cleaning up the program will start copying/downloading the files from DVD to memory device. The window below will appear when copying/downloading is complete: Left click “OK” to exit this program. Remove the Memory Device Safely remove memory card from the memory card reader or disconnect the USB cable. a. -
Page 155: Restore
When backup process is started, progress dialog box appears. The dialog has only one button Cancel to interrupt process. If process is interrupted no cleanup operation is undertaken. During backup operation, data is being copied from /Storage directory on the unit to directory YYYYMMDD.HHMMSS.nsu –... - Page 156 Restore button starts process to copy data from selected to backup directory to Storage directory from unit’s root. If there is some data in Storage directory, warning appears to confirm overwriting files. When restoring process is started, progress box appears. The progress box contains Cancel button to interrupt process.
Need help?
Do you have a question about the XDVDN8190 and is the answer not in the manual?
Questions and answers