Table of Contents
Advertisement
Advertisement
Table of Contents

Related Manuals for TC-Helicon VOICELIVE Touch


Summary of Contents for TC-Helicon VOICELIVE Touch
- Page 1 UICK TART...
- Page 2 MPORTANT AFETY NSTRUCTIONS AUTION Read these instructions. You are cautioned that any change or modifications not expressly Keep these instructions. approved in this manual could void your warranty. Heed all warnings. EMC/EMI Follow all instructions. Do not use this apparatus near water. This equipment has been tested and found to comply with the limits for Clean only with dry cloth.
-
Page 3: Table Of Contents
When you see this icon, it means there is more information Using the Lockout Modes ......... 15 regarding the feature in the Details manual. FAQ and Troubleshooting ........16 Specifications ............17 TC Helicon Vocal Technologies Ltd. Quick Start revision 1.0 VoiceLive Touch www.tc-helicon.com English Version... -
Page 4: Mounting To A Mic Stand
With no cables attached to the product, grasp it on both sides so the printed top faces you and is approximately level. Slide VoiceLive Touch to the left so that the upper shaft of your mic stand is captured by the lower slot on the product. (Figure 1) Slowly but firmly lower the front of the product so the serrated slot fully captures the micstand shaft. -
Page 5: The Voicesupport Application
The VoiceSupport Application Page Head To access the VoiceSupport application SING OICE UPPORT Download VoiceSupport from www.tc-helicon.com/voicesupport. VoiceSupport is your way of getting the most from your TC-Helicon product, as well as letting your product grow with firmware updates that include new features. -
Page 6: Connections
Z (impedance) In jack. If you use effect pedals, they should be Rear View connected after VoiceLive Touch. Plug a 1/4” cable from the Thru jack to your first effect pedal or to your amplifier/PA. If you leave the Thru unconnected, the guitar sound will be mixed into the main output of VoiceLive Touch. -
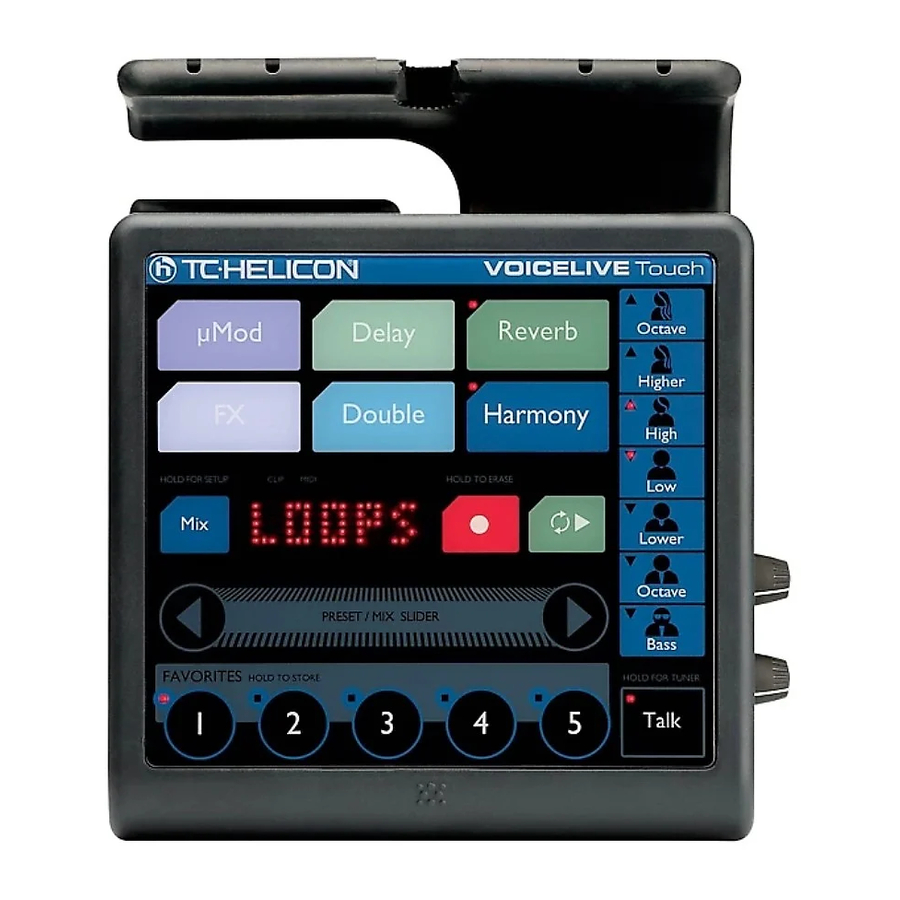
Page 7: Front Panel
Front Panel 1. EFFECT BLOCKS - Tap any effect block to turn it on or off. Hold to 6. LOOP CONTROLS - Tap red button to record and again to loop. edit, then tap to exit. Holding the Delay button is used to set tap tempo. Tap green to stop and play. -
Page 8: Basic Operations
Presets and Favorites To save a preset to a Favorite: VoiceLive Touch contains over 200 factory presets. You can store any 1. Load a preset you want to store as a Favorite. of these presets to a Favorite including any edits you’ve done on that 2. -
Page 9: Musical Control Of Harmony & Hardtune
Try each scale for best fit with your music. The harmony and HardTune effects require musical information to Now, sing the song with your accompaniment. sound correct with your accompaniment. VoiceLive Touch dynamically detects whether a single device (guitar, MIDI or MP3 player) is ASIC OOPING connected and temporarily assigns it as the musical control device. -
Page 10: Editing Procedure
More detailed information on basic looping as well as the 3 Lead Level - Lowers lead (dry voice) when the effect is the only one advanced Loops and Shots modes can be found on the VoiceLive Touch active. Useful for 100% wet effects when needed. - Page 11 Basic Operations sound from 0% (mono) to 100% (stereo). Harm+Dbl: Transducer is inserted on the Harmony and Doubling paths only. 5 Tempo - Parameter appears when delay style is set for tap tempo (styles 1-16 only). Used to set delay time via beats per minute (BPM). Voices: Transducer is inserted on the Lead, Harmony and Doubling voices and their effect sends.
-
Page 12: Using The Guitar Features
PA. This is in addition to the guitar being useful for guiding harmonies. 6 Key and 7 Scale - Sets Harmony control to a fixed key and one of the VoiceLive Touch allows adjustment of the global guitar level (Guitar) 3 Major and 3 minor scales when the Naturalplay setting is configured and effects level (Gtr Fx) selection parameters when you press the Mix for Scale. -
Page 13: Finding Presets With The Preset Wizard
Basic Operations Setup menu, tap the Slider. INDING RESETS WITH THE RESET IZARD To exit the Setup menu, double tap the Slider. & In Home mode, press and hold the Slider Holding the left or right Arrow buttons while in the Setup menu Drag the slider to choose a preset category will cycle to the MIDI and Advanced menus for further parameter Tap the Slider... - Page 14 Basic Operations 6 Thk + Arena - Thicken plus long arena reverb you have entered in the Harmony edit menu will apply to all presets 7 Arena - Arena reverb only (On) or each preset may have a different key and scale (Off). 5 Output - Configures the outputs for stereo or mono.
-
Page 15: Using The Lockout Modes
The Lock mode is especially useful on worship teams or situations where subsequent tap/release=Record on/off during playback, tap/hold=undo there is more than one singer, each using VoiceLive Touch. In Lock /redo previous, double tap=Stop. mode, the user interface features are locked out except for accessing the MIDI Chan - Choose a channel from 1 to 16 to match the MIDI output Favorites and Talk. -
Page 16: Faq And Troubleshooting
Alternate tunings e.g. drop D, DADGAD, etc. are okay. The most Why do the Favorite buttons flash? important notes of your chord, as far as VoiceLive Touch is concerned, They show that you have made an edit. Either store the edit or reload are the chord root and the third, so make sure these notes are clearly the Favorite. -
Page 17: Specifications
Specifications Analog Inputs Power Connectors: Mic: Balanced XLR, Guitar: 1/4” phone jack, Aux: 1/8” stereo mini jack External Power Supply Mains Voltage: 100 to 240 VAC, 50 to 60 Hz (auto-select) Input Impedance: Balanced/Unbalanced Mic.: 2.14/1.07 kOhm Power Consumption: <14 W Mic Input Level @ 0 dBFS: -42dBu to +1dBu EIN @ Max Mic Gain Rg = 150 Ohm: -127 dBu Safety...
Need help?
Do you have a question about the VOICELIVE Touch and is the answer not in the manual?
Questions and answers
Сброс настроек до заводских
@Дмитрий Как это сделать?