NETGEAR ReadyNAS 2120 Hardware Manual
Readynas os 6 rack-mount storage systems
Hide thumbs
Also See for ReadyNAS 2120:
- Hardware manual (116 pages) ,
- Manual (54 pages) ,
- Quick start (2 pages)

Subscribe to Our Youtube Channel
Related Manuals for NETGEAR ReadyNAS 2120


Summary of Contents for NETGEAR ReadyNAS 2120
- Page 1 NETGEAR ReadyNAS OS 6 Rack-Mount Storage Systems Ha rd wa re Manual Models: 2 1 20 April 2013 202-11272-01 350 East Plumeria Drive San Jose, CA 95134...
- Page 2 Trademarks NETGEAR, the NETGEAR logo, and Connect with Innovation are trademarks and/or registered trademarks of NETGEAR, Inc. and/or its subsidiaries in the United States and/or other countries. Information is subject to change without notice. © NETGEAR, Inc. All rights reserved.
-
Page 3: Table Of Contents
Factory Default Settings ........36 ReadyNAS 2120 Technical Specifications ......37 Safety Warnings . - Page 4 NETGEAR ReadyNAS OS 6 Rack-Mount Storage Systems General Safety Precautions ........39 Electrostatic Discharge (ESD) Precautions .
-
Page 5: Chapter 1 Getting Started
Getting Started Congratulations on your purchase of a NETGEAR ReadyNAS storage system. This manual ® describes the physical features of the ReadyNAS OS 6 rack-mount storage systems. This chapter contains the following sections: • Additional Documentation • Setup Location •... -
Page 6: Additional Documentation
For detailed information about configuring, managing, and using your ReadyNAS storage system, see the ReadyNAS OS 6 Software Manual, which is available at http://support.netgear.com/product/ReadyNAS-OS6. NETGEAR maintains a community website that supports ReadyNAS products. Visit http://www.netgear.com/readynas for reviews, tutorials, a comparison chart, software updates, documentation, an active user forum, and much more. -
Page 7: Supported Operating Systems
Use only supported SATA hard disk drives (HDDs) or solid-state drives (SSDs) in your ReadyNAS storage system. If you use disks that are not supported, NETGEAR technical support will not provide assistance. For a list of supported disks, see the NETGEAR Hardware Compatibility List at http://www.netgear.com/readynas-hcl. -
Page 8: Chapter 2 Readynas 2120
ReadyNAS 2120 This chapter describes the physical features of the ReadyNAS 2120. It includes the following sections: • Front Panel • Rear Panel • Status Information • Power On and Shut Down • Boot Menu... -
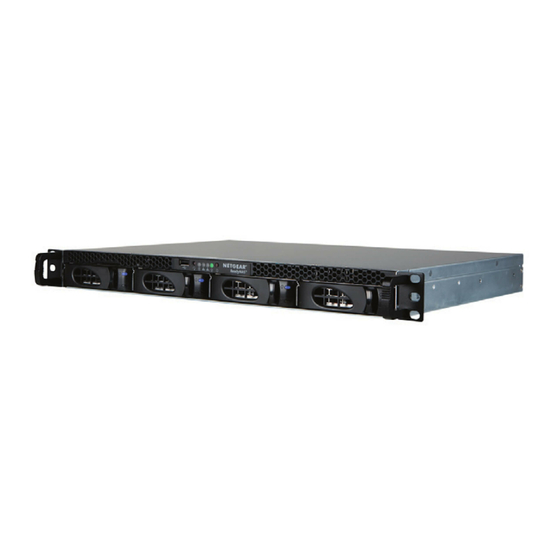
Page 9: Front Panel
NETGEAR ReadyNAS OS 6 Rack-Mount Storage Systems Front Panel The following figure shows the front panel of the ReadyNAS 2120. Figure 1. Front panel 1. Drive bays 2. Control panel 3. Mounting bracket 4. Fault LED 5. Disk activity LED 6. -
Page 10: Rear Panel
NETGEAR ReadyNAS OS 6 Rack-Mount Storage Systems Rear Panel The following figure shows the rear panel of the ReadyNAS 2120. Figure 3. Rear panel 1. Power cable socket 2. Power switch 3. Disk exhaust fans 4. E-SATA ports 5. USB 3.0 ports 6. -
Page 11: Status Information
NETGEAR ReadyNAS OS 6 Rack-Mount Storage Systems Status Information You can obtain information about the status of your ReadyNAS 2120 by reviewing the LEDs listed in the following table. Table 1. Status information Indicator Description Disk activity LED (disk tray,... -
Page 12: Power On And Shut Down
NETGEAR ReadyNAS OS 6 Rack-Mount Storage Systems Power On and Shut Down This section describes how to power on and shut down your system. If you need to shut down the system, use one of the preferred shutdown methods whenever possible. -
Page 13: Power State
• Tech support. Boots into a low-level diagnostic mode. Use the tech support boot mode only when instructed to do so by a NETGEAR technical support representative. • Volume read only. Mounts a volume as read-only. Use this option when you are attempting to rescue data off a disk during a disaster recovery. - Page 14 NETGEAR ReadyNAS OS 6 Rack-Mount Storage Systems • Test Disk. Performs an offline full disk test. This process can take four hours or more, depending on the size of your disks. Any problems are reported in the system logs, which you can view using the local admin page.
-
Page 15: Chapter 3 Disks
This chapter describes how to reformat, add, and replace disks in your ReadyNAS OS 6 storage system. For information about configuring disks on your storage system, see the ReadyNAS OS 6 Software Manual, which is available at http://support.netgear.com/product/ReadyNAS-OS6. This chapter includes the following topics: •... -
Page 16: Disk Tray
NETGEAR ReadyNAS OS 6 Rack-Mount Storage Systems Disk Tray The following figure shows the features of the disk tray. Figure 4. Disk tray 1. Disk tray handle 2. Disk tray release latch 3. Fault LED 4. Disk activity LED 5. Disk screw holes (for 3.5-inch disk) 6. -
Page 17: Supported Disks
Use only supported SATA hard disk drives (HDDs) or solid-state drives (SSDs) in your ReadyNAS storage system. If you use disks that are not supported, NETGEAR technical support will not provide assistance. For a list of supported disks, see the NETGEAR Hardware Compatibility List at http://www.netgear.com/readynas-hcl. -
Page 18: Migrate A Volume
NETGEAR ReadyNAS OS 6 Rack-Mount Storage Systems For more information, see Add a Disk on page 19. Reset the system to its factory default settings. WARNING: This process erases all data and reformats all disks into a single X-RAID2 volume. If you want to preserve the data on the disks, you must back up the data to an external drive before using the disks in your ReadyNAS storage system. -
Page 19: Add A Disk
NETGEAR ReadyNAS OS 6 Rack-Mount Storage Systems Add a Disk You can add a 3.5-inch hard disk drive, 2.5-inch hard disk drive, or a 2.5-inch solid-state drive to an empty disk bay. If you want to add a previously formatted disk to your storage system, see the instructions in Previously Formatted Disks on page 17. - Page 20 NETGEAR ReadyNAS OS 6 Rack-Mount Storage Systems Remove the plastic air blocker from the disk tray. Place the new 3.5-inch HDD in the disk tray. Secure the HDD in the tray using the screws that came with your storage system.
- Page 21 NETGEAR ReadyNAS OS 6 Rack-Mount Storage Systems The disk tray is secured in the drive bay. If necessary, turn on your system by pressing the Power button. If the disk that you added was not previously formatted, the system uses the disk in one of the following ways: •...
- Page 22 NETGEAR ReadyNAS OS 6 Rack-Mount Storage Systems To add a 2.5-inch hard disk drive (HDD) or 2.5-inch solid-state drive (SSD): Determine whether you need to shut down your system: • If you are adding disks to a diskless system, gracefully shut down the system.
- Page 23 NETGEAR ReadyNAS OS 6 Rack-Mount Storage Systems Secure the drive in the tray using the screws that came with your storage system. Make sure that the hard disk connectors face the interior of the disk tray when you assemble the disk.
-
Page 24: Replace A Disk
NETGEAR ReadyNAS OS 6 Rack-Mount Storage Systems • In a system that uses Flex-RAID, the disk becomes available for use. You use the local admin page to manually configure the new disk. For more information about X-RAID2, Flex-RAID, and using the local admin page, see the ReadyNAS OS 6 Software Manual, which is available at http://support.netgear.com/product/ReadyNAS-OS6. - Page 25 NETGEAR ReadyNAS OS 6 Rack-Mount Storage Systems To replace a 3.5-inch hard disk drive (HDD): Press the disk tray release latch. The disk tray handle pops out. Pull out the disk tray. Remove the screws and the old 3.5-inch HDD from the tray.
- Page 26 NETGEAR ReadyNAS OS 6 Rack-Mount Storage Systems Slide the disk tray back into the drive bay of the system. Press the disk tray handle until it latches closed. The disk tray is secured in the drive bay. If the volume that contained the failed disk uses a protected RAID configuration, the system automatically resynchronizes the volume using the new disk.
- Page 27 NETGEAR ReadyNAS OS 6 Rack-Mount Storage Systems Pull out the disk tray. Remove the screws and the old 2.5-inch HDD or SSD from the tray. Place the new 2.5-inch HDD or SSD in the disk tray. Secure the drive in the tray using the screws.
- Page 28 NETGEAR ReadyNAS OS 6 Rack-Mount Storage Systems might take several hours, depending on the disk size. You can continue to use your storage system, although access is slower until the volume resynchronization finishes. For more information about RAID configurations, see the ReadyNAS OS 6 Software Manual, which is available at http://support.netgear.com/product/ReadyNAS-OS6.
-
Page 29: Chapter 4 Maintenance
Maintenance This chapter describes how to perform maintenance activities like replacing a fan or on-board battery. It includes the following topics: • Access the Inside of the Storage System • Replace a Fan • Replace the On-board Battery... -
Page 30: Access The Inside Of The Storage System
To access the inside of a 2120: If your system is mounted in a rack, grasp the two handles on either side and pull the system straight out until it locks. -
Page 31: Replace A Fan
Fans are hot-pluggable, so you do not need to power down your system when replacing a fan. To replace a fan on a 2120: Remove the chassis cover. For more information, see Access the Inside of the Storage System on page 30. - Page 32 NETGEAR ReadyNAS OS 6 Rack-Mount Storage Systems Pull up on the fan gently to remove it from the housing. Remove the four pegs that hold the fan in the housing. Insert the four pegs into holes in the replacement fan.
-
Page 33: Replace The On-Board Battery
If the system power is on, the hot-plug feature causes the fan to start immediately. Replace the On-board Battery Replace the battery only with the same or an equivalent type recommended by NETGEAR. Dispose of used batteries according to the manufacturer’s instructions. - Page 34 NETGEAR ReadyNAS OS 6 Rack-Mount Storage Systems Install the new battery. Take care to install the new battery with the correct side up. Maintenance...
-
Page 35: Appendix A Defaults And Technical Specifications
Defaults and Technical Specifications This appendix includes the following sections: • Factory Default Settings • ReadyNAS 2120 Technical Specifications • Safety Warnings... -
Page 36: Factory Default Settings
NETGEAR ReadyNAS OS 6 Rack-Mount Storage Systems Factory Default Settings The following table lists factory default settings for ReadyNAS OS 6 rack-mount storage systems. Table 2. ReadyNAS OS 6 factory default settings Feature Default Login Default IP address The default IP address for the ReadyNAS is assigned by the local router (DHCP server). -
Page 37: Readynas 2120 Technical Specifications
NETGEAR ReadyNAS OS 6 Rack-Mount Storage Systems ReadyNAS 2120 Technical Specifications The ReadyNAS 2120 storage system meets the following technical specifications: General: • Marvell Armada XP 1.2 GHz • 2 GB memory • Four bay storage • Two E-SATA port •... -
Page 38: Safety Warnings
Replacing the battery with an incorrect type creates a danger of explosion. Replace the battery the same or an equivalent type recommended by NETGEAR only. Dispose of used batteries according to the manufacturer’s instructions. Installing the on-board battery upside down, which reverses its polarities, creates a risk of explosion. -
Page 39: General Safety Precautions
NETGEAR ReadyNAS OS 6 Rack-Mount Storage Systems using metal tools, which can easily damage any electrical components or circuit boards they come into contact with. • Do not use mats designed to decrease static electrical discharge as protection from electrical shock. Instead, use rubber mats that have been specifically designed as electrical insulators. -
Page 40: Electrostatic Discharge (Esd) Precautions
NETGEAR ReadyNAS OS 6 Rack-Mount Storage Systems Electrostatic Discharge (ESD) Precautions Electrostatic discharge (ESD) is generated by two objects with different electrical charges coming into contact with each other. An electrical discharge is created to neutralize this difference, which can damage electronic components and printed circuit boards. - Page 41 NETGEAR ReadyNAS OS 6 Rack-Mount Storage Systems • Always keep the rack’s front door and all panels and components on the servers closed when not servicing them to maintain proper cooling. Defaults and Technical Specifications...
- Page 42 Notification of Compliance Regulatory Compliance Information This section includes user requirements for operating this product in accordance with National laws for usage of radio spectrum and operation of radio devices. Failure of the end-user to comply with the applicable requirements may result in unlawful operation and adverse action against the end-user by the applicable National regulatory authority.
- Page 43 This transmitter must not be co-located or operating in conjunction with any other antenna or transmitter. FCC Declaration Of Conformity We, NETGEAR, Inc., 350 East Plumeria Drive, San Jose, CA 95134, declare under our sole responsibility that the NETGEAR ReadyNAS OS 6 desktop storage systems comply with Part 15 of FCC Rules.
Need help?
Do you have a question about the ReadyNAS 2120 and is the answer not in the manual?
Questions and answers