NETGEAR ReadyNAS Duo Installation Manual
Hide thumbs
Also See for ReadyNAS Duo:
- Installation manual (15 pages) ,
- User manual (4 pages) ,
- Hardware manual (41 pages)
Advertisement
Quick Links
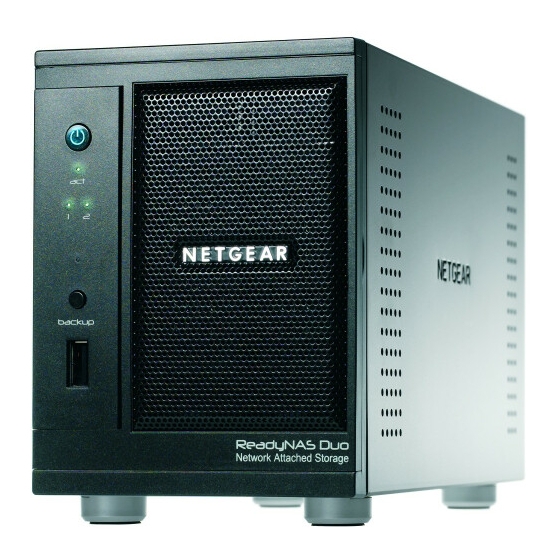
NETGEAR ReadyNAS Duo
Start Here
Follow these instructions to install your NETGEAR® ReadyNAS™ Duo. Then, consult
the ReadyNAS Duo Setup Manual on your Resource CD for instructions on using the
Setup Wizard to configure the ReadyNAS Duo. Some typical ReadyNAS Duo use
scenarios are also included. See the ReadyNAS Duo User Guide to configure any
advanced features (a link to the User Guide is on your Resource CD). The ReadyNAS Duo
User Guide is also on the NETGEAR support site at http://kbserver.netgear.com.
Estimated setup time: 15 minutes
When you have completed installation of the ReadyNAS Duo, your network should
resemble this illustration.
Note: If you purchased a unit with only one disk, and want to add a second disk for
redundancy, NETGEAR suggests that you install your ReadyNAS Duo and the RAIDar
utility, then connect the ReadyNAS Duo to your network and validate the installation
before adding the disk. See Installing a Disk Drive for installation instructions.
First, check your package contents
Before starting installation, check your package contents:
•
ReadyNAS Duo
•
Installation Guide
•
Warranty Card
•
Power cable
•
Ethernet cable
•
ReadyNAS Duo Resource CD
•
Four screws for installing an additional hard disk installation (included only with one-
disk units)
Next, connect the ReadyNAS Duo to your network
The router in your network must have an ethernet port available to connect the ReadyNAS
Duo unit to the router via the Ethernet cable. Your router also must be configured to
automatically provide an IP address for your network devices.
1.
Unpack the unit and stand the unit on its
feet—be sure it has ample ventilation.
Avoid putting the unit in a location where it
could be knocked over easily. Do not place
items on top of the ReadyNAS Duo.
2.
Connect one end of the provided Ethernet
cable to your router and the other end to the
back of the ReadyNAS Duo unit..
Plug in the power adapter to a power source
and connect the other end to the unit
3.
Press the On button on the front of your unit.
The blue light will flicker while the unit boots
and obtains an IP address; then it will turn
solid blue.
Then, install the RAIDar utility
Installing the RAIDar software utility provides an easy way for you to detect the
ReadyNAS Duo on your network, and is the method recommended by NETGEAR.
Note: To install the RAIDar Widget for Mac OS X (included on the Resource CD), see the
ReadyNAS Duo Setup Manual. An on-line link to the Setup Manual is on the Resource
CD.
To install the RAIDar software utility:
1.
Insert the Resource CD into your computer. On the Welcome
screen, click Install the ReadyNAS RAIDar utility. (For
Mac OS X, open the Mac RAIDar Setup Folder and double-
click Setup_Mac.dmg.)
2.
Follow the screen prompts to complete installation of the RAIDar utility. On the last
screen, select the Run RAIDar check box, and click Finish. The RAIDar utility will
locate all ReadyNAS devices on your network.
A shortcut to the RAIDar utility will be placed on your desktop for future use.
.
The MAC address of the ReadyNAS Duo, Host Name (which includes the last four
digits of the MAC address), IP Address and other statistics will display. If you have
multiple ReadyNAS units connected to your network, the RAIDar software screen
will list them also.
3.
To set up the ReadyNAS Duo unit, select the ReadyNAS Duo and then click Setup.
4.
On the login screen, enter admin for the user name, and netgear1 for the password
(all lower case letters and the number 1). The ReadyNAS Duo Home screen displays.
5.
Click Setup Wizard and follow the steps to complete the setup of your unit (for
detailed instructions, see the ReadyNAS Duo Setup Manual on your Resource CD).
It should not be necessary to modify any of the suggested default settings.
If you choose not to install RAIDar, you can also access the ReadyNAS Duo by entering
the IP address of the ReadyNAS Duo, which can be obtained from your router, into your
browser. This method is explained in the ReadyNAS Duo User Guide; a link to the User
Guide is on your Resource CD.
Finally, copy files to your ReadyNAS Duo
The folder structure in the ReadyNAS Duo includes a Backup folder, a Media folder
containing three sub-folders (Music, Pictures and Videos), and a Printer/Fax folder.
To verify that you can copy files to and from your new ReadyNAS Duo drive.
1.
Open the RAIDar utility. Select the ReadyNAS Duo and click Browse. The
ReadyNAS share folders display. (No password is required.)
Note: You can also access your share folders by browsing "My Network
Neighborhood" (or equivalent for Microsoft Vista and Mac OS X). Your ReadyNAS
Duo is located under its workgoup name (the default is Volume), and identified by
Advertisement

Related Manuals for NETGEAR ReadyNAS Duo


Summary of Contents for NETGEAR ReadyNAS Duo
- Page 1 See the ReadyNAS Duo User Guide to configure any feet—be sure it has ample ventilation. advanced features (a link to the User Guide is on your Resource CD). The ReadyNAS Duo Avoid putting the unit in a location where it User Guide is also on the NETGEAR support site at http://kbserver.netgear.com.
-
Page 2: Technical Support
Open the RAIDar software utility. On the RAIDar screen, the Status LED for Drive 2 will remain blue until the drive is ready.You can continue to use the Duo during this If you purchased a ReadyNAS Duo with only one installed drive, and you want to add a time.
Need help?
Do you have a question about the ReadyNAS Duo and is the answer not in the manual?
Questions and answers